Long post - heavy on pics.
I've written before about making wooden nuts and screws with hand tools. There are many YouTube videos that show electric powered machines making them, but I'm much more interested in how it was done a couple centuries ago.
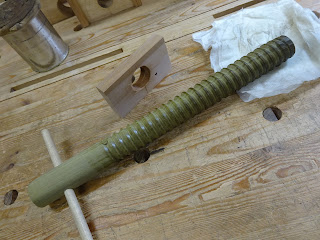
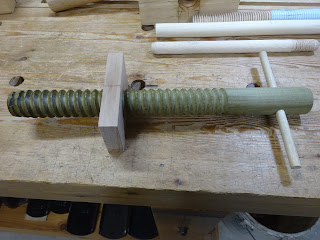
It seems counter-intuitive to me, but the nuts are far easier to make. The screws aren't too bad either, if you use a chisel and have a lot of time and patience. The hard part for me was making a screw-box. I'd been close before, but I finally got it this time. The secret is two-fold: sharpen the cutter properly and get it in the right position.
 |
| First successful screw using a screw-box (top), with one made using a chisel and files |
I'll go through the process here, including the making of the nut even though I've shown that before. I apologize if I've left out some details (posts from May and June 2021 have more details). This time I'm making a screw with major diameter 1 1/4" and minor (root) diameter 1". The pitch is 3/8" and the angle between threads is 90°. This results in a screw with a flat on the top of each thread.
 |
| Square up a 1" blank and lay out lines for threads at 3/8" pitch. Make a mortise for the 1/4" x 1/8" cutter and its wedge. |
 |
| Make the blank round (I used planes, spokeshaves, scrapers), leaving the knifed layout lines |
 |
| Connect the layout lines with a pencil line. I wrapped a piece of clear flexible plastic around to help connect the lines. |
 |
| Cut the 1/8" deep kerf on the laid out spiral. I chucked this up in the benchtop bungee lathe to make this easier. |
 |
| One way to obtain the angle that needs to be cut in the block |
The horizontal pencil lines in the above pic include a centerline for the block and two lines each 3/16 from that center, making those two lines 3/8" from each other. The kerf through the block is cut along the lower left and upper right corners of the rectangle described by those two pencil lines and the two vertical knife lines 3 1/8" apart.
 |
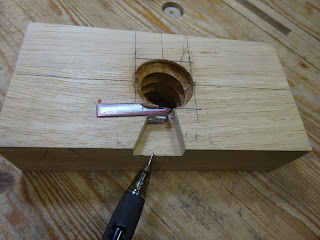
| Insert a shaped piece of metal so it shows inside the hole. Double-side tape a couple of stand-off blocks to the entry side of the block. |
 |
| Starting to thread a test piece. Those stand-off blocks give a little space between the nut blank and the tap block to allow chip ejection. |
 |
| Partially cut threads. It'll be done when there are no more flats. |
It's good to have a screw already prepared to test that you've cut away enough material in the nut for it to work with a screw. I know, this is a bit of a chicken and egg kind of thing. But I had made a screw using a chisel (shown in first pic, above) and it turned out to be a really good thing for testing purposes.
 |
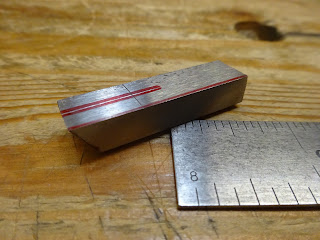
| Make the cutter. Start with 3/8" x 1/4" x 1 1/2" piece of O-1 steel. File a 30° angle on the front end and lay out center lines top and bottom. |
 |
| Saw and file to about 5/8" back. You can barely see the markings on the side for material to be removed. See next pic for how that came out. |
 |
| Clamped a square up through the threaded block to help locate the cutter mortise. |
And here's the problem. I found you can't locate the tip of the cutter right in line with the tips of those inside threads. You've got to get the tip a little further towards the center. This took some trial and error. See the progression below.
 |
| Marked the outline of the cutter |
 |
| Chopped the mortise. Pic shows the tools used, including impromptu 1/8" router plane. |
 |
| This pic shows I chopped too deep. The tip of the cutter needs to be as close to in-line with the tip of the inside wooden thread as possible. |
 |
| Added some card stock shims to the bottom of the mortise ... |
 |
| ... until it was just right |
 |
| To fit a 1 1/4" screw blank in this block, need to cut away this first thread |
 |
| I added a shavings escapement |
 |
| Due to the shims, the cutter was a bit proud of the surface of the block. So I relieved a little material from the alignment plate. |
At this point I tried cutting some threads, but ran into problems again. As I twisted the screw blank into the screw box, the threads being cut would not engage the inside threads of the block. I could cut part of a thread and then it would get bogged down.
Frustrated again, I put it down for the weekend. I consulted what videos I could find and got back to it on Monday. In particular, two videos by Paul Hamler really helped me: "Cutting Wooden Threads" and "Sharpening a V-Gouge". I used his suggestions for how to sharpen my cutter. I cheated a bit here, using a Dremel tool to help out with grinding and stropping.
I also used the weekend to think about the cutter position. I realized I needed to move the cutter further towards center of the hole, so I chiseled a bit away and added some paper shims to tighten the cutter in place.
 |
| Paper shims inserted at pointer after removing a bit more material on mortise wall opposite the pointer |
 |
| With the square aligned with the tips of inside threads, tip of cutter is now about 1/16" towards center. |
This actually took a few iterations. But the excitement was building. When I thought it was ready, I cut off the mangled threads (from earlier attempts) at the end of the screw blank and gave it a whirl. It started cutting threads.
 |
| Turning the blank into the screw-box. Threads coming out the other end. Shavings coming out the escapement. |
Well, this was exciting. I prepared a new screw blank from poplar and let it sit in mineral oil overnight. The next day I ran it through the screw-box.
 |
| SWEEEEEET!!! Oh man, what a feeling! The first 6" of the blank had been soaked in mineral oil, but I didn't notice any difference in the next 4" of threads cut without the oil |
 |
| Finally, some measure of success. It took less than 1 minute to cut these threads, whereas it took several hours to do it with a chisel. |
 |
| Testing with a nut |
 |
| Still two things bother me. First, the thread angle is more than 90° (thought this doesn't seem to affect the function) |
 |
| Second, while the tap was made with 3/8" pitch (8 threads over 3 inches, or 2 2/3 threads per inch) ... |
 |
| ... the screw has a slightly lesser pitch (almost 8 1/2 threads per inch). I'm guessing this has to do with a little slop in the tap nut. |
 |
| That also doesn't seem to affect the function. |
So I'm calling this good. I'll still play around with this and with other sizes, but I'm happy it finally worked out. Now I have the confidence that I'll be able to make the appropriate screws when the time comes that I need them. Good stuff!


I have a commercial 1/2 and 3/4 inch thread cutter (and taps). I will take a look at the cutter and sharpen/hone it with the instructions you used. I might even try to duplicate making one.
ReplyDeleteThat's amazing work, but when you mentioned that it's a lot easier to make a nut than a screw thread well, I rightly don't know how. How do cut the thread internally with a chisel? Do you know what is the correct setting for the blade on the commercially made screw boxes?
ReplyDeleteIf I said I cut the inside thread of a nut with a chisel, then I was misleading. I showed how to make a nut in the first half of this post, using the tap to scrape away the waste in a nut. No chisel required. I've never held or looked at (in person) a commercially made screw box. But I imaging it's much the same: nudging the cutter up, down, sideways with shims (or whatever adjustment mechanisms they may have) until you get it right. The vertex of the V-cutter has to extend into the interior of the screw-box just a little bit (past the internal threads of the box) to work right. You will end up using a few screw blanks before it's right, but that's what it takes. Having said that, I'm sure that screw boxes new from Beall or similar company come already adjusted and ready to use.
Delete