Saturday, July 31, 2021

Forgetting a Step Leads to Challenging Situation

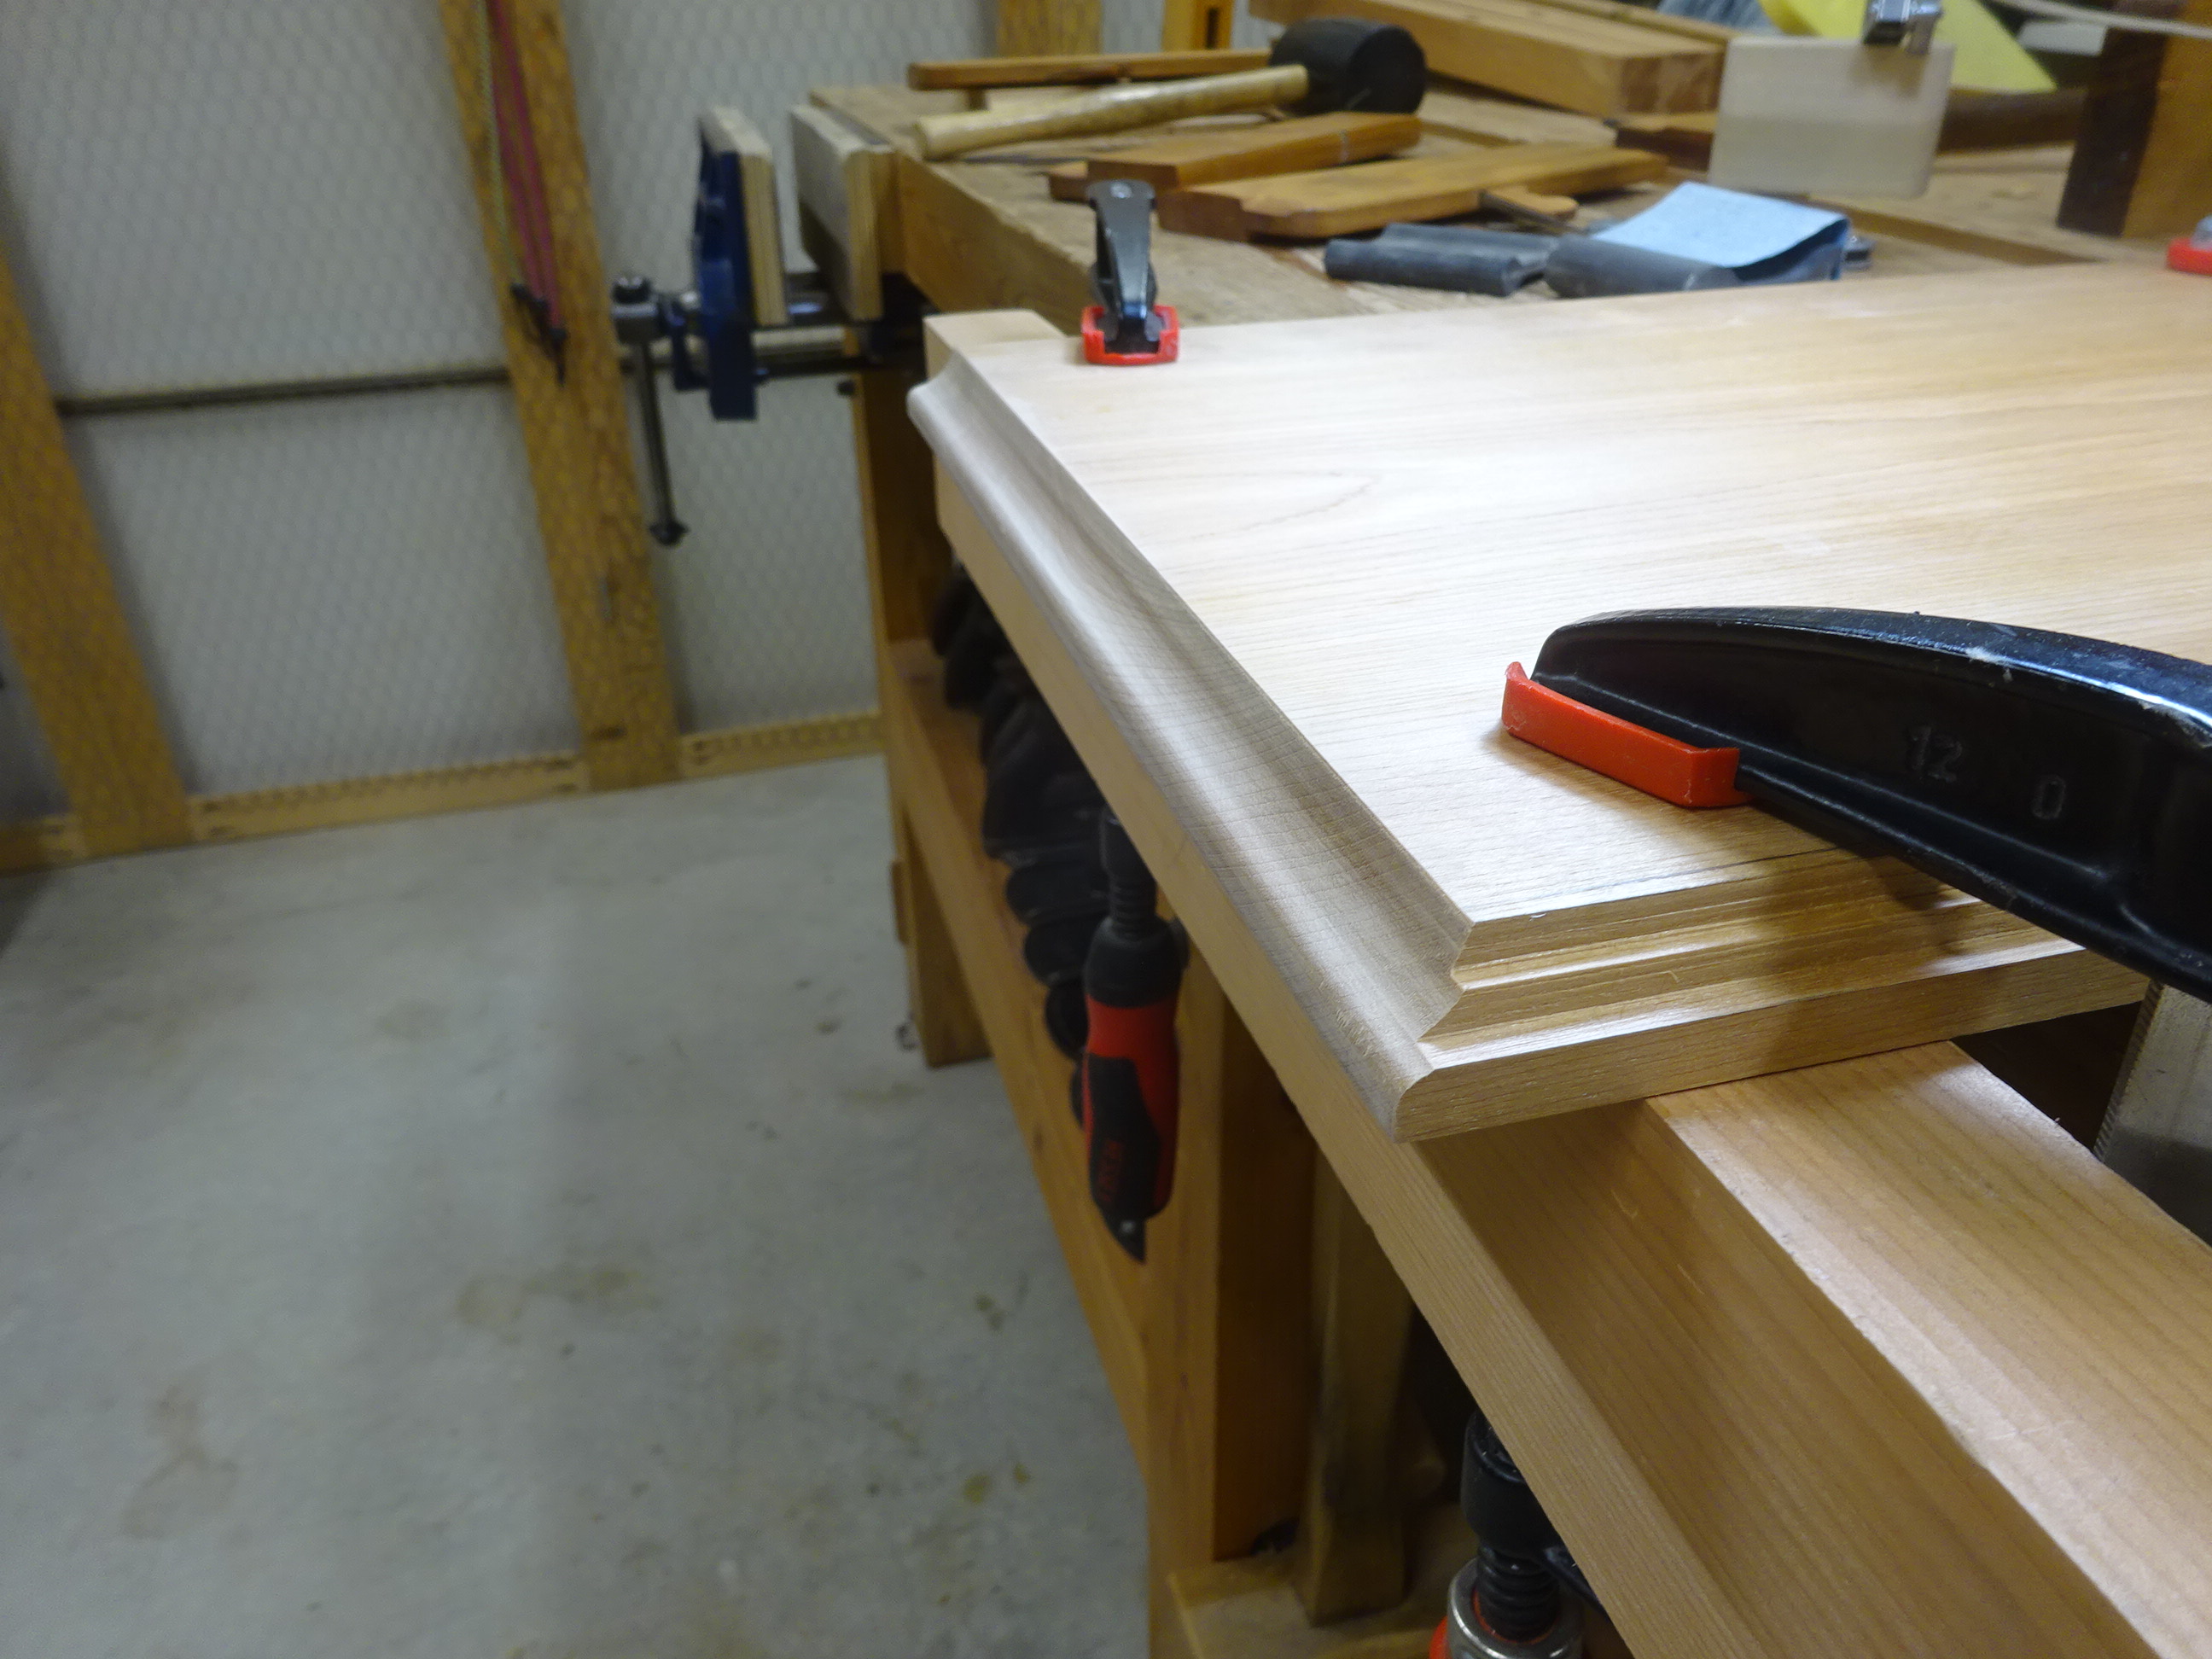
I'm finishing up the second of two shoe shelves and after I glued up the undercarriage, I realized I hadn't chopped the mortises for the buttons that would be used to attach the top.

There are supposed to be mortises in the inside faces of the upper rails

I recall reading once about a "drawer lock chisel" that can help you mortise in tight spaces.  But I don't have one, so it's time to improvise.

For the mortises in the short rails, there was enough space to fit a chisel and a hammer, but it was still not easy.  Prying out the waste with a chisel held at a low angle was tough - the long rails got in the way.

Chopping a slanted mortise

This was a job for some rarely used tools.  Normally for a 3/8" wide mortise, I use the 5/16" mortise chisel (the yellow handle in pic below).  But it's a very long chisel and length is not your friend in this situation.  Pictured with it are two 1/4" chisels - the blue-handled Irwin and a cheap (read: horrible) chisel that was part of my first ever set of chisels.  But there is an advantage to that cheap chisel, namely that it's relatively short (it can't hold and edge worth a damn, though).  I was able to use it to pry out waste, where other longer chisels couldn't fit.  I also pulled out the heavy metal hammer in the picture because of its smaller head than my wooden mallet.

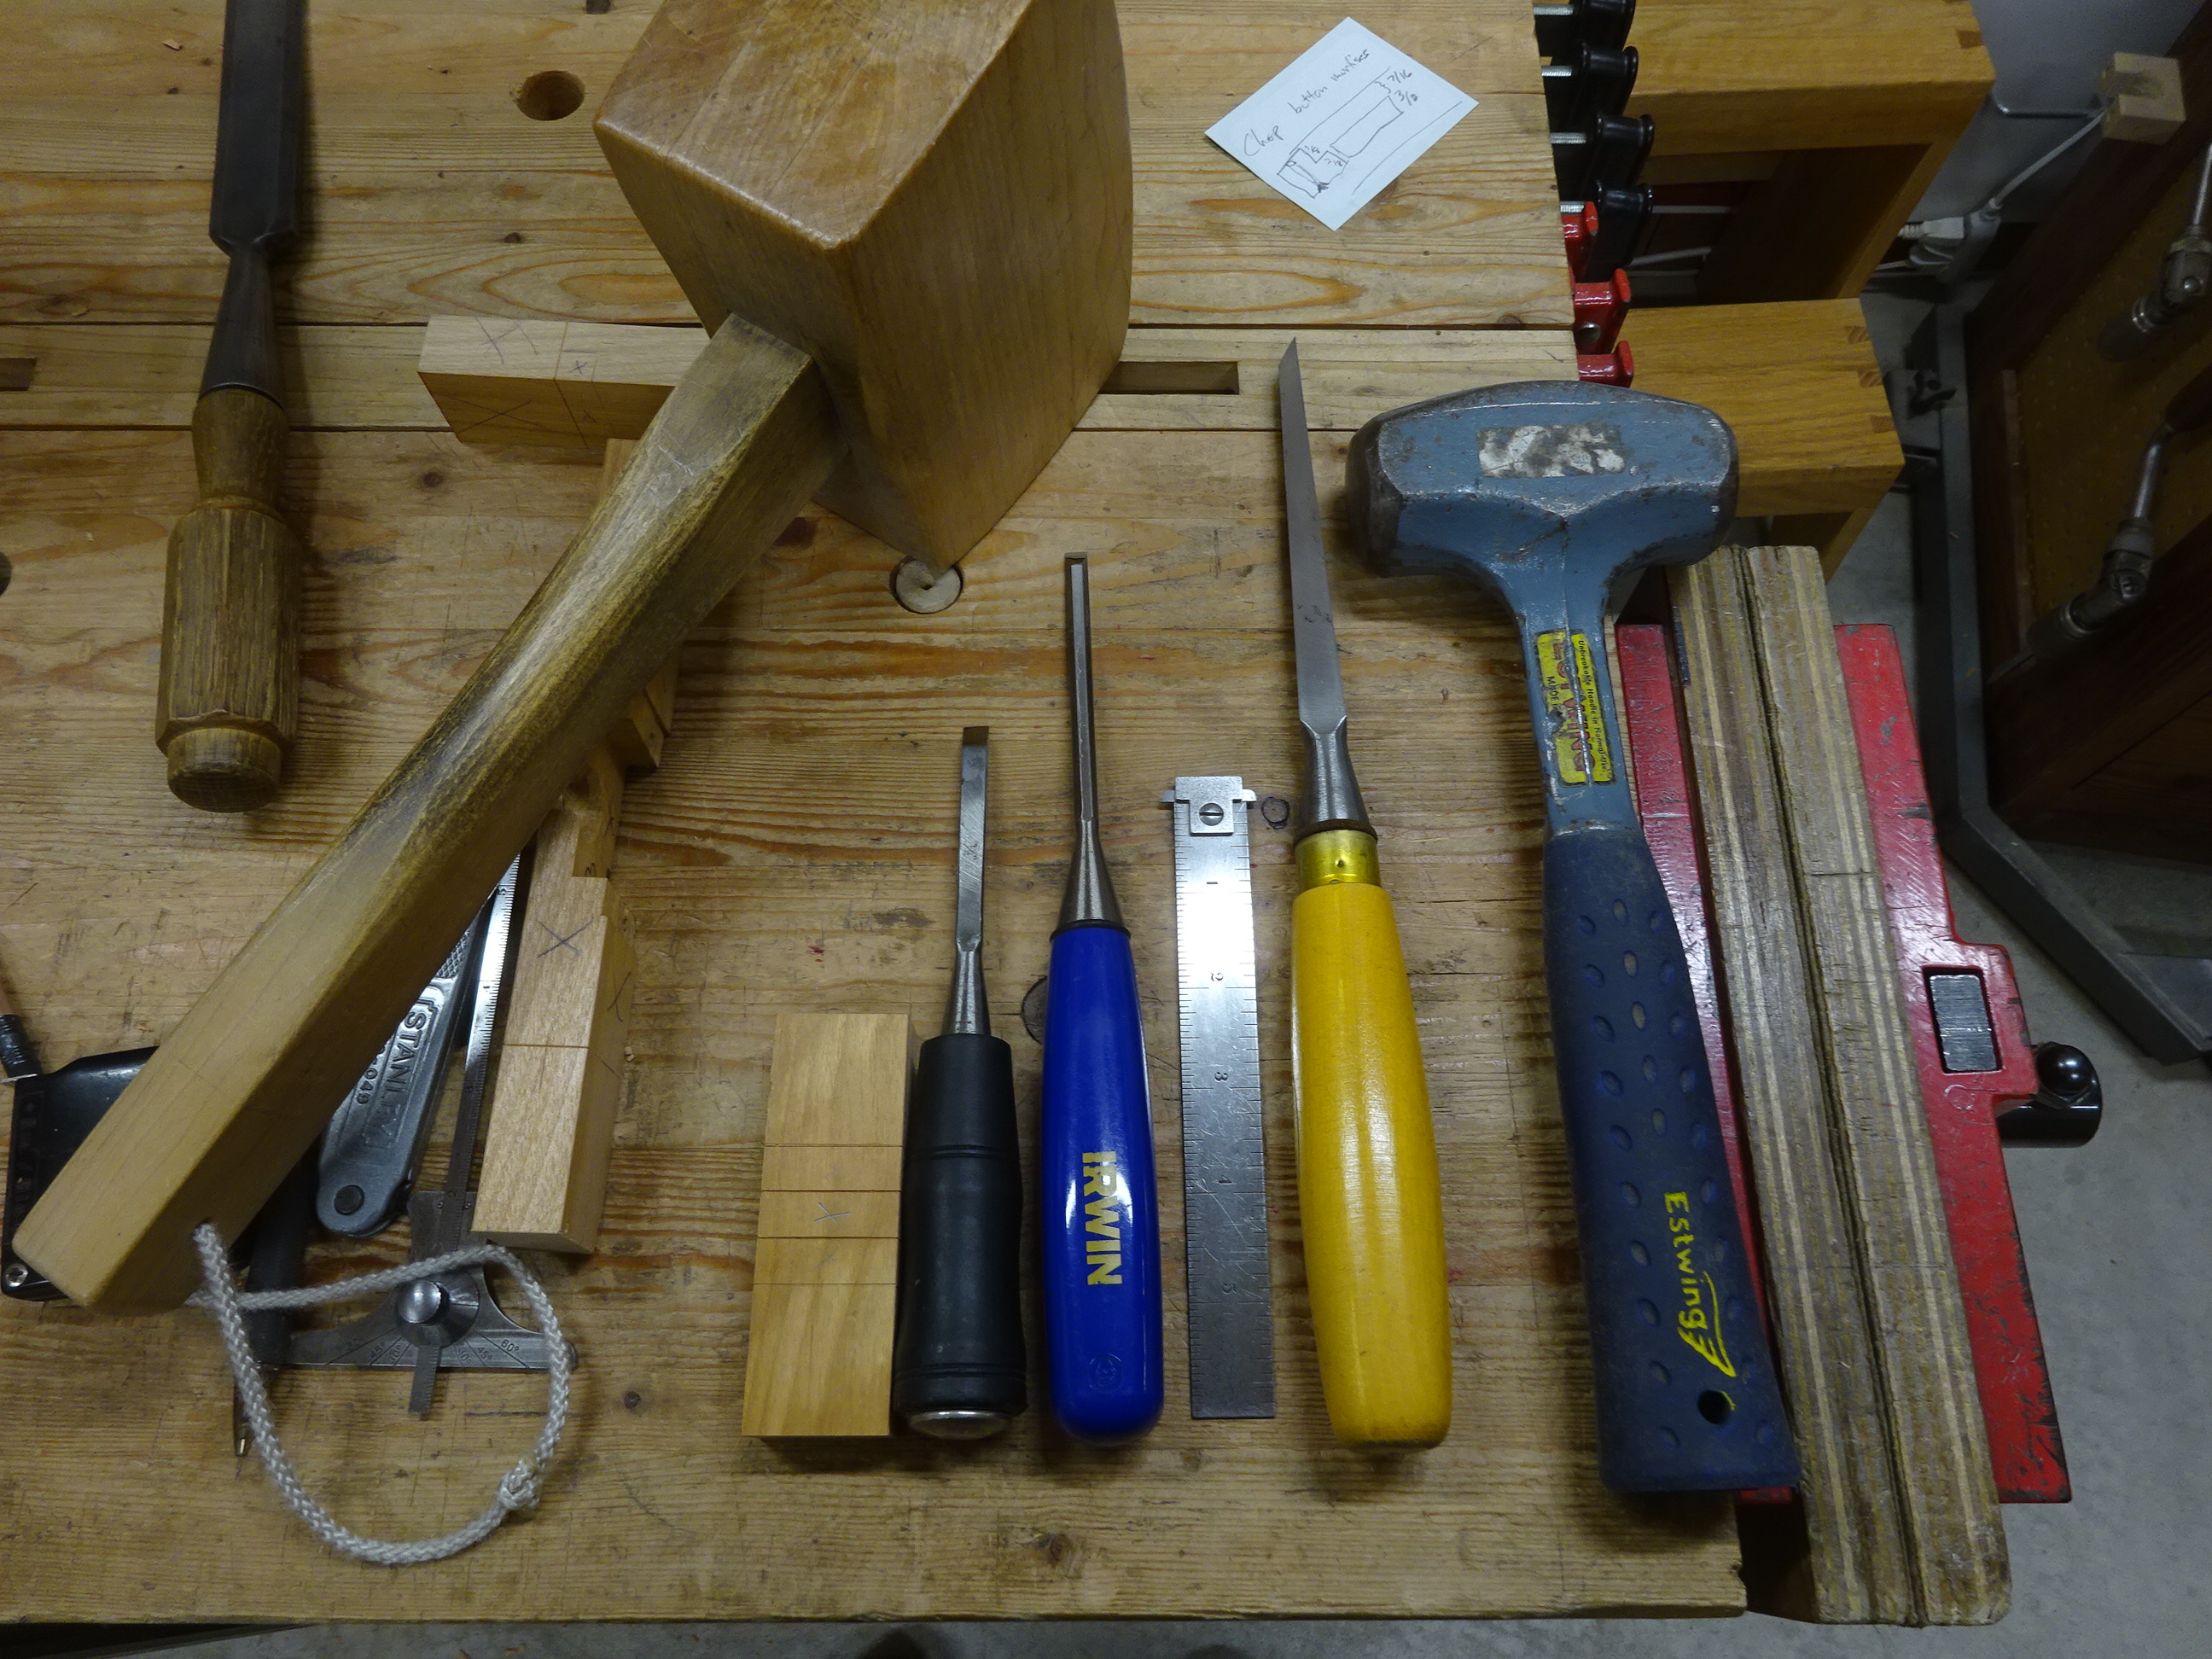
An assortment of chisels and hammers

I also pulled out of a drawer a 1" Stanley chisel (garage sale find a few years ago) that was far shorter than other 1" chisels I have.  The 1" chisel is useful for paring the sidewalls of the 1 3/8" long mortises.  Being relatively short allowed this one to fit in these tight spots.

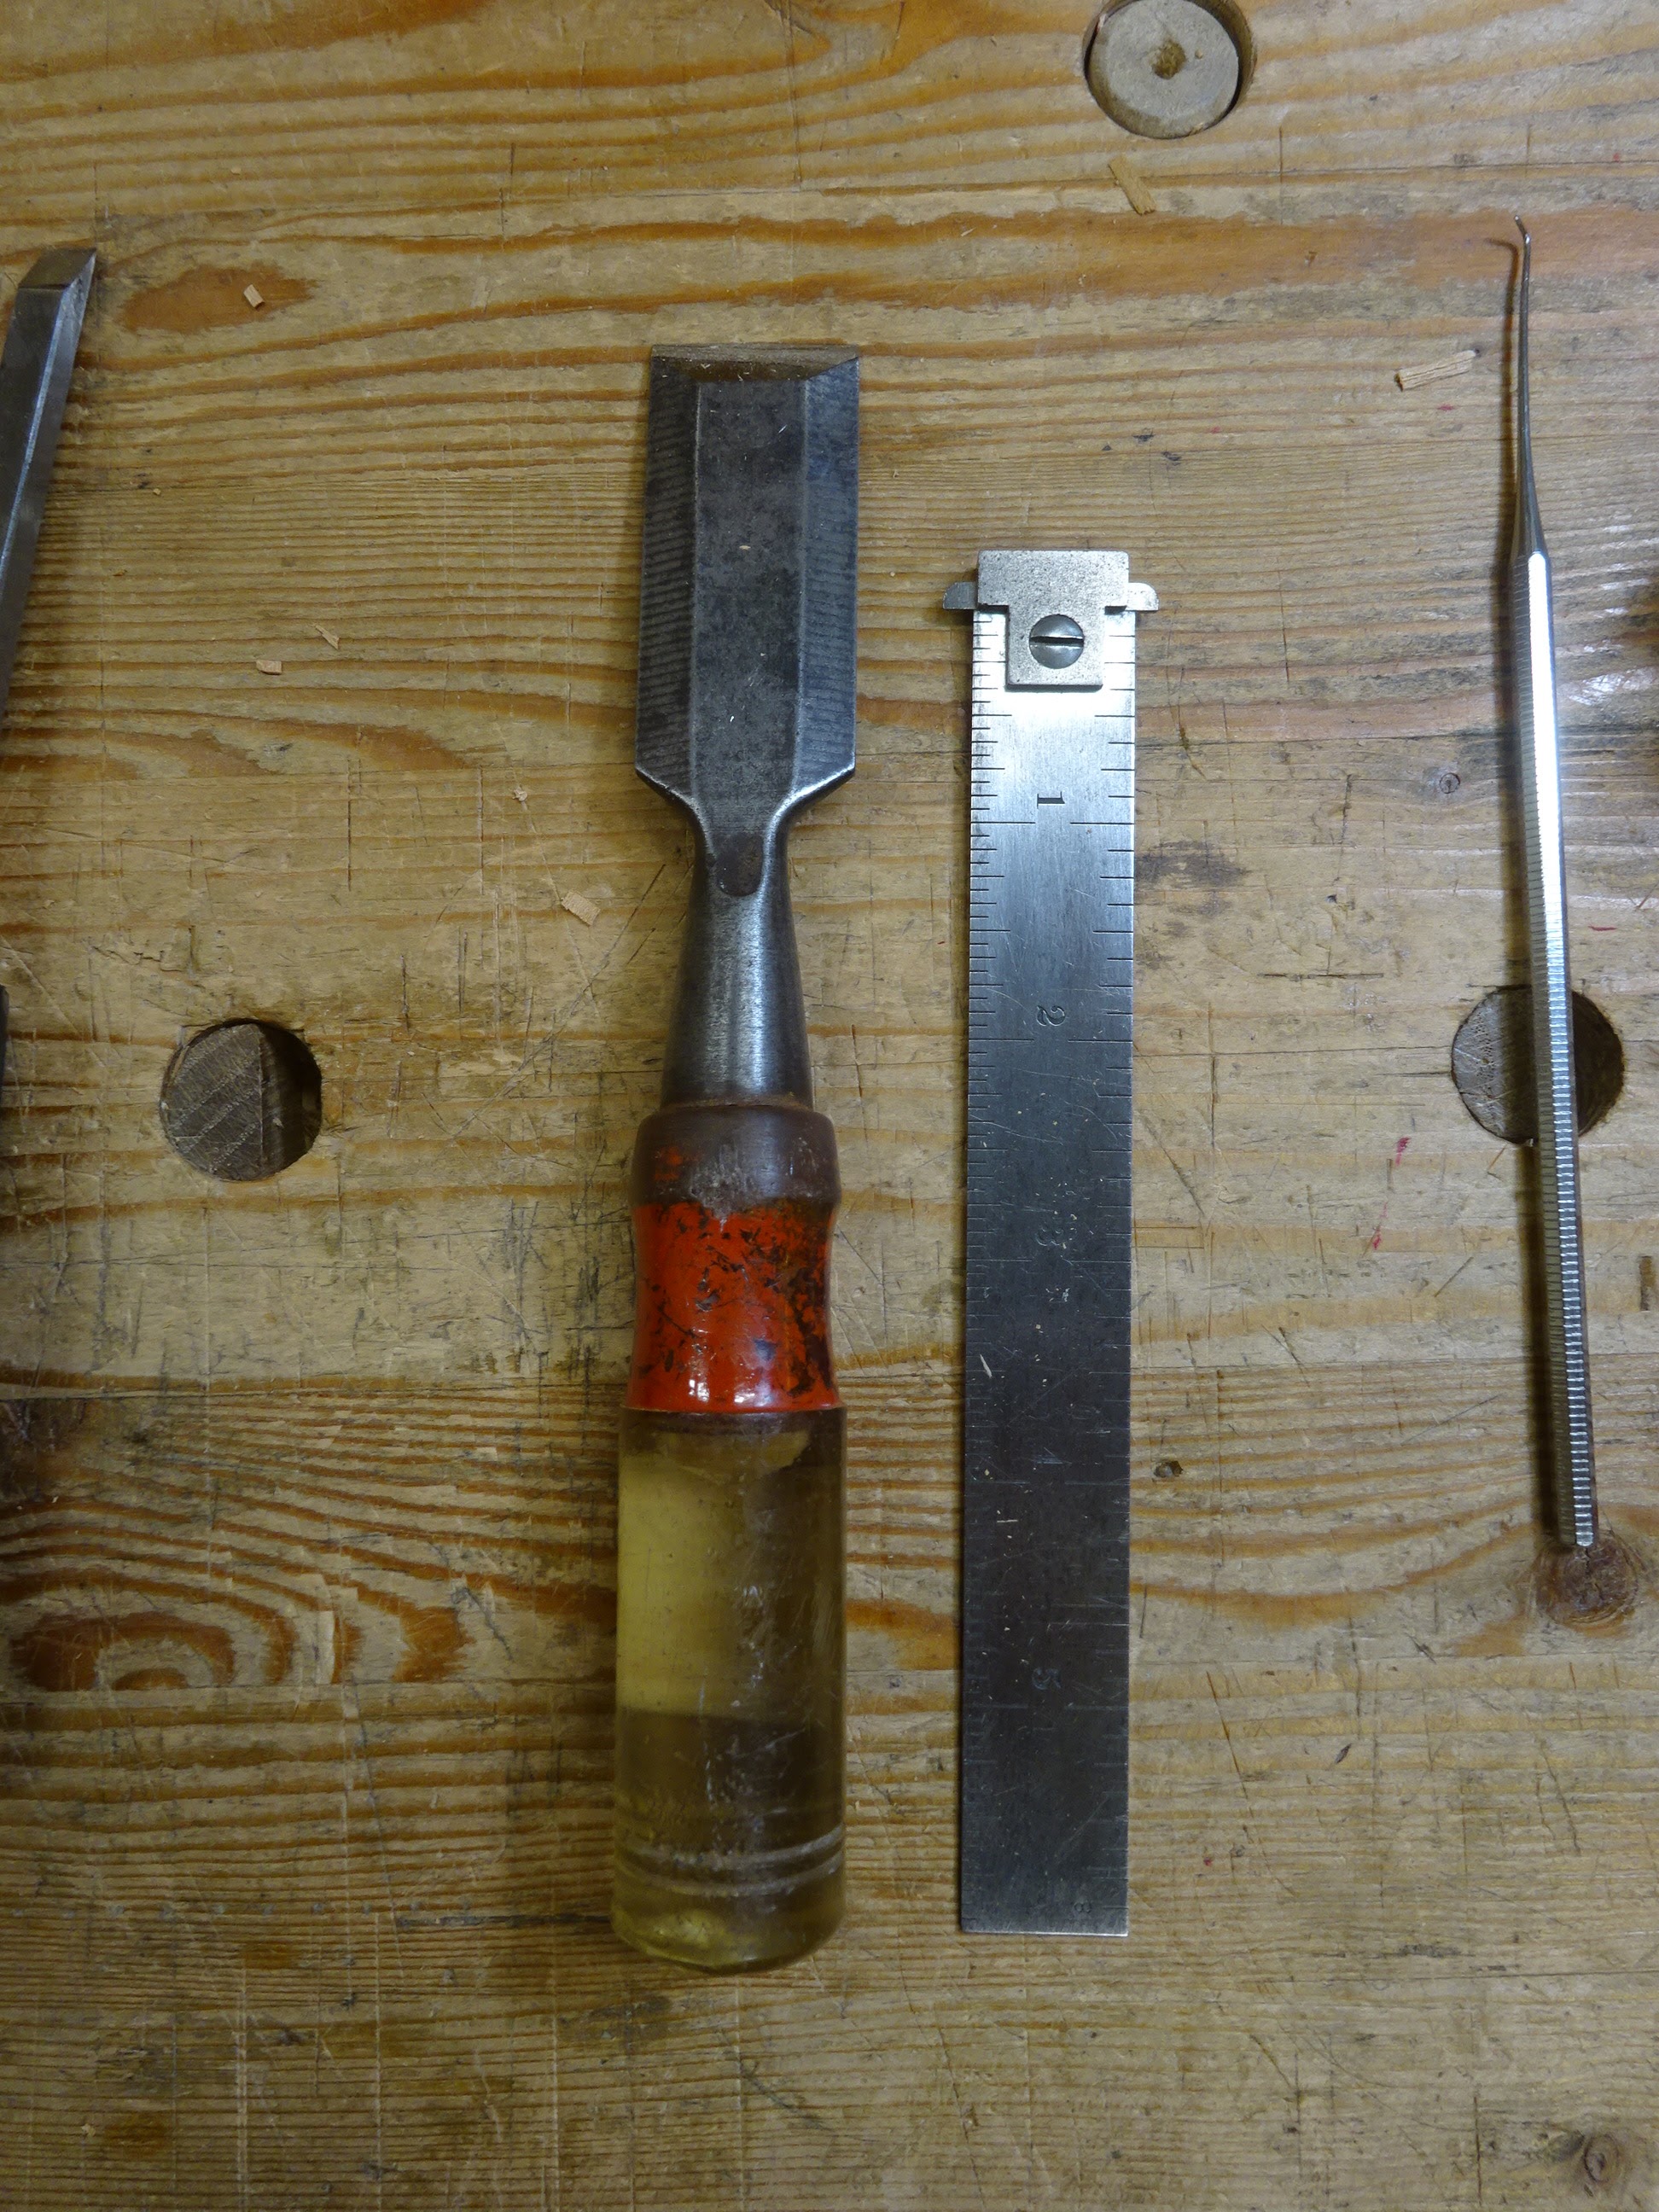
Very short blade on this 1" chisel

After completing five of the six mortises, I settled on a method that worked well.  I used the Irwin 1/4" chisel to chop an angled mortise (the final mortise width is 3/8").  I could then use the short 1" chisel to pare the side walls.  The short black-handled chisel was able to get into tight places to pry out waste wood.

Chopping an angled mortise in a long rail

The mortises came out fine.  But it took at least three times as long to chop these mortises in the assembled carcase than chopping them before glue-up.

A completed mortise in a short rail

We all forget to do some things, or to do them in the right order.  But when that happens, consider it a challenge.  How can I get the task done with the carcase in the way.  It forces you to think ... and maybe to use some forgotten tools deep in a drawer somewhere.

Thursday, July 22, 2021

Shoe Shelves, Part 4: Using Hollows and Rounds on End Grain

Did you know you can use hollows and rounds on end grain?  I've got Matt Bickford's excellent video, "Moldings in Practice", but he focuses on making moldings on long grain pieces that are applied to a project.  But what about a molded edge all around a table top?  For my shoe shelves, I was aiming to have a top with similar molding profile as the existing table we'd been using.  It's an ogee profile with no fillets.

Here's the shape I'm going for on a piece of scrap - only a long grain edge done so far

When laying out the shape, it helps to draw exactly what you're trying to achieve.  The upper concave part has a 5/8" radius and the curve does not quite come to vertical at the top.  The lower convex portion has a 3/8" radius and the curve does come to vertical at the bottom.

The shape, with layout lines highlighting the transition point from concave to convex

Drawing in the rabbets that will be cut

The rabbets help to guide a round plane in cutting the upper hollow.  I first cut the rabbets all around the four edges.  Note in some pictures below that I've clamped a straight board to the underside of the top.  The top had a fairly large cup and forcing it flat really helps get the rabbets and subsequent shaping more consistent.

Rabbets cut on all four edges - used a 3/4" homemade straight rabbet
and 1 1/4" D.R. Barton skew rabbet

One long edge shaped - used homemade 1/2" round, 5/8" round and 3/8" hollow

When planing the end grain edges, I first sharpened up the irons and set the planes for a very light cut.  I also came from both directions so that I wouldn't blow out any long grain at the ends.  One last thing I did was to score the top with a marking gauge at the extent of the upper hollow.  This helped ensure no top surface fibers were torn: a lesson learned from practicing on scrap.

Working on the end grain

Another view of the end grain work

The meeting at the corners came out pretty good 

A closer view of a corner

A number of years ago I found at a garage sale some rubber sanding blocks that are hollow on one end and round on the other end.  Sized from 1/4" to 7/8", these are perfect for smoothing out the curves.  The end grain needed a bit more sanding than the long grain, but they both came out great.

The undercarriage has three coats of shellac and so far, the top also has three - I might add some more.  The top is attached to the base with 6 buttons.

Glamour shot

I've already gotten a good start on the second shoe shelf.  It's identical to this one, but two inches less wide.  About half the mortises are done, so it's time to get back to it.

Thursday, July 15, 2021

Shoe Shelves, Part 3: Gluing With Hide Glue

Doing those 24 mortises by hand was a bit tiring, but it got done.  There was one more thing to do with them, though.  The tenons intersect inside the legs, so the ends of the tenons need to be chamfered.

You can see the end of the tenon inside this mortise

All 24 tenons needed to have their ends angled.  Note the labels - 
there were too many joints not to have them clearly labeled!

The first dry-fit

Marking the shelf boards' shoulders directly from the rails to which they'll be attached

And a dry-fit with the shelf boards in place
(that's 8 more m&t joints for those who are counting)

The next step was some shaping.  I put a bead on the bottom of each rail.  I just get a real kick out of using the beading plane.  Does everybody feel this way?

Using the old A.C. Bartlett's Ohio Planes 5/16" beading plane and a sticking board

I also did some shaping of the legs, but got no pictures.  The outside corners got chamfered and the bottom 4" of the inside faces were curved to make it look as if the legs kick out a bit.  You can see it in a picture below.

I did at least three dry-fits to figure out the best order to put things together.  It made the most sense for me to first attach the shelf boards to their short rails and set them aside.  Next, assemble the two front legs with their three long rails, then the two rear legs with their three long rails.  With one long rail / leg assembly flat on the bench, add the short rails and short rail / shelf board assemblies.  Finally, add the second long rail / leg assembly.

One of a few dry-fits

Gluing with hide glue (two more clamps still to be added at top) 

Cleaning some excess glue the next day

I have some experience with hide glue, but not a great amount.  For good or bad, I hate getting my hands sticky and if you use hide glue, you're going to have sticky hands.  And sticky everything else, for that matter.  I got a lot of squeeze-out and some of it I wiped away with a wet rag right away.  But for some reason I didn't do that for all joints.  Maybe it was because the clamps made it tough to get to it.  But the next day I was trying to remove the excess with a chisel and it was neither fun nor effective.  But then I remembered one of the great things about hide glue - that it is water soluble.  A toothbrush, some hot water and a rag took care of the excess.  It took a while, but the joints look good now.

Since I had gotten a lot of the project wet, I thought I'd wipe down the entire thing with a damp rag to raise the grain.  I'll lightly sand it before I start adding coats of shellac.

One last thing.  The carcase came out a little wobbly.  After clamping, I checked the top corner to corner for square and it was within almost spot on. But I didn't check the front, back or sides and something must have been amiss because one foot is about 1/32" off the table.  You would think that with all these right angle joints, the project couldn't come out anything but square!  I'll take a rasp to one of the legs to level it, but still, I'm disappointed that I didn't get it square.  It was much better during a dry-fit with clamps.

I still have to cut the top to size and put a decorative edge on it and will report on that next time.  I've got one coat of shellac on the shoe shelf now, and I've already started on the slightly smaller twin to this shoe shelf.  Things are moving along.

Thursday, July 8, 2021

Shoe Shelves, Part 2: Mortise and Tenon Notes

I mistakenly wrote in part 1 of this series that each shoe shelf would have 20 m&t joints, plus the small mortises for attaching the top with buttons.  In reality, each shoe shelf will have 24 m&t for the aprons and rails, 8 shallower ones for the shelf boards, and maybe 6 for the buttons.  That's a lot of m&t joints!

I designed this project with aprons and rails being only 1 1/4" wide.  And with shoulders all around the tenons, each mortise will be less than 1" long.  The mortises are also 1" deep.  It can be challenging to chop a mortise with these dimensions without damaging the end rims, so I decided to bore out much of the waste first.  Here is my sequence.

Mortise is a hair over 3/8" wide.  Boring two 5/16" holes, 1" deep.

Marples 5/16" mortising chisel

Chop out the waste between the holes.  A 1/4" bench chisel also helped in the deeper parts.

Square up the ends with the mortise chisel

Use 1/4" bench chisel to score the corners and separate fibers

3/4" chisel directly in the gauge line to pare down the walls

After cleaning out some waste, checking to see that the end wall is vertical.
The adjustable square also acts as depth gauge.

Using a depth gauge to check that the side walls are vertical

Ended up with a nice, clean and square mortise

For the tenons, once the wide shoulders are sawn, most waste is split off

On one side only, the router plane is used to clean the tenon cheek to the gauge line

On the other cheek, the gauge lines are still visible after splitting

Using a 3/4" chisel to get close to the lines, but not all the way to them!
Not using router on this side since the tenon might not be perfectly centered
as different rails might have different thicknesses. (I have only one router
plane and wanted to keep it at one setting.)

At this point I have to say this: I wish I could just pare directly to the lines, but that ALWAYS leads to a loose fit for me.  It would be great if the theoretical would match the practical, but it doesn't always work that way.  The mortise and the tenon are marked out with the same gauge setting, and you'd think you could pare exactly to the lines and get a perfect fit, but ...

Testing the fit in the mortise

After marking the side cheeks from the mortise hole and sawing them,
 testing the fit to see if the joint is self supporting

I've been doing a lot of mortises similarly lately and it is working well for me.  But, man, are there a lot of them to do!  I'm not done yet with all of them for the first shoe shelf.  Then I get to do it all over for the second piece.  Fun, fun, fun ...

Thursday, July 1, 2021

Shoe Shelves, Part 1

The shoe storage situation in our house is lacking, and it's finally time to make something for it.  The current situation is shown below, and that's not all the shoes: there are others scattered about as well.  It's a small table that once belonged to my wife's mother.  I refinished it last year (or two?) and we'll use it for something else.

Current shoe storage

My plan is to replace the current small table and the basket with two matching small shelves, each the same height as the current small table (about 24 1/4" tall).  To fit the area, one will be 20" long, the other 22".  Each table will be 12" deep.

Here's the Sketchup drawing

Here's a closer view, showing some more detail.

Detail view

The four legs are 1 1/2" square, the aprons and rails are relatively narrow at 1 1/4" wide to maximize shoe space, and the shelf boards are 1 1/2" wide.  I'm using red alder that was formerly a blanket chest that someone was getting rid of.  All stock started out approximately 3/4" thick (the legs were glued up).

All of the joints will be mortise and tenon.  This will be a LOT of m&t joints.  Each shoe shelf will have 20 m&t joints, plus 4 or 6 small mortises for the buttons that will attach the top.

So far, I've milled up all the pieces and marked out the joints.  Tomorrow I start cutting the joints.

The aprons, rails and shelf boards and some of the tools used to get them to size

The two tops: I'm not happy with the color match of the smaller top and 
will cut off the right-most 3" and replace with something better matched

Eight legs squared up, ready to cut to length

Arranging the legs for a pleasing color and grain

Marking the tops of the legs for relative position and table number

Marking the rail locations and mortise extents on the legs

Ganging the long rails to mark tenon shoulders together

Lately I've been using a homemade 3/8" (fixed) mortise gauge for my mortises - on the right in the pic below.  But there was a problem in that the pin further from the fence did not protrude the same as the first pin.  When I adjusted the pin to make it match the other, I mangled it a little bit.  

Marking the tenons with a mortise gauge

The shape of the mortise gauge pins is shown below and they are a little fragile.

The shape of the mortise gauge pins

I'm going to replace them with conical pins like on the Marples gauge on the left above.  In the mean time, I'm using the Marples gauge for the rest of the project.

Marking out the mortises on the legs

The reference faces on the legs are the inside faces.  The aprons and rails are not centered on the legs, but closer to the outside faces (1/8" reveal).  For some reason, it seems natural to reference the mortise gauge off the adjacent face that is closer to the mortise. But I believe it is better to have the inside faces (the ones that receive the joinery) as the reference faces.  In doing so, I had to figure out the gauge setting to get the mortises in the proper position to give the rails that 1/8" reveal.

All for now.  Tomorrow, I will be forming mortises and tenons all day long.  And I'm certain I won't finish all of them in whatever time I have tomorrow - this will take a few days.