Thursday, April 30, 2020

Two Wooden Jack Planes

I've already posted about the 8" wooden smoother that I bought at a tool auction recently.  In that same auction "lot" were two wooden jacks and a transitional plane.  This post will be about the two jacks.
Two new-to-me woodies
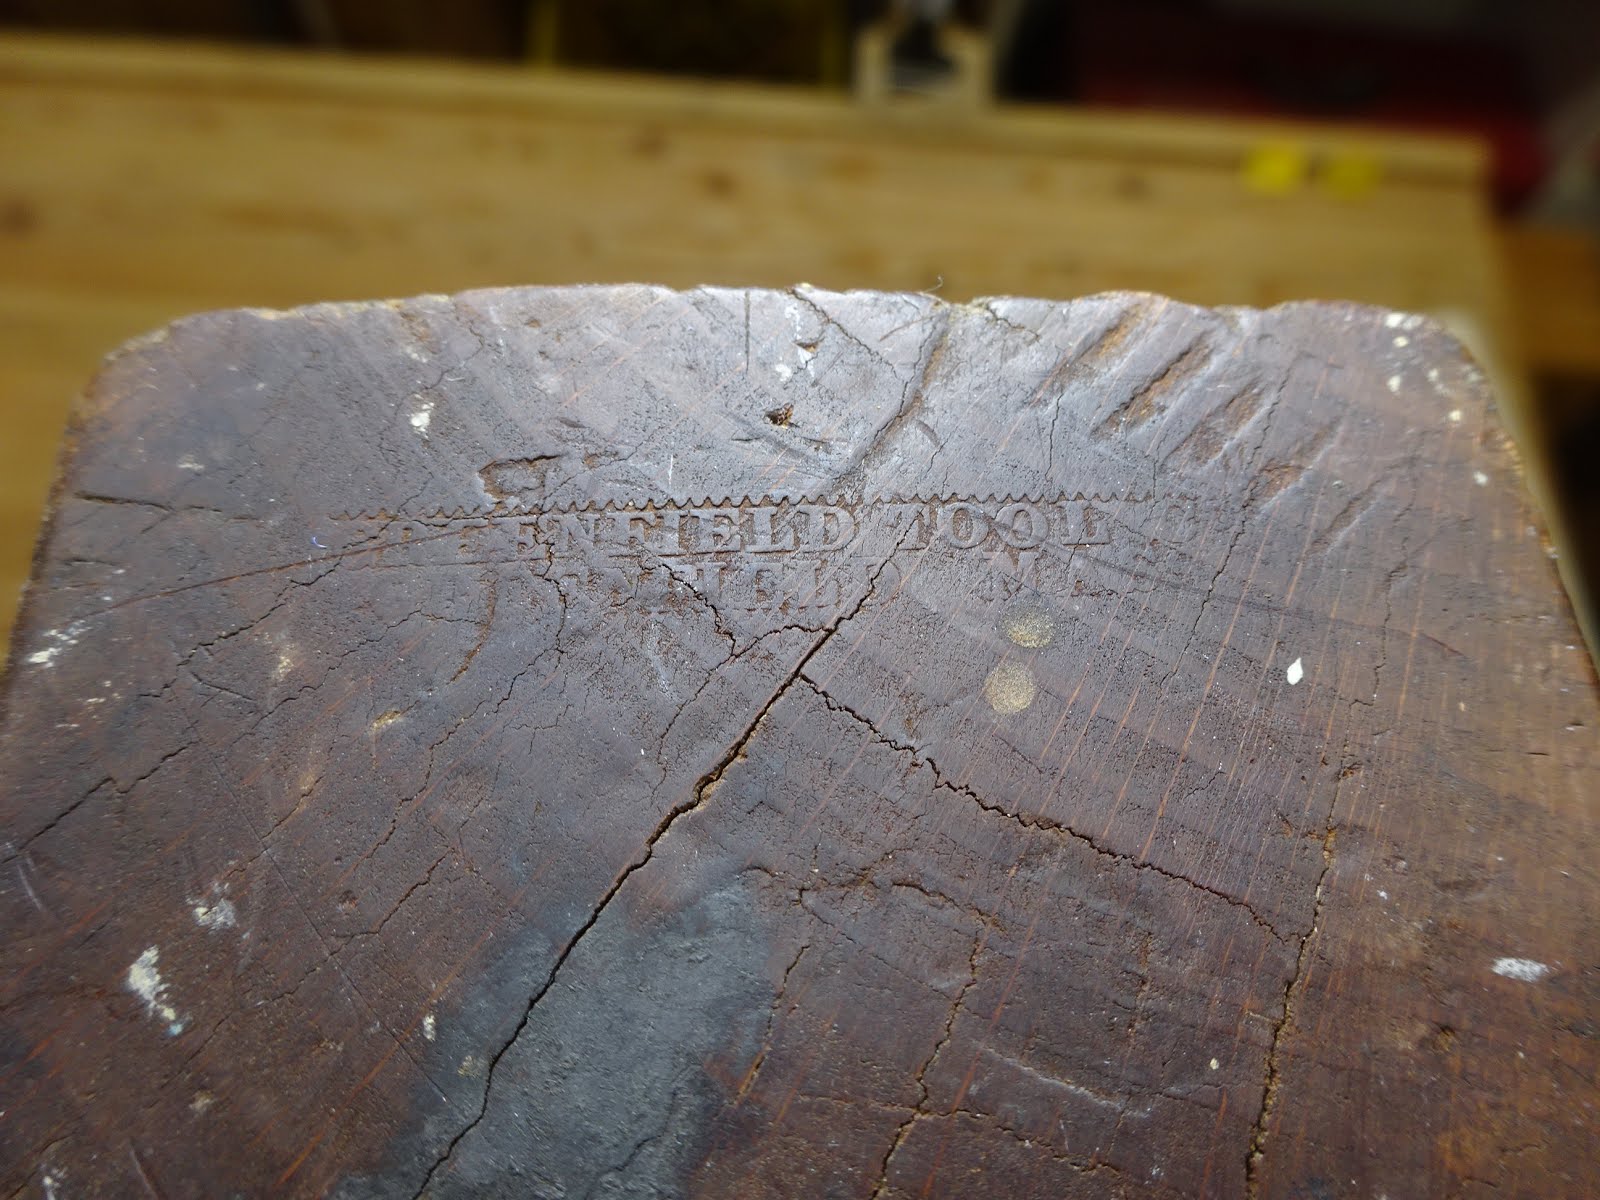
The smaller of the two is a 15 7/8" long plane from Greenfield Tool Co.  It has a 2 1/8" wide Humphreysville Mfg. Co. iron with a mild camber at its cutting edge.  The plane is 2 3/4" wide and about 2 5/8" tall (1/16" shorter at the heel).  Perhaps it was 2 3/4" tall when new and after having the sole flattened many times, ended up at its current uneven height.
Greenfield Tool Co. jack plane
Markings on the toe show a lot of wear
The Greenfield Tool Co. operated in Greenfield, Mass. (north central MA) from 1851-1883, according to the Davistown Museum.

There's not a lot of this laminated iron left, so this plane probably saw a lot of use, though probably not in the last few decades.
Humphreysville Mfg. Co iron and cap-iron
Slightly cambered iron
Humphreysville Mfg Co. operated in what was then called Humphreysville, Conn., present day Seymour, CN, in south central Connecticut, not far from New Haven.  From a thread on swingleydev.com, it is unclear the exact years they operated, but it was mostly in the middle 1800's.

The plane has some issues.  The sole is not close to flat, though that's not a big deal for a jack plane.  The bed is not flat.  The wedge doesn't fit quite right.  A big chip came off the upper left abutment.
The wedge seems to fit OK, but look down deep
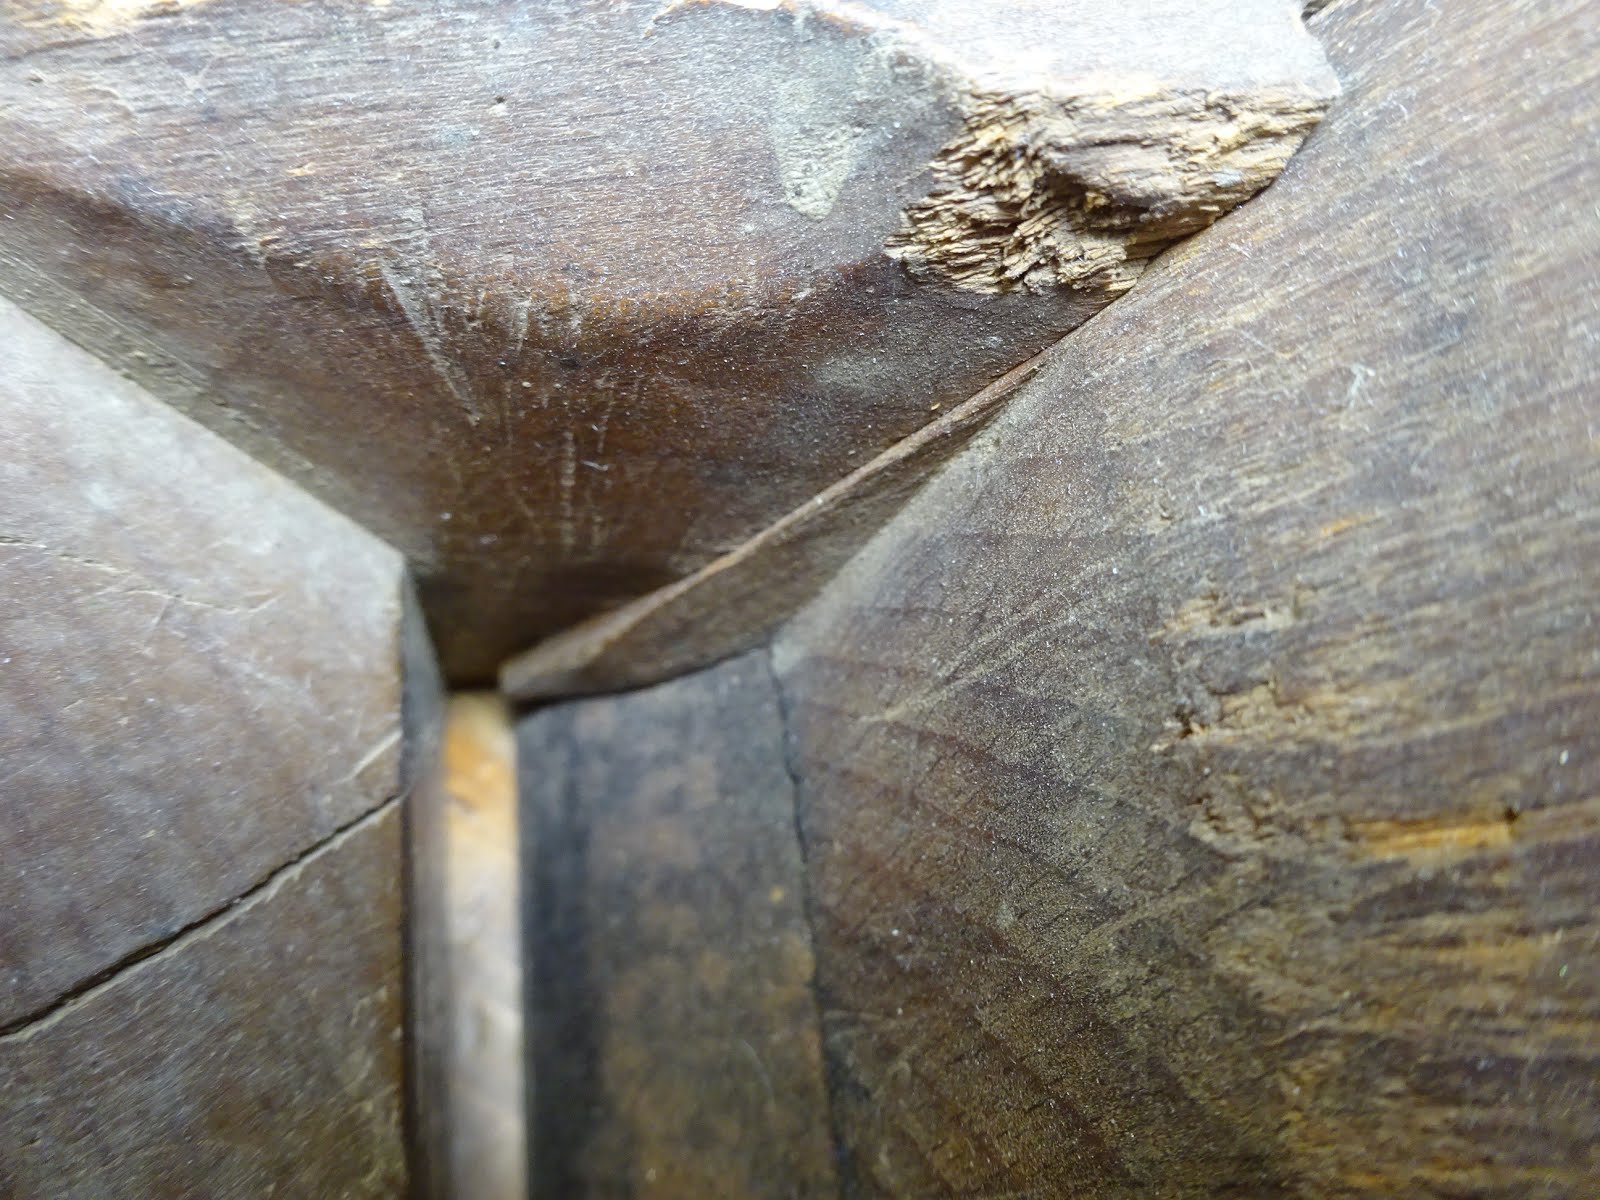
The tip of the wedge extends past the start of the curve of the cap-iron,
giving a place for shavings to get caught
The pic that follows shows a view through the mouth from underneath.  The arrow points to the tip of the wedge.  Not only is there a large space between the wedge and the side of the throat, but there's also space between the tip of the wedge and the cap-iron.  Both bad things for jamming.
Obvious areas for shavings to jam in the mouth
The throat is pretty messed up.  Both abutments are chipped.  There are cracks throughout the body.  The slot for the cap-iron screw-head is not quite deep enough at the top.
Throat with iron/cap and wedge removed
Not sure what I'll do with this plane.  So far it's been on display on my desktop bookshelf.  Not sure if I'll try to fix it up.

The second plane is an 18 1/8" long jack of unknown make.  It is 3 1/8" wide and 2 3/4" tall.  The 2 1/2" iron is from Auburn Tool Co., Thistle brand.
The unknown maker plane with Auburn Tool Co double iron
Auburn Tool Co. manufactured in Auburn, NY (central New York State) from 1864 - 1893 (reference).  They later became (or were absorbed by?) Ohio Tool Co.  They were known for using prison labor to manufacture their goods.
The iron with Auburn logo
Different light shows a little more
The iron is 2 1/2" wide and so is the mouth of the plane!  This leaves no side-to-side play to adjust the iron.  I don't know if this is due to wood shrinkage over the past century-plus or if it is a replacement iron.
View from below - mouth and iron are same width
The plane has some good sized cracks.  Up front, the strike button seems to have led to a long crack from toe to throat.
Big crack!
Front of the throat shows the crack was once filled with something
I had suspected that the iron was not original to this plane for other reasons.  It looks like the underside of the wedge was modified by a user to accept the protruding screw of the double iron.
Seems like a rough "hack" job of recessing the back of the wedge for the protruding screw
My other evidence is that the wedge doesn't fit quite right.  The points extend further down than the high point of the cap-iron, creating gaps that can jam shavings in the throat.
View from underside of mouth: see the tapered end of the wedge in there?
There is s huge gap between it and the cap-iron where shavings can jam up.
On the plus side, the sole is fairly flat, it has a comfortable closed tote, and the abutments are in great shape.
Throat area showing abutment in good shape
There's not much length left on the iron as you can guess from the pic of the whole plane.  Maybe I'll remake a wedge, file the iron sides a little to fit better side-to-side and give it a whirl.  Don't know yet.  But if I do, you'll be the first to know.

What follows are a couple odds and ends that I'm recording just so I have the info somewhere.

Characteristic:                            Greenfield Jack                            Unknown Maker Jack
Bed angle                                   46°                                                46°
Wear angle                                 95°                                                78°
Wear height                                1 3/8"                                            7/8"
Abutment / Wear Intersection    1/4" up from sole                          3/16" up from sole
Breast angle                                120°                                              116°
Toe to rear of mouth                   5 1/4"                                            5 3/8"
Wedge angle                               11°                                                 ~11°

Thursday, April 23, 2020

Box for Carving Chisels

It has been almost two years since I became the new caretaker of Orvil Heft's tools.  Among those tools were these carving chisels.  Orvil carved birds and painted them so lifelike it was incredible.  Recently I took the time to sharpen every one of the chisels.
Orvil's carving tools: Western tools left, Japanese right
They came in this old shoe box
Finally I'm going to give the chisels a better home.  Recently Paul Sellers put out a series of videos of making a desktop organizer.  I used that design, but changed the dimensions to suit my needs.  I have no in-process construction photos (some details are at the end), but since this is for carving chisels I thought I'd try some carving on the top of the box.  I used some scrap wood for a first pass.
Found a font that I liked and printed words on regular printer paper, then cut the letters out with a knife
I used the paper as a template to draw the letters onto a piece of redwood.  I used the smaller Japanese carving tools to form the letters.
Not too shabby for a first attempt, but this took a long time
My wife and her daughter use a device called a "Cricut" to make things for scrapbooking.  It's basically a printer that has a blade instead of ink, sort of like a mini-CNC machine for paper.  Anyway, you place the paper on a platform and ask it to print your text (or picture, or whatever).  And it accepts different thicknesses of paper - in this case, I used card stock for my template.
From the Cricut on card stock
Taped the template to the box lid and drew the outlines
Ready to carve
This was very slow going and my cuts are not nearly as polished as good carvers' work.
Half way through
And finished
Here's the lid in place
The box has an upper compartment for the larger chisels ...
... and a lower drawer for the small Japanese chisels
The box is made from redwood that formerly was a deck or a fence
Dovetails came out nice
I had sworn not to buy cheap hardware store hinges again, but I didn't want the expense of Brusso hinges for this box.  Hoping to find something in between the two, I called Lee Valley and asked if their small box hinges were any better than the cheap crap at the hardware store and I was assured they were well-made.  When they arrived, I found they were no better (probably exactly the same) as the hardware store hinges.  So I ended up getting a larger size from the hardware store and they seem to be working fine.

Anyway, I'm glad I finally have a permanent home for Orvil's carving tools.  They deserve better than an old shoe box.

Side note: that old shoe box was a "Lazy Bones" brand of shoes that was for little girls and was probably from the 60's.  It's possible that the box has some collectible value to someone.  It's not in pristine condition, but it's not falling apart either - just a little dirty.  And inside was a small informational brochure in perfect shape.  If any of you know more about this and would like to have it, I'd be happy to ship it to you.  Just send me a message on the "contact me" gadget.

Thursday, April 16, 2020

Making a Wooden Smooth Plane, Part 3: Wedge and Final Shaping

Part 1 of smoothing plane build.
Part 2 of smoothing plane build.

Now that the throat is shaped, I could get to the wedge.  OK, I'm fessing up.  I actually made the wedge immediately after forming the abutment recesses because I couldn't wait to try to make shavings.
First shavings with prototype
First shavings with the final plane
Anyway, after squaring up a blank and fitting it side-to side in the recess, I planed an angle at one end based on my layout lines.  Then tested the fit ... and planed some more ... and tested ... and more ...
First try was not close
Getting closer, but still not there
When I was happy with the fit, I figured out the length of the wedge.  Take a look at the iron.
Knife points to the location where the cap-iron starts curving towards the iron.
The pencil points to a mark where the iron exits the throat
It's important that the points of the wedge do not extend past the line that the knife points to.  If they do, they will create a gap that shavings can get caught in, causing a jam in the mouth.  So I placed the iron and wedge into the throat and marked on the wedge where it meets the start of the cap-iron's curve.
The lower end of the wedge
The wedge has two functions.  First, as it is tightened, it forces the iron against the bed to keep it solidly in place.  Second, it allows for the efficient redirection of shavings, forcing them to the center and up.  The tapers at the end of the tips of the wedge divert shavings towards the center and the angled ramp sends them up in the throat.

Update:  I've been using the plane for a few weeks now, and have had to cut the tips of the wedge shorter.  As the plane has worn in, the wedge seated about 1/8" deeper, forming an area where shavings were getting caught.  I'm guessing that this is because the wood fibers on the wedge and on the front abutment wall have compressed with repeated hammer blows to the wedge.

After the wedge was all set, I could shape the plane body.  The prototype was the same size as the J. Pearce smoother used as a model, so I used the Pearce body as a template.  The final plane is 1/8" longer and about 3/16" wider, so I scaled up the shape a little bit.
The shape drawn on top
In the photo above, you can see two curved lines on each side.  This accounts for the chamfer that I put all around (the chamfer extended 3/8" down the sides) and also gave me the extents of the curve that I drew in for the back end.

On some planes I've seen, I really like the detail of the rounded back end with sharp transitions between flat and curved surfaces.
Note the curves on top and on the heel.  Used a circle template to lay them out.
Sides shaped, back end pending
I used chisels, rasps and files to get the back end smoothed out and was very happy about the shape.
Back end shaped - note the sharp semicircular transition
Not as sharp a transition on top - I had smoothed it for a more comfortable grip.
The last thing I added was a strike button like the J. Pearce smoother has.  I made a 3/4 dowel out of maple and slightly rounded the end.  Then bored a 3/4" hole, about 1/2" or 5/8" deep (can't remember now), centered in the front deck of the plane.  Cut off enough of the dowel so that it would extend about 1/8" above the top of the plane and glued it in.
Strike button glued in
The strike button works like a champ!  I mean, phenomenally well!  And I feel much better about hitting the maple end grain with a metal hammer than I would about hitting the plane body.

As a final fitting of the iron to the bed, I used a trick I learned from Bob Rozaieski where he burns a candle to get soot on the iron.  Insert the iron and wedge and tighten them up.  Then advance the iron and the soot left on the bed will tell you where you need to remove some material to get a better fit.
Back of iron with soot
Dark spots mark where I had to shave a little wood
After several go-rounds with this method, the iron fit the bed like a glove.

Another task before completion was to flatten the sole, and I did this on plate glass / sandpaper.  The iron was in the plane, well retracted.
Marked lines on the sole to gauge progress
I finished the planes with two coats of BLO thinned with turpentine.

And here they are, prototype in poplar and maple and the real deal in red alder.
Ta da!
Smoothing plane complete
One final note: on the prototype I really nailed the mouth opening, but it's a bit too big for my liking on the final plane.  So far, it performs fine, but if I ever work with figured or more gnarly woods I might find it a problem.
Prototype - toe to bottom of photo
Final plane - toe to right in photo
All for now.  I hope you all are finding solace in woodworking through this health crisis.