Showing posts with label Homemade Tools. Show all posts

Saturday, June 20, 2026

New Iron for the Veritas Plow Plane

I've recently been working on my old woodie plow plane and it got me thinking about the Veritas plow.  When I bought it, I got a 1/4" and a 3/8" iron with it.  But it seems most of the grooves I make these days are small.  I absolutely love using the wooden plow, but the irons are a little funky.  None of them are the nominal size - they're typically off by a bit (some more than others).  For example, the 1/8" iron (0.125") measures 0.157".  That's almost 22% over nominal.  But the 1/4" iron for the Veritas is spot on.

Here's the Veritas plow plane

And here's its 1/4" iron

Anyway, I thought I'd make a new 3/16" iron for the Veritas, and maybe later I'll make a 1/8" iron.  Their irons are 1/8" thick and, as luck would have it, I have some 1/8" O-1 tool steel.  So I got out the old hack saw and cut a blank to just over 1/4" wide and just over 3" long.

Sawed it out to just over 1/4" wide

The blank filed to 1/4" wide next to the factory 1/4" iron

Next was to file away 1/16" of metal in the lower 3/4" to 1" of the iron.  I probably should have hacksawn this because filing it took a while.  But I got a fairly precise 3/16" wide iron.

Iron clamped sideways in a vise

Filed the width, and also sawed and filed the notch for iron depth adjustment

I also filed the sidewalls so that the bevel side of the iron is a little thinner than the flat side, giving clearance for the iron in a cut.  The next pic shows the iron test fit into the plane.  I made the body of the iron 1/4" wide so that the iron clamping screw would act similarly to the way it does for the stock 1/4" iron.  You can also see where the lever cap meets the iron - that's why I didn't go higher on the iron with the 3/16" width.

First test fit into the plane

The notch fit nicely with the depth adjusting nut

Just a note here.  The metal that was filed away to make the business end 3/16" wide, was filed on the outer side of the iron.  You can't tell in these photos, but the plane's skate sits below the inner side of the iron.  So for the skate to properly support the iron, the metal had to be removed from the outer side.

I heat-treated the iron with a torch until cherry red and nonmagnetic, then plunged into oil.  Then because I didn't want to use our kitchen oven to temper the iron (it was 96° that day and we have no A/C), I tried for the first time to temper it using the colors that advance to the cutting edge as I heated the iron about midway along its length.  When the golden straw color reached the bevel, I plunged in oil.

I didn't get any pictures of that, but it seems to have worked well.  When I sharpened the iron, I thought I might have done the tempering wrong because it seemed I couldn't get a good cutting edge.  But after I removed a bit of material, I sharpened again and got a great cutting edge.  I'm guessing that the initial hardening treatment left the thin cutting edge area a bit brittle and it just needed to be ground back a bit.

Here's the iron sharp and ready to go

First 3/16" groove cut in some soft wood

And a 3/16" groove cut in some fairly hard oak

I'm happy to report that the new iron performed very well.  It locks into the plane nicely, is easy to adjust and cuts a relatively precise 3/16" groove.  Now I've just got to decide whether or not to make a 1/8" iron.

UPDATE: I ended up making a 1/8" iron and it also works very well.  There's something very satisfying about making your own tools.

Monday, July 28, 2025

Shop-made Small Router Plane

For several years now, if I needed to route a dado or groove that was less then 1/4" wide, I used a makeshift router plane.  This was nothing more than a block of wood with a 45-ish degree angle on the front end, a 1/8" groove cut into that angled front, and a 1/8" chisel clamped into the groove.

My original small "router plane"

The clamp block holding the chisel in place is a piece of wood screwed to the main block

While this worked well during the infrequent times that I needed it, I always thought it would be nice to have a dedicated tool.  So recently I did something about it.

For the blade, I used an old 5/32" Allen wrench.  The 5/32" dimension is flat to flat, and the dimension from apex to opposite apex is close to 3/16".  The short leg of an Allen wrench has one flat face facing up when standing like an "L", so the 3/16" dimension is horizontal, and that becomes the width of the cutting edge after some filing, grinding and sharpening.

The Allen wrench in cross section

I heated the 90 degree bend to red hot and bent it to more like a 100 degree angle.  This gives a "clearance angle"; it allows the blade to cut a dado without the heel of the blade rubbing on the bottom of the dado.

This shows the approx. 100 deg angle on the Allen wrench

One major concern was about how to hold the blade.  I got a 1/4-20 bolt and tried to drill a hole through it.  Nothing doing!  That bolt must have been some sort of specialty bolt, as it was as hard as kryptonite.  I annealed it and it was still way too hard to drill.  So I got another bolt and that one was far easier to drill, though I found out the 1/4" bolt was too small for a 3/16" hole and I had to go with a 5/16-18 bolt instead.

Punching a center point into the insanely hard bolt

Successful 3/16" hole in a 5/16-18 bolt

Here's how it'll work: Allen key through the hole in the bolt, 
nut at rear of the wood block tightens the Allen key to the wood body

I grabbed a chunk of scrap from the bin that just happened to have a 1 1/8" hole bored through it.  About 2/3rds the way up from the bottom of the block, I drilled a 5/16" hole through the back and into the larger hole of the block.  The 5/16" bolt was inserted and a washer and nut placed on the back end.


Also made a groove where the cutter will rest as a sort of "bed"

Made two thumb holes in the back end for a better grip

Then made a large bevel on the top surface (as seen from the right end)

The plane's body is 4" wide, 1 1/8" tall and just over 2 1/8" front-to-back.

Shaping and sharpening the iron was not too tough, but it was tedious.  I filed or ground a flat on the bottom, then filed a bevel on the top.  The diamond plates were used to refine the surfaces and get a nice edge.

Dragging the bottom flat backward on the diamond plate

And sharpening the bevel.  This took a lot of patience.

But I got a good smooth surface on the bevel ...

... and the bottom flat

I finally got a wingnut to tighten the iron in the body - a nice upgrade from a hex nut and wrench to tighten.  A nice project - I'm looking forward to using it when the need arises.

In use cutting a ~3/16" dado

Glamour shot

Back view showing wingnut

And lastly, I made two more smaller irons - one about 7/64" wide and one about 5/64" wide.  It was a challenge sharpening these tiny irons, but they all came out great and work well.

Three small Allen keys became router plane blades

All for now.  Hopefully I'll get back in the flow soon and post more often.  I've been in a woodworking slump for the last couple of months.


Thursday, March 27, 2025

Making a Marking Gauge with Wooden Thumbscrew

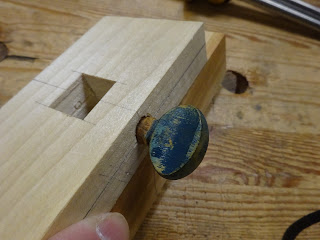
This is the culmination of the wooden screw rabbit hole I've been in for several weeks.  It started from a Worth marking gauge I was given some years ago, the screw from which didn't fit the inside threads in the fence very well.

It all started from this

It turned out that the inside threads were the problem - they got wallowed out a bit and the screw would no longer hold.  So with my experience a few years ago making larger wooden screws and with the help of some online videos, I figured out how to make threads of the appropriate size: 3/8" major diameter at 10 threads per inch (3/8" - 10, for short).

To pull it all together, I made a new marking gauge.  The major challenge with this one was making the wooden thumb-screw.  I'll get to that in a little bit.  But first, I made a prototype marking gauge fence from scrap wood to see if I could create inside threads through the top and extending to the mortise that houses the beam.

I needed the prototype marking gauge to be at a specific height in
the threading box, so I planed a scrap piece and super-glued the fence to it.
Then ran the tap through the fence to make the inside threads.

And it worked very well.  Here's the original wooden screw
in that tapped hole - a nice snug fit.

Later I made a fence blank from walnut and repeated the procedure on the real thing.

Here's the walnut fence getting threaded

and I got a nice fit here, too

The walnut took the threads pretty nicely

Next I tested a 3/8" diameter piece of walnut to see how well it would take outside threads.  I had soaked it in mineral oil for a few days, and it worked out pretty well.

Testing a 3/8" walnut dowel for outside threads

And it fits an inside thread nicely

With that adding confidence, I laid out a wooden screw on a walnut blank.  I was careful to lay out precisely to keep things aligned.

Laid out the shape using the original as a guide

Then sawed and rasped the to-be-threaded end a little oversize and
tapped it through a dowel plate for a fairly accurate 3/8" diameter.

The extra material on the right in the above picture is so I could mount it in the threading box.  I formed that into a 5/16" diameter so I could use one of the couplers I'd already made (I realize that might only make sense if you had read the previous posts about threading small diameter wood).  Then I cut the outside threads and tested them in the walnut fence.

It fits nicely and it locks the beam solidly!

I cut off the extension on the back end and shaped the thumbscrew head similar to the original.  I also cut off about 1/2" of threads so that there's only about 1/8 to 1/4" of threads above the fence when the screw locks the beam.

At this stage, there's just a little shaping to do and then some coats of shellac.  Like my last marking gauge, I added wax to all outside surfaces, except the bottom of the beam.  That exception will help ensure the beam won't slip in its mortise during use.

It's looking like a marking gauge

I added measurement lines on the side of the beam that is visible to me (a right-hand dominant person) when in use.  I find the lines very useful on the original Worth gauge, and I don't know why more marking gauges don't have this feature.

I laid out these lines carefully - they go out to 6"

Almost forgot to mention - I made the pin from an old 3/32" drill bit.  It was annealed (though it was still very hard after annealing) with a torch and sharpened using a drill and hand-crank grinder.  It was a little loose in the 3/32" hole in the beam, so I bent it a little bit and now it holds well.

And here is the glamour shot.  When the screw is tightened, the beam will not go anywhere.  It clamps as solidly as a rottweiler on a postman's leg.

It's a beauty

I'm done with wooden screws for now.  It's time finally to move on to other things.

Saturday, March 22, 2025

Threading Small Diameter Wood - Part 3

Last time, I had some success threading 1/2" dowels and fitting them into 1/2" wooden nuts.  I had used a three sided box with dadoes that housed blocks.  One block holds a machine screw and nut with a specific pitch.  The end of the screw was modified to hold either a dowel ready to have outside threads cut, or a tap ready to cut inside threads in another block.  Another block simply gets an inside thread cut into it or it houses a cutter to cut an outside thread on a dowel that is fed into it.

Here's the box set up to cut outside threads on a dowel

After some experimentation, I made some improvements.  First, I wanted to angle one of the sets of dadoes so that the cutter mounted to it would cut outside threads at the proper pitch angle.  For the 1/2" - 8 threads and the 3/8" - 10 threads that I'm working with, this angles turns out to be around 5 degrees.  Without this angle, the V-shaped threads cut into a dowel would not be symmetrical: one side would be more vertical and the other side more angled.

This shows the angled block to account for the pitch angle.
The previous picture shows a straight-across block.

Second, I realized that my outside thread cutters were cutting a much wider thread than I want due to cutter angle and geometry.  So I modified the cutters to make a narrower cut (no pics of that).

Third, I made improvements to the methods of connecting the screw to a dowel.  Originally, I had used a piece of rubber hose and hose clamps, but these tended to slip.  Later, I made wooden couplers that used set screws to lock the screw and dowel in place.

Here's an early experiment with 5/16" tap cutting inside 3/8"-10 threads
in a block.  The machine screw has 3/4"-10 threads and the coupler is
made from plastic tubing, hose clamps and a split wooden ring to adapt the
5/16" dowel to the 3/4" ID plastic tube.

Now is where I get into 3/8" diameter screws with 10 threads per inch.  I use a 5/16" dowel for cutting inside threads.  In earlier experiments I just drilled a hole through a 5/16" dowel and stuffed a cutter in the hole to make a tap.

The little cutter was made from a steel hinge, rectangular in cross section
and fit tightly into the round hole drilled through the dowel.

That worked, but after the first use, the hole got wallowed out and the cutter wouldn't stay in place.  So I decided to try a different way to hold the cutter in place.  This method uses a set screw in the end of the dowel to lock the cutter in place.  But as you'll see, there were issues.

Drilled, tapped and put a set screw in the end of the 5/16" dowel.
Before tapping the hole, I fit the dowel into a 5/16" hole drilled in scrap.
This kept the dowel from breaking apart as I tapped.

Made a new cutter from an old 1/8" drill bit

After annealing, it shaped easily with hack saw and files

But after a few times tuning it into a (hopefully) new nut, it was destroyed.
This one was made from relatively soft red alder.

I made another 5/16" dowel from beech, hoping the harder wood would hold up better.  Then I ran it through another 5/16" pilot hole and it worked without getting destroyed.


Got the sample 3/8" screw through the nut

Some success!

The threads were very tight.  I'm pretty sure the problem lies in the profile of the external threads on the screw.  I'm using a 60 degree cutter, but I think the angle at which it is presented to the 3/8" dowel makes the effective angle greater than 90 deg.

After working on cutter geometry a bit, I got back to the screw to dowel connection.  The coupler is a block of wood with a 3/4" hole on one end and a 3/8" hole in the other.  Then I drilled a hole through the coupler and the 3/4" screw, as well as through the coupler and the dowel.  Both are pinned with wood pegs.

The new coupler has a 3/4" hole on one end ...

... and 3/8" hole on the other end.  After the screw and dowel are inserted,
a hole is drilled down through both and pinned with a small wooden peg.

First tried a very dry beech dowel.  It worked, but the beech didn't take threads well

I had soaked these two red alder dowels in mineral oil for a few days ...

... and this one took the threads far better than the dry beech.

Fits in the tapped threads in a block

But there's a problem: a flat spot with barely any threading

It turns out that the 3/4" screw is not sitting in it's block perpendicular to the block.  It's probably a few degrees off 90, so I shimmed the nut in the block and got it somewhat better.  The result of this problem is that the back end of the threaded piece wobbles as it is fed into the cutter and one side of the dowel gets much less threading than the rest.

Look at the difference in how these two took threads

Finally, I broke down and bought a couple things to help the situation.  The first was a 5/16" brass rod to make a new (practically indestructible) tap.  Similar to the above beech tap, it has a hole drilled and tapped down the center to take a 10-24 set screw.  The cutter for the tap is housed in a 1/8" hole drilled through the diameter of the rod.

Brass rod drilled and tapped - carefully to keep it centered

I also purchased a 12" length of 3/8" - 10 lead screw.  This was much easier to deal with than the large 3/4" screw.  And it also fit into tapped holes I had already made in blocks that fit the threading box.  And because the threaded blocks were aligned properly, the lead screw has very little runout.

Brass tap on left and 3/8"-10 lead screw on right.

The lead screw and brass rod have shallow drilled spots to allow
the set screws to engage them and hold them tight with no slippage

And this worked out great - got a nice thread in the block that fit the screw well

Well established 3/8"-10 inside threads

And here's where it ties back into the thing that started this rabbet hole.  The marking gauge that got me thinking about small diameter wooden threads is shown in the next picture.  The threads on the wooden screw fit perfectly in the tapped holes.

The wooden screw that started this rabbet hole fit perfectly!

With this success, I'm making a new marking gauge: one that holds the beam in the fence with a wooden screw.  And I'll share that next time.