Thursday, July 28, 2022

Wooden Scrub Plane - Part 2

Last time I ended with a glue-up of the two halves of the plane body.  The glue-up was successful in that the two halves mated well at the bed with only minimal cleanup to do.  Since then I've finished up the plane and it looks great and seems to work fine.  I'm not sold on the iron, though.  It was just a found piece of steel that looked like a plane blade, so I assumed it was tool steel.  I've heat-treated and tempered it, but after only a few plane strokes on soft pine the iron is no longer sharp.  I'll give it some time before I decide what to do.

Now, here in pictures is the rest of the build.

Scribed a straight line, then an arc of about 2 1/2" radius.
In retrospect it was a bad idea to use a metal scribe on the back side of a plane iron.

With this thick iron, it took a long time to grind the new arc and bevel.
I heat treated and tempered before final sharpening.

Here's the plane body after glue-up - not quite a perfect mate of the two halves

Using a 45° block helped guide a sharp chisel (not shown).
A cheap crappy chisel with ground off blunt end (shown) scraped the bed flat.

After planing a wedge for side-to-side width and angling to fit into the recess,
testing with feeler gauge for gaps (not good enough yet)

Wedge marked for material removal

After some careful sawing and chiseling

Couldn't help but try a few shavings with the wedge and iron done

Cut the wedge to length and shaped it - a little shorter than the iron

Next was the tote.  Had to decide style and shape (an earlier plane is also in pic).
The steel rule in the pic is aligned with the iron so I could look at different tote positions
 and ensure the tote won't interfere with adjusting the iron.

This part was tough.  Due to the relatively short length of this plane, I couldn't fit the closed tote unless it was positioned far below the top surface of the plane.  I wanted to use a razee configuration, but not that much.  The closed tote in this pic was a prototype I made a few years ago and really liked it for comfort, so I compromised.  It'll be an open tote, but with a little more forward lean like this closed tote and from relatively thick wood (1 1/8" thick).

Drawing a template

Testing the template on the plane body

Marking material for removal

After material removal - that center section will actually become part of the tote.
Also shown here is the chunk of wood available for the rest of the tote.

Gluing that chunk to the body

Made a template and drew shape on the blank

Cut away most waste with coping saw

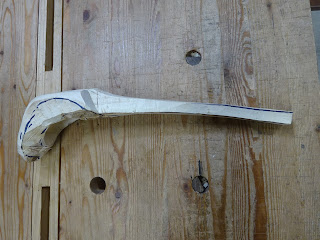
Shaped with chisels, rasps, files and sandpaper.  Used a paper template to check progress.
The template was slightly less than a half circle of 1 1/8" diameter.
I spent a lot of time on this - it's more challenging when attached to the plane body.

After doing the rest of the shaping for comfort (beveling upper edges, etc.)
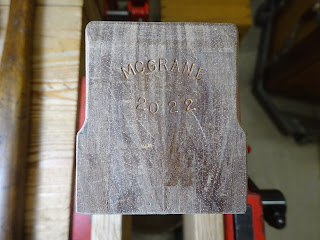
added my "maker's mark" on the toe

One last job before adding finish: a strike button.
Bored a 1/2" deep, 7/8" diameter hole.
On the left is stock gluing up for the button.

Strike button glued in - sticks up about 1/8"


And here she is, with first of 2-3 coats of BLO

Glamour shot

This plane is an odd duck.  It's narrower than most planes.  I plan to use it for very rough scrub work.  I have another jack plane with less cambered iron for lighter scrub chores.  Time will tell if I use this and like it more than others.  But it was a fun build and I got to put to work that iron I found.  Let's see if it can handle the tasks.

Thursday, July 21, 2022

Wooden Scrub Plane - Part 1

This will be mostly a pictorial essay.

A few months ago at an estate sale, I picked up what appeared to be some kind of homemade plane blade and I thought that I'd make a plane body for it.  Eventually I decided on a scrub plane.

1 1/2" wide and just under 7/32" thick

The iron had been thicker and shaped somewhat like a banana, but I worked on it with a hand-cranked grinder, a Dremel tool and diamond stones to get it reasonably flat.  The other day I drew up a plan and found some scrap wood for the plane body.  The available wood determined the overall length of the plane.

A rough plan - some numbers changed after this pic was taken

This plane body will be made with a two-piece construction.  The shaping of the throat is done on each half and the two are glued together - you just have to be very precise about the glue-up so that the bed surfaces line up right.

This unknown species wood came from a table that was being thrown out.
It's very dense and heavy.  Each piece is 1 1/16" thick.

The two pieces mated and the top initial layout done

After transferring the lines to the inside faces, I cut the recess for the wedge and iron using a 90° block and a small saw.

Cutting the deeper recess ...

... and leveling the bottom with a router

Didn't get the sawing perfect, so using a chisel with the 90° block to clean up

Repeat with the breast line (front of throat), but not as deep

... and the two halves look like this

And when they're mated, it's starting to look like something

There's more material to be removed in the throat and it's more saw and chisel work.

This saw cut is as deep as the wedge/iron recess at top of throat,
but drops to zero depth at bottom

After chiseling out the extra material it looks like this

There's a little piece at the bottom of the wedge abutment that needs to be relieved and this was done with a chisel.

Pointing to bottom of abutment - that needs to be angled towards the cheek

Here it is after angling those two triangles

This view shows that bit a little better

Two more things before glue-up.  First, add the "eyes" that make if more comfortable for fingers to pull shavings from the throat.  Second, make sure the iron fits OK.

These are the "eyes"

This was more side-to-side room than I wanted, so I planed about 1/32" off
an inside face of one of the body halves.

Glue-up: extra clamps were used to try to keep the two pieces' bed surfaces aligned

Next time I'll write about the iron, the tote, and (hopefully) finishing up the plane.


Thursday, July 14, 2022

Pittosporum Spoons - Update

A few weeks ago I wrote about cutting a branch of a pittosporum and that I'd hoped to make some spoons from it.  Well from the 6 blanks that I partially prepared, I ended up with 3 spoons.  Three of the blanks got some pretty bad splits.  I probably should have gotten them to a MUCH more completed shape before letting them dry for a few weeks.

An example of one of the spoon blanks

The spoons I made are nothing special - no fancy carving like Follansbee or Fisher.  Just simple spoons.

Some creative clamping was needed when working on the bowl

Three spoons with two rejected blanks

This is the blank on the right in the above pic.
With a nice natural curve, I had hoped this would make a ladle.

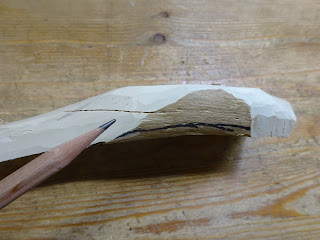
Here are a few of the cracks on that blank

For a finish, I wanted to use a curing oil that was nontoxic.  I've thought about (non-boiled) linseed oil for a while and decided to use that.  It's sold in grocery stores as flaxseed oil, a nutritional supplement and/or cooking ingredient.  I know it will take a fair amount of time to cure, but that's OK with me.  UPDATE: The spoons have been drying outside for 3 days now and I still get an oily residue on my hands after handling them.

Flax oil = Linseed oil
Not sure why both names evolved

Here are the three spoons.  Like I said, nothing special.  But they'll be fully functional and that's what matters to me.  This was an interesting exercise.  The odd thing for me is that I didn't enjoy it as much as I thought I would.  Didn't hate it, just didn't think it was as fun as other stuff.  Maybe I'm just not cut out for spoon making.  Time will tell if I get back to it later.

Note the little pin knots in the bowls of the two lower spoons

As far as the pittosporum wood is concerned, it worked fine, but there were a lot of little small knots.  The color is very pale.  The oil only darkened them a tiny bit.  Maybe the sun will darken them as they dry.  And maybe time will alter the color.  We'll see.

Thursday, July 7, 2022

Benchtop Shave Pony - Update

Last week I wrote about making a shave pony, but I didn't have enough practice with it to figure out its faults.  Since then, I've used it more and made a couple key improvement.

Here's how it was last week

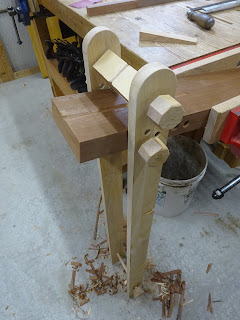
The first improvement is just a little thing, but it makes a nice difference.  The 7/16" oak dowels that are used to put the thing together could start migrating during use.  So I drilled a 1/16" hole in the dowels right where they exit the left upright and fashioned some cotter pins from paper clips.  It works perfectly - the dowels don't go anywhere.

Cotter pins holding the dowels in position

The next thing is really the important change.  In the first picture above, you can see that the foot pedal (treadle?) is simply one of the dowels going through the uprights.  This worked, but depending on the workpiece thickness, I might have to extend my leg too far to engage the clamp bar on the workpiece.  I saw a design for a removeable treadle on a few different shave pony videos.  It's a chunk of wood with notches cut at one end so that it fits between the two uprights.  The shoulders of those notches bear against the front edge of the uprights.  This treadle extends about 1 1/4" past the uprights and another piece of wood is screwed to its upper surface.  The edge of that piece bears against the back edge of the uprights.  This new treadle rests on the existing dowel and extends about 7-8" towards the user.

New treadle makes it MUCH easier to clamp a workpiece

Aside from those things, I cut a few inches of the bottom of the uprights - they were just too long.  And then I figured out how to store it when it's not in use.  If I move the clamp bar down to one of the holes near the treadle, the base can fold right in between the uprights.  If I needed to, I could also remove the treadle and it would be fairly flat.  I can store it in the ceiling rack (above the lifted garage door) I made some years ago.  And the dowel pins make sure it won't vibrate out of position and come crashing down on my head.

Stored safely in the ceiling rack

I used it all day today working on some spoons.  These changes made a great difference!