Showing posts with label Finishing. Show all posts

Thursday, April 6, 2023

A Note On Shellac Shelf Life

I remember reading once that shellac shouldn't sit on the shelf for more than 3 months.  In Bob Flexner's book "Understanding Wood Finishing", he says that the moment shellac flakes are mixed with alcohol, the shellac starts losing its ability to cure hard.  Who knows how old the cans of shellac in the hardware store are?  Odds are they've been there longer than three months already!

For several years now, I've been using shellac flakes that I mix with alcohol.  When I do, I write the date on the jar so I know how old it is.  My typical batch is about 1.5-2 cups of mixed shellac.

My most recent batch - August of 2022

The two-step stool that I completed recently got a few coats of this shellac.  But before I started, I tested the shellac on a piece of scrap.  Over the course of an hour, I gave the stick a few coats and let it sit overnight.

The test stick

Even after a half hour or so, the surface felt perfectly dry - not gummy at all.  Certainly after an overnight cure it felt fine.  This batch of shellac was mixed 7 months ago.  Now, I'm not going to put any other type of finish on top of the shellac, so I don't need to worry that the shellac will interfere with adhesion of a topcoat.

I should mention that my storage conditions are favorable for a longer life.  I store the mixed shellac in a cabinet in the shop where it gets very little light and probably has relatively small temperature fluctuations.  It's in a mason jar that seals very well.

Does anybody have hard data or empirical knowledge here?  Please comment about your experience with using shellac that has aged a bit.

Thursday, March 11, 2021

Desk-side Table, Part 4: Finishing Up

I was able to make the top from a single wide board.  The bottom had been flattened early on in the build and it sat for a while.  Thankfully, it moved out of flat very little, so planing it up went smoothly.  I wanted to shape the edges similar to what is on the desk it will reside next to.

The initial edge profile - the top of the top is at the bottom of the photo

I used a 1/2" radius on the top edges and about a 1/16" radius on the bottom edges.  These were done with jack plane followed by a smoother and a little scraping / sanding.  The corners were rounded with a 1" radius using a chisel, then a rasp and files.  I blended this curve with the existing profile curves.

Top with shaping done, ready for finish

The finishing started with a wipe with a damp rag to raise the grain and sanding after it was dry.  I would be staining the piece to look about the same color as the desk it will sit next to, so I filled the oak's open pores a bit with two coats of shellac.  The first coat is on in the picture above.  The stain was a single coat of Behlen American Walnut dye stain.  This product has acetone in it, but it also has some ethanol, and it seemed like it partially dissolved some of the shellac.  After that dried, I added two more coats of shellac to seal the stain.

Stain applied

I've had poor results when using fine steel wool on projects during the finishing stages.  I always get fine wool dust in the wood fibers that discolor it and end up wishing I hadn't done that.  But I felt that four coats of shellac might prevent these types of problems.  Before waxing, I rubbed down the whole thing with fine 0000 steel wool, which dulled the sheen.  Then I added a coat of paste wax using a cloth - not with steel wool as I've seen some people do it.

Waxing implements (the steel wool was used pre-wax)

I got an awesome finish!  The oak is smooth to the touch and reflects light nicely.

The last thing to do was to screw in the buttons that keep the top on.  I used brass screws, so I waxed them before driving them home.

Buttons installed

And here she is, ready for some thin cork foot pads and to be placed by the desk where it will live.

Side view

Front view

Installed in place

The color match with the desk is not quite right, but I'm happy enough with it.  The desk is a bit more on the orange side.

My wife likes it, but she would have been happy with something slapped together.  But really, where's the fun in that?  And I need the practice.  This was a nice project.  Having no drawer certainly simplified it, but she didn't want one.  Overall, very enjoyable.

Thursday, January 14, 2021

Small Entry Table Refinish

Refinishing is not really my thing.  But I'm always up for something different and besides, it was on the honey-do list, so what choice did I have?  This table was my wife's mom's.  Before she died (26 years ago), she had started sanding the top, preparing to refinish it.  We've been using it as a shoe shelf and stuff catcher for the last 7 years.  It was time.

An interesting little table.  Top is 12" x 24".  It is 24 1/4" tall.

Here's how the table is constructed.  The legs fit through holes in a batten, which was glued and screwed to the underside of the top.  The leg tenons extended through the battens and into depressions in the top.

Underside of table

Legs detached from table top

Each front leg is attached to a back leg with a turned rail, whose tenons are about 3/4" long and 3/4" diameter.  One of them was loose and had to be re-glued.  The 5/16" thick shelf is glued into grooves in the two rails.  The shelf has a VERY rough underside.  I got to thinking about the method used to make the turned rails with a groove.  Perhaps plow a groove in square, over-long stock, glue in a stick to fill the groove so the edges of the groove don't blow out too badly when turning.  But only apply glue at the ends (that would be cut off later) and a tiny spot in the middle (that could be chiseled out later).  Remove the stick after turning and voila.

First thing I did was to plane, scrape and sand the top.  I worked both sides and removed as much finish as I could, and was surprised how light (in color) the wood was.

Top of the top

Underside

I filled a couple of small chips on the underside that extended to the edges.

Outline marked out

Then excavated, glued in patches and planed flush

I didn't want to risk taking the undercarriage apart, so it was a hassle working on it.  Scraping and sanding the turned legs was time-consuming and tough.  But in the end it looked pretty good.

Top and undercarriage prepared for re-finishing

I used the underside of the top to show my wife what three different stains might look like.  I tried the stains with and without a pre-coat of shellac.

Shellac applied before stain (above) and stain only (below)

We both liked the Behlen American Walnut stain with shellac undercoat - upper left in pic.  After a single coat of shellac and light sanding, the stain was applied with a small rag, working lighter areas more to get as even a color as I had patience for.  The next day, I applied some water-based "polycrylic" finish with a brush.  The top and shelf got two coats with light sanding in between.

And there she is

The top looks good

And back in service

I'm really happy with how this came out.  All the work sanding was worth the time spent.  More importantly, the wife is very pleased with how it came out.

I've been thinking about an alternate solution for shoe storage that would replace this little table.  The wall that it is against is at about a 45° angle to the wall at the left.  I'd like to design a piece that wraps around that 45° corner.  Maybe there will be more on that in a future post.

Saturday, December 24, 2016

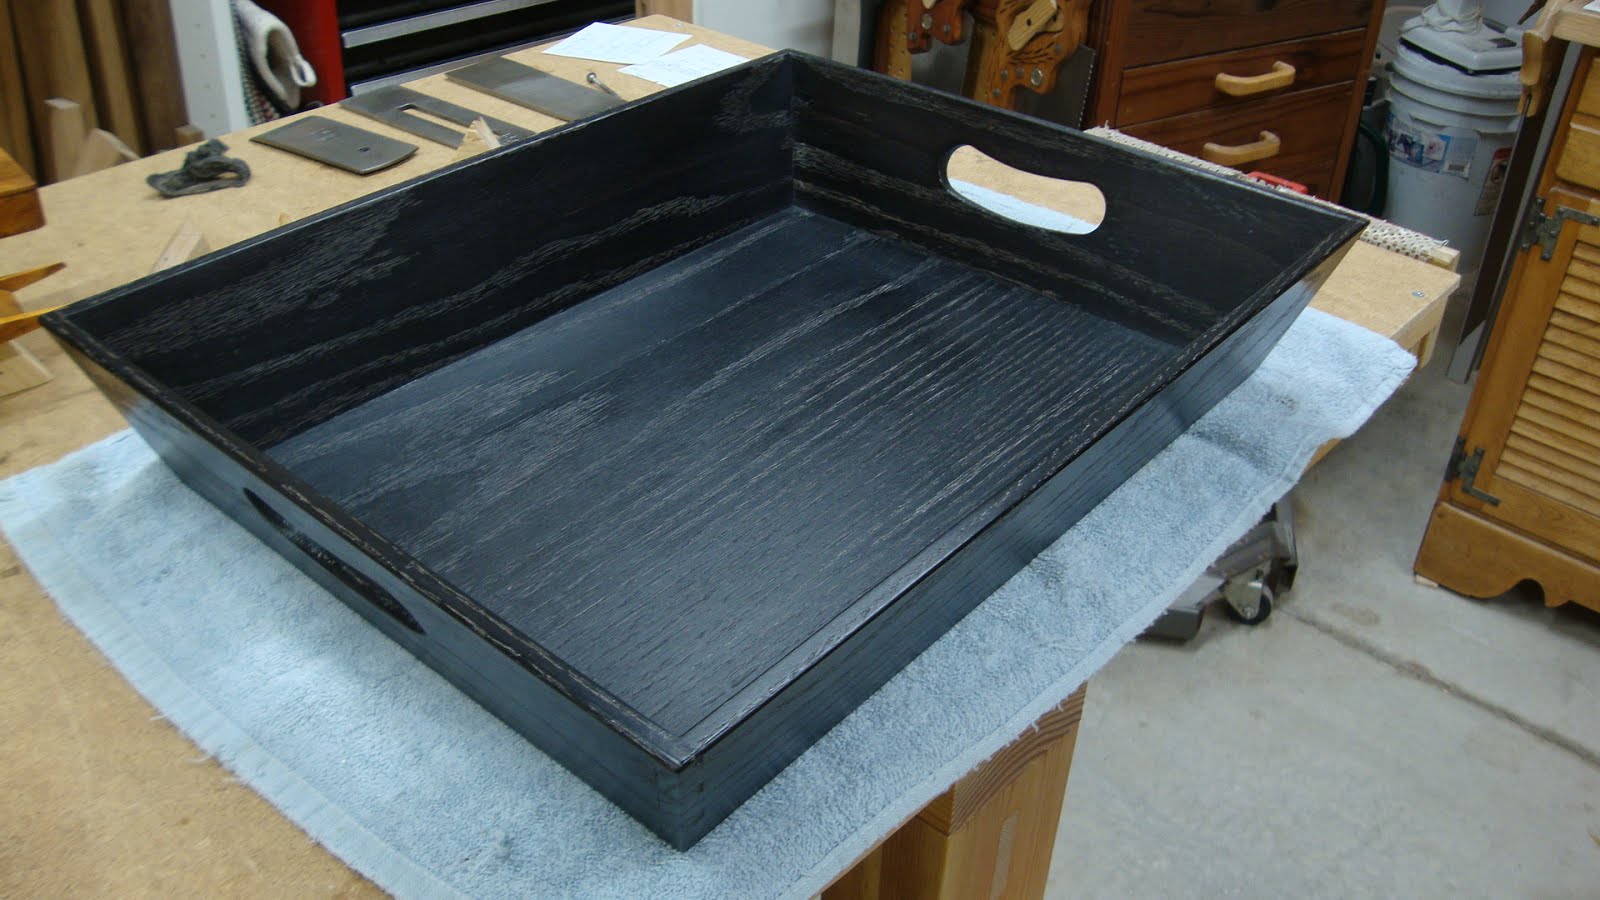
Holiday Gift #2: Ebonized Oak Serving Tray - Finishing

Just wanted to add a little bit to the last post.  Ebonizing of the project went well.  For the iron solution I used steel wool and apple cider vinegar.  Time pressures made it so I couldn't wait 7 days for the solution, so I waited about 4 days, stirring each day.  And since it was chilly in the garage I also wrapped it in a heated "corn cozy" a lot of the time - heat increases the rate of a chemical reaction.

The steel wool had not disintegrated like it usually does, so I was a little worried.  So I tested the solution by dipping a couple test pieces in an oak-shaving tannin broth and then in the iron solution.
Test pieces turned color quickly
With a good test I went for it, giving the project a heavy coat of hot tannin broth, letting it dry and later knocking down the raised fibers.  I repeated that and after it was dried and sanded I applied the iron solution.  The color went dark quickly, but I still added a couple more coats.
Still wet with first coats - drill shown for black comparison
Hanging from the bicycle seat drying
After all ebonizing steps
When satisfied, I coated with BLO, waited 15 minutes and wiped dry, then waited a day before a second coat.  Lacking time, that was all the coats it would get.  This morning I gave it a couple coats of paste wax and it shined up pretty good.
The complete tray
Lookin' shiny
The final shot
Happy with how this came out.  And just in time ...

Sunday, September 4, 2016

Ebonizing Oak - An Experiment

On a hike last weekend in the Santa Cruz mountains that separate the San Francisco Bay from the Pacific Ocean, I came across this guy.
Banana slug
This one is about 4" long.  I don't see them nearly as much this time of year.  They're more commonly seen during the wet season.  OK, on to woodworking.


Richard McGuire's latest video series was a side table project that included ebonizing the legs as part of the finishing regimen.  If you haven't subscribed, it's an excellent series and I thought the part on ebonizing was well worth the cost of the entire series.  I thought I'd try the process on an oak frame that I built a couple weeks ago.

I have to say here - I tried to contact Richard and Helen to ask if they minded if I blog about my experiment, but I have not heard from them.  So I hope this is OK and if I leave out some details, you'll understand.

I started a couple weeks ago by preparing an iron solution that would be used to react with the tannins that occur naturally in oak to turn it black.
8-12 oz. mason jar, fine steel wool and some vinegar
I filled the jar with vinegar, put the lid on loosely (to let any evolved gases escape) and let it sit, stirring every day or two.
Just started
I didn't really know what to expect with this.  After two days it looked like this.  You can see a reddish brown muck starting to form at the top.  But the wool is dissolving.
After two days
I stirred it with a stick and got this.
After two days - mixed
I expected the solution to get black and stay that way, but it separates over a couple hours.
Day 4
Day 10
Here's what day 10 looked like from the top.
I ended up scooping out most of this muck
The second thing you need for the ebonizing is a solution that has some tannic acid in it.  Oak has tannins in it naturally, but apparently in dry oak (and this was very dry, old, re-purposed oak) the effect is less.  The answer is to take some oak shavings and boil them to create a tannic acid solution.
Mmmm, oak soup
When this was ready, I got the stuff together and hit the shop.  The following picture shows a pine/spruce/fir store-bought shim that I dunked first in the oak soup, then the iron solution.  You can see on the shim that I dunked about 2/3 of what you can see in the soup and after that, about 1/3 in the iron solution.  The oak soup has little effect on its own, but after the iron hits it, the color changes.
Testing the oak soup and iron solution on a coniferous shim
BTW, it's interesting that this worked on a wood other than oak that has no natural tannins.

After coating the frame with the soup and letting it sit a while (twice), I added the iron solution.  You can still easily see the original oak color, but the chemical reaction that turns things black keeps going well after the application of the solutions.
Oak frame (and scrap frame piece) after first application, shown with raw oak
Here it is after letting it dry.
After a while
I used one or two more applications to darken the color and after that was dry, I applied three coats of BLO with a day in between each coat to let dry.  After a few days curing, I applied a coat of paste wax and buffed with a shoe brush.
I like the color
I like how you can still see the grain.  The next picture is a close-up of one corner and you can see that I didn't get the solutions deep enough in the open areas of the porous sections of the oak.  I'm not concerned about that at all - it still looks really neat.
Close-up showing grain
On another section I took a picture with something in the shop that was black to get a comparison.
Not as black as this black plastic, but still pretty dark!
Another area showing hints of the original oak brown
I know I could have repeated the process a few more times (before oiling and waxing) to get a deeper black, but this was just an experiment.  So when I do this for real, I'll know what to look for and when I've gotten the color I want.

One last thing - I was interested in how far into the wood the black color reached.  So I took one of my scrap test pieces and crosscut it.  Here is the end grain view.  You can see a little penetration in the upper left where there was a small crack on the wood, but almost zero penetration from any long grain surface into the wood.
Shows almost no penetration of the color into the wood from long grain surfaces
And here is a view showing how far the penetration went into end grain.  Not even a 16th of an inch.  I expected a lot more.
End grain penetration
A nice experiment.  Next time I'll be much more liberal with my application of the solutions.  And once again - if you are interested in this method, think about subscribing to Richard McGuire's video series to get all the details.  He's really teaches well and I learned a lot from just this one series.

Monday, April 4, 2016

Mixing Shellac and Problems With Veritas Plow Plane

Shellac

Today for the first time I mixed shellac from flakes and alcohol.  Previously, I'd always used Zinsser's "Seal Coat", which is dewaxed shellac.  I wasn't certain what pound cut this shellac was, so I did a quick search and found three different answers.  A post on some forum somewhere said it was a 1 pound cut, Highland Woodworking's site said it was a 2 pound cut and the technical data sheet from Rust-Oleum (apparently the parent of Zinsser) had it as a 3 pound cut.  You can always trust the internet to get you the right answers, huh!  I'm going with 3.

Anybody reading this probably knows that the "pound cut" refers to the weight of shellac in pounds dissolved in 1 gallon of alcohol.  In the past, I've typically thinned the Seal Coat one-for-one with alcohol, so if it really started as a 3 lb. cut, then I use it as a 1.5 lb. cut.
250 grams of blond shellac flakes
Of course, the units I'm dealing with are neither pounds (for the shellac) nor gallons (for the alcohol).  I'm just looking to mix up about 8 oz. (1 cup) or so of shellac, so I had to figure out how much of the shellac flakes to use.

I'm a math guy, so I worked it out as follows.  To change from 1.5 pounds per gallon to some weight in grams of shellac per cup of alcohol, I used:

(1.5 lbs./gal) * (1 gal/16 cups) * (454 g/lb.) = 43 grams/cup


This was close enough to 50 g/cup that I decided to split up my 250 g of shellac flakes into 5 equal portions.  Not having a scale for this type of thing, I just eye-balled it in plastic baggies.
Package of shellac flakes split in 5 (roughly) even portions

50 g ready to be mixed and the rest ready for future mixing
After adding a little more than a cup of alcohol, 
OK, I guess I need to stir this
I stirred a couple times over then next few hours and the flakes were nearly completely dissolved.  By tomorrow, this stuff will be ready to go.
Looking good


Plow Plane

Lee Valley recently offered an upgrade to the Veritas small plow plane that will enable it to take beading irons.  So I went for it and also bought a 3/16" beading iron.  I sent the plane to Lee Valley a few weeks ago and I got the plane back the other day and finally had a chance to unbox it today.
It's back
As far as I can tell, the upgrade to allow the plane to use the beading irons consists of a simple chamfer on the skate.
Chamfer on skate
Front view of the skate chamfer
I was happy to finally put the plane back together and anxious to try out the beading iron.
Parts is parts
I got almost everything assembled, but ran into a problem.  I must be doing something wrong with the depth stop assembly.  The depth stop never worked perfectly anyway, but now I can't even get the screw to contact the depth stop's stem to lock it in place.
The depth stop area is in center
Not shown in this pic are the thumb screw, curved washer and clamp block.  I wrote Lee Valley customer service to see if they have a suggestion.  It just seems that the screw is not long enough now.  And I didn't even send that part to them.  Wacky!