Friday, April 28, 2017

Fixing and Fettling a Wooden Plow / Plough Plane - Part 4

Parts 1, 2 and 3 of this series of posts are here, here and here.  When I left off, I had sent the crappy set of irons back to the seller and I was looking for a decent set.  Ideally it would be a set from Ohio Tool Co. to match the plane.  But I was told that they can be tough to find (and big bucks) and that British sets can be found more easily (and inexpensively).  I ended up getting a set of Thomas Ibbotson irons #1 through #8 that were in pretty decent shape.
Same emblem on all 8 irons
Thomas Ibbotson & Co. were in business from about 1830 to 1905, when Marples bought them.
Don't let the rust fool you - they're in good shape
After the usual citric acid treatment (except this time I left them overnight) and a little sanding, they looked a lot better.
A nice difference
And here's the beveled / grooved side
Almost immediately, a fine layer of rust appeared, especially on the sides.
Looked like this within a few minutes of being perfectly rust-free
So I re-sanded and immediately wiped down the irons with a cloth dampened with 3-in-1 oil.

These irons are interesting.  Each iron is laminated from two pieces of metal, and the part that takes an edge does not go all the way from sharp end to back end.  You can see the junction in the following picture (bevel side is down).
You can see where the lamination begins
All the bevels were ground at something close to 25°, so I only really needed to clean up the bevel and then grind a secondary bevel at 30°.  These came out pretty nice, though the pictures make it look like I didn't grind them square to a side.
Sizes #8 to #3
Here's an interesting thing - I thought the sizes would be closer to the expected 1/8" to 5/8" than they are.  Here are the nominal and actual sizes:

  • Number     Nominal     Decimal Nominal     Actual Size (diff. from nominal)
  • #1              1/8"            0.125"                       0.152" (+0.027",not all that close!)
  • #2              3/16"          0.187"                       0.199" (+0.012")
  • #3              1/4"            0.250"                       0.263" (+0.013")
  • #4              5/16"          0.312"                       0.324" (+0.012")
  • #5              3/8"            0.375"                       0.386" (+0.011")
  • #6              7/16"          0.437"                       0.418" (- 0.019")
  • #7              1/2"            0.500"                       0.495" (- 0.005"
  • #8              5/8"            0.625"                       0.561" (- 0.064" (more than a 16th undersized!)
Maybe the #8 is really 9/16" nominal.  Either way, one thing I've learned from hand tool woodworking: the actual sizes are not that important - you make parts to fit to grooves you plow.

With the irons sharp, I couldn't wait to make a test cut.  The original wedge didn't fit well with the 1/8" iron (or any of the others), so the planing was not as smooth as it could have been, though it still worked.
First test cut in oak with #1 iron
The next and last post of this series will be about making and fitting new wedges and a few test cuts.

Friday, April 21, 2017

Tapered Reamers

I found two old tapered reamers at a garage sale recently.  Thinking that they could come in handy someday, I grabbed them (along with a few other things).  I never got on the staked furniture train, so I don't know if I'll ever need to taper any holes, but you never know.
The two tapered reamers
The smaller of the two (top in above photo) has "No. 242" stamped onto one side of the back end, with a logo that appears to bear the letters G, T, D.
Smaller reamer markings
The opposite side has the following markings:
Made in USA, EX V5
The cutting edges of this reamer are about 2 1/4" long and form a (approximately) 30° taper.  It's maximum diameter is about 1 3/8"

The larger of the two reamers has the following markings:
1/4 to 1 1/4  ATCO
Made In USA
Not sure if this was original or stamped by an owner
This reamer creates a taper with an angle of about 33° and its maximum diameter is about 1 1/2". There are 10 flutes on each reamer and they are in a spiral pattern.
Ten spiraling flutes
Bottom view
I tested them out on a piece of scrap pine.
Marking a center and drawing a 1" diameter circle
Then boring a 1/2" diameter hole
Then turning the bit in the hole with a brace
A closer view
Well, this got nowhere fast.  It just wasn't cutting.  So I looked on the internet to try to find out how one might sharpen this type of reamer.  I found absolutely nothing (say it again!).  Almost all the information on tapered reamers was for a completely different type of tool (see, for example, this article by Peter Galbert).  If anybody happens to know anything about this type of reamer, please leave a comment.

So I decided to sharpen it freehand.  At first I tried a small file, but found out quickly that wasn't going to work.   Fortunately I have a diamond paddle and this helped a lot.
One flute showing cutting edge and trailing edge
Here's the rub - since the flutes are slightly spiraled, you have to change the angle of sharpening as you go from large end to small end.  In addition, each flute needs to be sharpened so that the leading edge of the cutting flute is higher than the trailing edge.  If the trailing edge was higher (or the same height), the cutting edge would never have a chance to do its job.

I basically just winged it here, realizing the importance of the leading edge and trying to file appropriately.
One of ten flutes sharpened - now for the other nine
All done.  I kept at it until I could feel a sharp-ish leading edge
When I tried it out, it cut so much better than before.  It didn't necessarily cut fast, but not too slowly either.  And it doesn't make shavings, but rather some fine dust.
Stopped to clean out the dust every 10-20 turns
Notice the pencil line of the 1" diameter circle in the above picture.  I used this as a guide to know when I was close to size and how close I was to centered.  When I was closer, I adjusted the angle of the brace to properly center the taper.
Cut just to the layout line
Close-up of the tapered hole shows fairly clean sides -
a little rougher at 2 o'clock and 10 o'clock to the grain direction
While I'm happy about how this came out, I may spend a little more time on sharpening the leading edges.  I'm about to order some more diamond paddles and they should help a lot.

Now I just need to figure out how to make tapered tenons without a lathe!  That'll be the next post.

Friday, April 14, 2017

Making a Set of Trammel Points

I've been in a woodworking funk lately.  I once read that when that happens, you can make some projects for the shop and that might ease you back into things.  That's what the miter sawing bench hook project was about, and that's what this project is about.

Occasionally I need to draw arcs to lay out some project part.  My previous jig was simple - long thin stick of wood with a little slot for a pencil point at one end and holes along the length for a screw wherever I need a radius.
Old arc-drawing jig

In his excellent blog, Dennis Laney posted in late 2014 about drawing ellipses.  In discussing this, he said "everyone needs a set of trammel points", and well, who am I to disagree with him.

So I looked on the internet and sketched a few things.
A few notes
I used a piece of oak 3/4" x 1/4" x 31" long for the beam.  I settled on a design that would use wedges in line with the beam and started work on a prototype trammel in pine.  The prototype was to look at shaping, but also to figure out the taper of the mortise for the wedge.  I used a wedge that was sitting on a shelf from some past project as a guide - I liked its taper.  I mortised the trammel, one end of which was angled for the wedge.
Tight fit on this side
Not so good on this side
The smart way to go would have been to lay out a rectangular mortise, hold the wedge to the layout lines and transfer the extents of the wedge to the trammel.  Live and learn.
The completed prototype
When I was satisfied with the prototype, I got a couple pieces of maple 7/8" square and about 8" long.  Each trammel would be about 2/7/8" long and I could get two out of one piece and a third from the second piece.
Mortising by eye
It takes some patience to ensure the mortise end wall is straight and without a hump.  But with careful paring and checking it came out fine.
Verifying that the mortise wall had no hump ...
... looking at both sides
As mentioned earlier, the other end of the mortise is tapered for the wedge and it's important to get it right.  But the smart way is to lay out the taper you want, cut the mortise, and then create the wedge to fit the mortise so that it locks the trammel tightly on the beam.

One of the trammels will be fitted with a 2" length of pencil.  I found the center at the end of one trammel and drilled a hole for a tight fit.  I also shaved off the arises of the hexagonal shaped pencil to make it more round and to fit better in the hole.
Hole drilled for first trammel
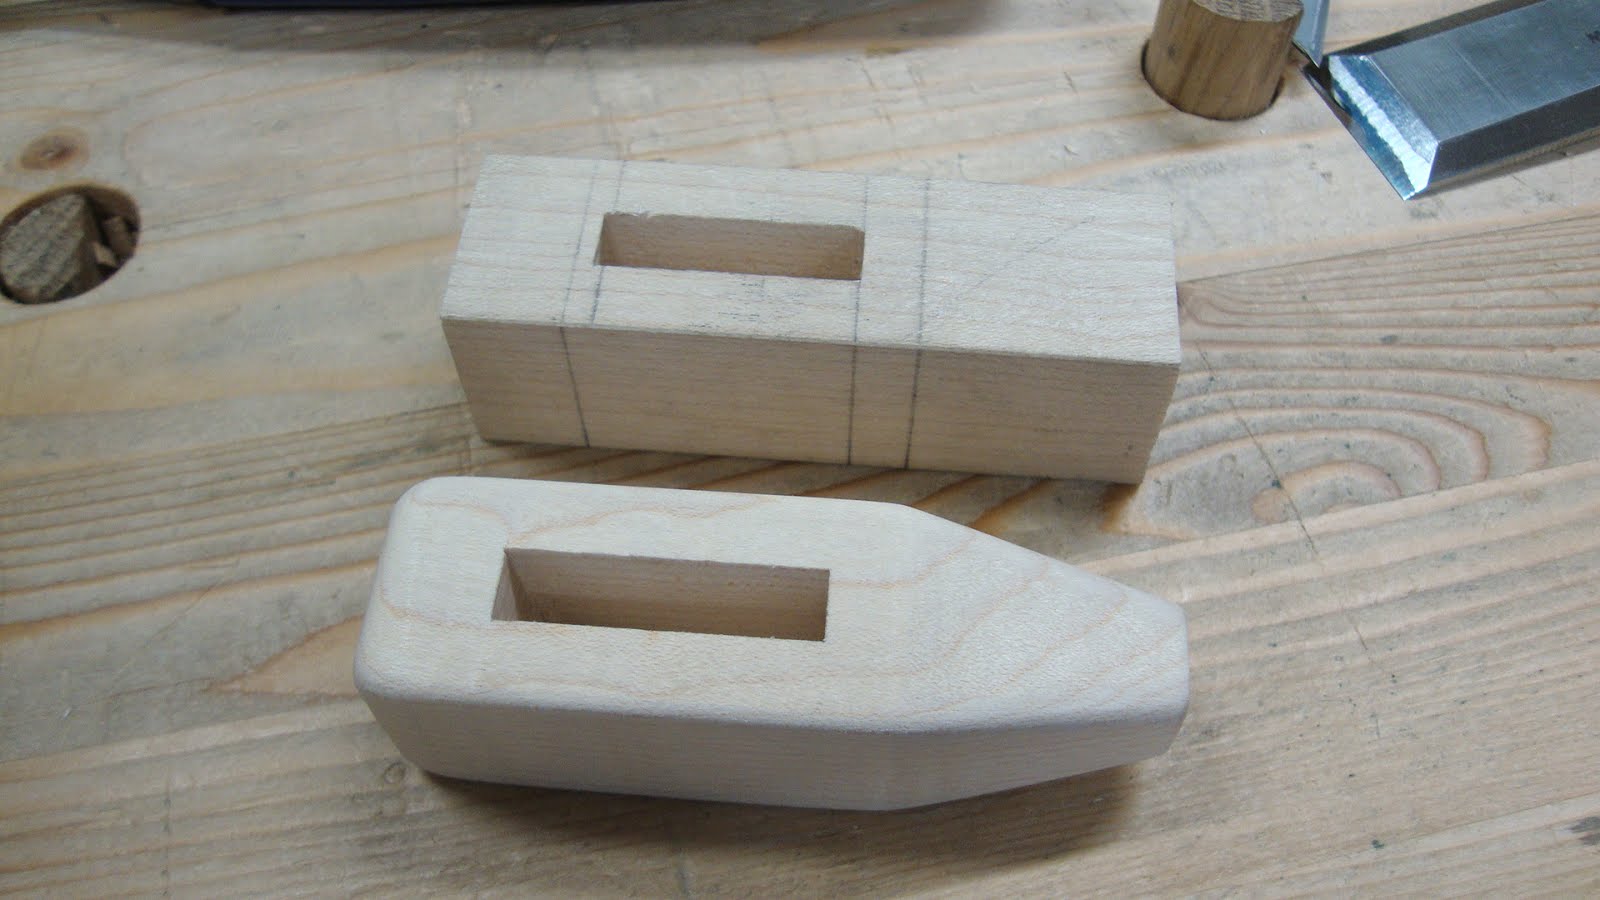
The other two trammels would each get a 1/16" hole, sized to fit a finish nail (with the head cut off).  As for shaping the trammels, the mortise area stayed relatively square and I gave them a taper towards the business end.
Before and after shaping
And here's the three musketeers, or stooges, or something.
Mo, Larry and Curly (or is that Shemp?)
I transferred the wedge shape of the prototype to a piece of maple and added a hump on the small end to keep it from sliding all the way out of the mortise when loosening it.
Wedge shape laid out and relief cut made
I pared close to the lines (picture was too blurry to share) and followed that with chiseling cross-ways to the line.
Sneaking up to the line
It's important that this side of the wedge is straight, so I took great care here.  When I was satisfied, I used the shooting board to trim the other side to get a perfect fit in the mortise.
Shooting for a perfect fit
Tight this side ...
... and tight this side
But I didn't like the way the wedge looked in the mortise when tightened - it wasn't "balanced".
Too much wedge on the right side
A couple shavings off the bottom of the wedge got it where I wanted it.
Much better balance
Then I rounded over the hump and all corners.  Since the three trammel mortises would most likely be slightly different, I fit each wedge individually to its trammel.  And to keep them straight I marked them.
"P" for pencil trammel, "1" and "2" for the two nail trammels 
I laid out some lines at 1" intervals on the beam to help me locate the trammels.  A couple coats of shellac and a coat of wax (except for where the wedges meet the beam) and this was done.
Stick a fork in it - it's done
Oh, yeah - the project is not really done until you've found a home for your new set of trammel points.
Hanging out on the side of my tool cabinet
I think these will be really useful and I'll love using them.  But I'll keep my old jig for when I need an arc with radius longer than 30".

Now I gotta get out of this funk and get on to some decent projects.

Friday, April 7, 2017

Miter Cutting Bench Hook / Fixing a Birdcage Awl

So many times I've seen people using bench hooks for various tasks.  I guess I'm a Sellers-ite because I do most tasks in the vise or on the bench top.  But I thought it was time to look at bench hooks.

About five years ago I picked up an issue of Fine Woodworking and it had a few interesting shop helper projects that I wanted to build - including a miter sawing bench hook.  I started with an off-cut piece of pre-finished plywood, cut and squared-up a piece 12" x 12" and one 12" x 3".
Too shiny and smooth
This was a great opportunity for me to use the toothing plane that I bought a couple months ago.  Just a few swipes diagonally in two directions and some straight swipes and most of the finish was gone and the surface was roughened up.
Much better - don't want my work pieces sliding around
Here's what the toothing plane does
Then I got a piece of maple about 2" x 1 1/4" and cut one piece 12" long and one piece 3" long.  On the longer piece I laid out some 45° and 90° cut lines.
Lines laid out
Then cut to the lines, leaving bottom 1/8" uncut
It's easier to cut to those lines when the board is not glued to the plywood.  BTW, when cutting those kerfs it's important to use the same saw that will be used routinely when using this sawing board. That way, the saw won't be sloppy or sticky in the kerf later.
Glued and screwed the maple to the plywood
When the glue had set, I finished the cuts
I toyed with the idea of not attaching a "hook" to the bottom and just using the center board in my bench as a stop.
Miter cutting board sans hook
But good sense got the better of me - I know how messy my bench top can get and it might be a hassle to raise the center board to use it as a stop.  So I glued and screwed the hook to the underside.
Hooks added to bottom register on front of bench and keep it from moving
I added some adhesive-backed sandpaper to the front of the hooks to keep the boards from sliding in use.  And note in the above picture that I made a smaller one from the 12" x 3" piece of plywood to help support longer pieces during a cut.

Note that these are meant for rough cutting, so you can finish up at the shooting board or with chisels, depending on the task.

Will I use these helpers?  Well, I just don't know yet.  I'll see in the next few months, but I think they'll be handy to have around.


On a completely different subject, I made myself a birdcage awl a couple years ago from some cherry and 1/4" square O-1 steel.  It was OK, but not great because I filed and ground the angles incorrectly. Only the end 3/4" was tapered.  I was just winging it and didn't know the proper angle to use.
This awl always had to steep an angle
Now that I have a hand crank grinder it was time to fix it.
Marked with red "Sharpie" and ground carefully, dipping in water frequently
Action shot
Ground new bevel starting about 1 3/8" back from the tip
Closer view
This made all the difference.  After some work on the diamond stones to refine the little pyramid shape on the end, this tool now makes quick work of small pilot holes for a drill or a screw. I've already used it a few times and am very happy with the performance.  Very satisfying.