Friday, March 29, 2019

Rehabing Orvil's Chisels, Part 1

Ever since I became the new caretaker of Orvil's chisels, I wanted to clean them up and make new handles for them.  And having made my lathe recently, I could finally do it.
Orvil's chisels
These chisels had gone through some rough use.  All the handles were reinforced with steel ferrules at the back end.  The ferrules were heavily peened over from who-knows-how-many steel hammer blows.  Many of the handles were cracked or broken.

The thing I don't understand is that Orvil Heft was a carver and painter of wooden birds.  It's hard for me to imagine that he needed these heavy-use chisels.  Perhaps he collected them and didn't use them.  Or maybe he had other woodworking interests besides birds.  But whatever the case, I wanted to make them nice again to be used every day.
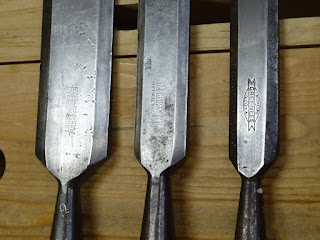
The three largest - 1 1/2", 1" and 7/8" - are Greenlee bevel edged chisels
The five smaller chisels - 3/4", 5/8", 1/2", 3/8" and 1/4" (last two not shown) - are D. R. Barton firmer chisels
The five largest chisels' handles
Right three handles are the remainder
To keep this post from getting too long, I'll go over the rework of the metal parts.  Next time I'll write about re-handling the chisels.

Removing the old handles was fairly easy.  Some were already loose, but some needed several raps on the benchtop to loosen them.  I took sandpaper to the metal - 180 grit and 220 grit.
Four cleaned, four to go
I was careful to go lightly over the logos.  I learned that lesson a couple years ago on a saw that I cleaned up and almost obliterated the etch.  Never again ...

When they were clean enough, I flattened the backs.  This went faster than I thought it might, thanks in part to the extra-coarse diamond stone that I got last year.  But it did take a fair amount of time, especially for the wide chisels.  Every one had low spots at the edges, possible due to being flattened on dished stones earlier in life.
Flattening the 7/8" chisel - note the oval scratch pattern,
showing sides and leading edge were low
Every one of these chisels was severely dull.  The 7/8" chisel had a big chip off one corner.  The 1/2" chisel had been rounded at the cutting edge.  And I'll get into the 1/4" chisel a little later.  All needed to be ground back to get past the rounded-over corners of the cutting edge.
Chip out of the 7/8" chisel
7/8" chisel ground straight across ...
... but this came at a price - there was a lot of material to remove to grind a new edge
OK, about that 1/4" chisel.  The leading edge had been ground to be 3/16" wide and the grinding started about 3/4" back from the leading edge.  I thought for a long time about what to do.  I really didn't want to remove 3/4" of usable metal and throw the length out of whack with the rest of the chisels.  My other option was to make this chisel into a 3/16" chisel.  I didn't have a 3/16" chisel, so that's what I did.

I'm not set up to do metal work.  But I went for it anyway.  Lacking layout fluid, I used a Sharpie marker to blacken the flat side and the bevel side near one edge.
Using Sharpie to lay out the metal to be removed
Then used a marking gauge set to about 1/32" to mark a line on the black ink
Used a round chainsaw file to cut in to the gauge line as far back as I would remove metal.
This was just shy of the D.R. Barton logo, which is on the side of the 1/4" chisel
(the logo is on the bevel side of all other sizes)
Filed to the line
On the first side I did, I tried to file straight across.  But on the second side, I filed "skyward" from both directions to leave a peak in the middle.
Peak in middle after filing from both directions to the layout line
Then I marked the edges and filed the middle, trying not to remove the black marker all the way to the edges.
 After the filing, I took the sides to the diamond stones, getting progressively finer with each stone.  This gave a much better finish to the sides, but I had over-filed a few spots that will stay looking not-so-good.
Here's the result: from 1/4" wide to 3/16" wide (flat side shown)
Side view: logo untouched, but over-filed a bit near the start of the step-down
This worked out pretty well.  I got within a few thousandths of 3/16" at the business end and I'm a few more thousandths over as I go further from the cutting edge.  I can live with that.

Next time I'll write about the re-handling.

Thursday, March 21, 2019

Wooden Try Plane Build

After gaining experience with the jack plane, I also built a try plane.  I had bought the two double irons a few months ago with these two planes in mind.  The try plane iron is almost 2 1/2" wide - it's a monster.

Aside from its sheer size, the main difference between this plane and the jack plane is the tote.  The try plane is fairly heavy, so it needed to have a closed tote.  I did my best to make a pleasing shape.  The back of the tote is basically the same shape as the open tote for the jack plane and the front came from totes I saw online.  I also used photos of a plane I saw at a PAST tool show last year.
Prototype tote in poplar all marked out
I cut out the shape and rounded it to my liking - but didn't get an independent picture of it.  You'll see one a little further down.

The build process was very similar that of the jack plane, so I'll go over that quickly in pictures.
Squared up the blank, cut off the 1/2" thick sides, smoothed and squared the sawn surfaces
Marked out the throat on the main body
Sawed out the throat and planed the sawn surfaces flat and square to its sides
(prototype poplar tote shown)
Knifing a line on the sides to mark the rear aspect of the abutment recess
Made a sketch and calculated where the front aspect of the abutment recess will go
Marked for the abutment recesses
Chiseled and routed the recesses
Made the slot in the main body bed for the cap iron screw
Glued up the plane body using cauls to distribute clamping pressure and to keep the sides and body in line
Removing glue squeeze-out and leveling the rear aspect of the abutment recess with the bed
Prepared a wedge complete with recess for the cap iron "nut" (shown)
It took a few iterations of planing and fitting, planing and fitting to get the right fit
Nice tight fit of iron and wedge to the recesses
Then marked out the blank for the final tote
Cut the shape with saws, shaped with chisels, rasps and files
Figured out where to place the tote - a little too close to the iron in this position
This gives better access to the iron, so I marked and then mortised for the tote
Got a good fit
Used hide glue to affix the tote
Needed to do quite a bit of work on the iron
Better, but still not flat - took a long time to flatten the back.
I then put a slight camber on the iron and sharpened it.
Added the same shaping details as on the jack's body.
Took some test shavings and all was good.
Then it was three coats of BLO over three days and she's ready to go.
Sitting and drying
The plane is about 23 1/2" long, 3 1/8" wide and 2 7/8" tall.  It's fairly heavy, but I think it's going to be a great worker.
Here's how the plane fits my hand.  I didn't lower the surface that the tote is
mortised into like I did on the jack plane, but I can still reach the iron with my finger.
For both the jack and this plane, time will tell whether the wood holds up.  They're made of some wood that came out of the sister's kitchen when she remodeled.  I've never definitively identified the wood, but I think it's alder.

Friday, March 8, 2019

Wooden Jack Plane Build - Final

The pine and poplar prototypes really helped me think through a lot of details for this plane.  One of the details concerned the location of the tote/handle.
The poplar prototype tote just seemed too far back
But you can see I have clear access to the iron with a hammer
The pencil is in line with the iron, showing good access to tap with the hammer
The front of the tote is about 1 1/2" from the back of the iron
This prototype is 15 1/4" long.  Due to stock limitations, the final plane only came out to 14 5/8" long.  While I moved the mouth forward a little bit to accommodate the shorter length, I was still concerned about the position of the tote.
Used the tote template to study the positioning.
Pencil is lined up with iron - tote gets in the way.
When I move the tote back enough to get clearance for adjusting the iron,
The rear of the tote is only 1/4" from the heel of the plane (see yellow pencil)
I had been thinking about this a while and did a "what if ..." scenario.  What if I cut away some of the height from the back of the plane, effectively lowering the tote.
Here, the tote is up closer to the tote, but not in the way of a hammer
adjusting the iron.  The tote is sunk into the plane body about 5/8".
While I was thinking about this, I made the tote, which came out really nice.
Lots of layout lines really help to get a nice result
The completed shape - with cutout at bottom right to allow it to fit into a rectangular mortise
Here it is next to the one it's modeled after
I ended up cutting the height of the rear portion of the plane down 5/8" and rounded the transition - somewhat "razee" style.  Then I mortised for the handle, being very careful about paring the walls vertically.  The tote fit perfectly into the mortise - after lots of fitting.
Here you can see the step-down at the rear
Another angle shows the back of the tote is about 3/4" from the heel
With this tote position, I can easily reach the iron, which helps stabilize the plane
The pics above show the plane after applying three coats of BLO that was thinned with some mineral spirits, then allowed to dry for a week.

And how does it work?  Holy crap!  This thing cuts like a dream.  The iron is cambered to make an aggressive cut and it really flies through some wood.  I got chills when using it.

Next up: using what I learned to make a try plane.