Thursday, October 27, 2022

Hand Crank Grinder - Workings and Clean-up

This post is about the hand crank grinder found recently at an estate sale.  There was no maker name - that always bugs me.  Seems to me that if they were proud of what they make, they'd put a name on it.  I realize it could be made by a known maker for a retail outlet or hardware store, but still, give me a name!

Looks reasonable enough

It came with a wheel of unknown origin that is 1" thick and has a 1" bore.  The bore is lined with metal (or pewter?) and doesn't seem to have been carefully made. The wheel is currently about 5 3/8" diameter with heavily rounded corners.  There is no indication of a maker of the wheel. 

I think some wheels are directional, so I marked the outside face.
You can see a lot of gunk caked on the sides of the wheel.

This grinder can handle a 6" wheel.  It has a 1" arbor (right word?) for the wheel to sit on, but that part is only about 5/16" long.

Pointing to the part of the arbor on which the wheel is mounted

The threaded end of the arbor is RH thread!  I thought they were typically LH thread so that the action of using the grinder won't loosen the wheel.  Heck, maybe this one was made for left handed users.  The tool rest can move to a second location that would make this possible.

You can see the tool rest in two of the above pictures.  It's a simple "L" bracket with a slot on one arm for adjustability.  It is fastened to the grinder with a slotted screw and a square nut.

The tool rest

The crank handle is secured with a hex nut.  But when the nut is removed, I still can't remove the handle!  Sometimes there is also a set screw holding the handle on, but it doesn't appear to have one.

The handle and its nut

There are two oil ports that are stopped up with short screws that have knurled heads for easy opening.  The upper one allows oiling of the small gear wheel and the lower port oils the shaft that the handle turns.

The oil ports and screws

The inner works are accessed by removing four screws on the clamp side of the body.

Pointing to one of the four screws
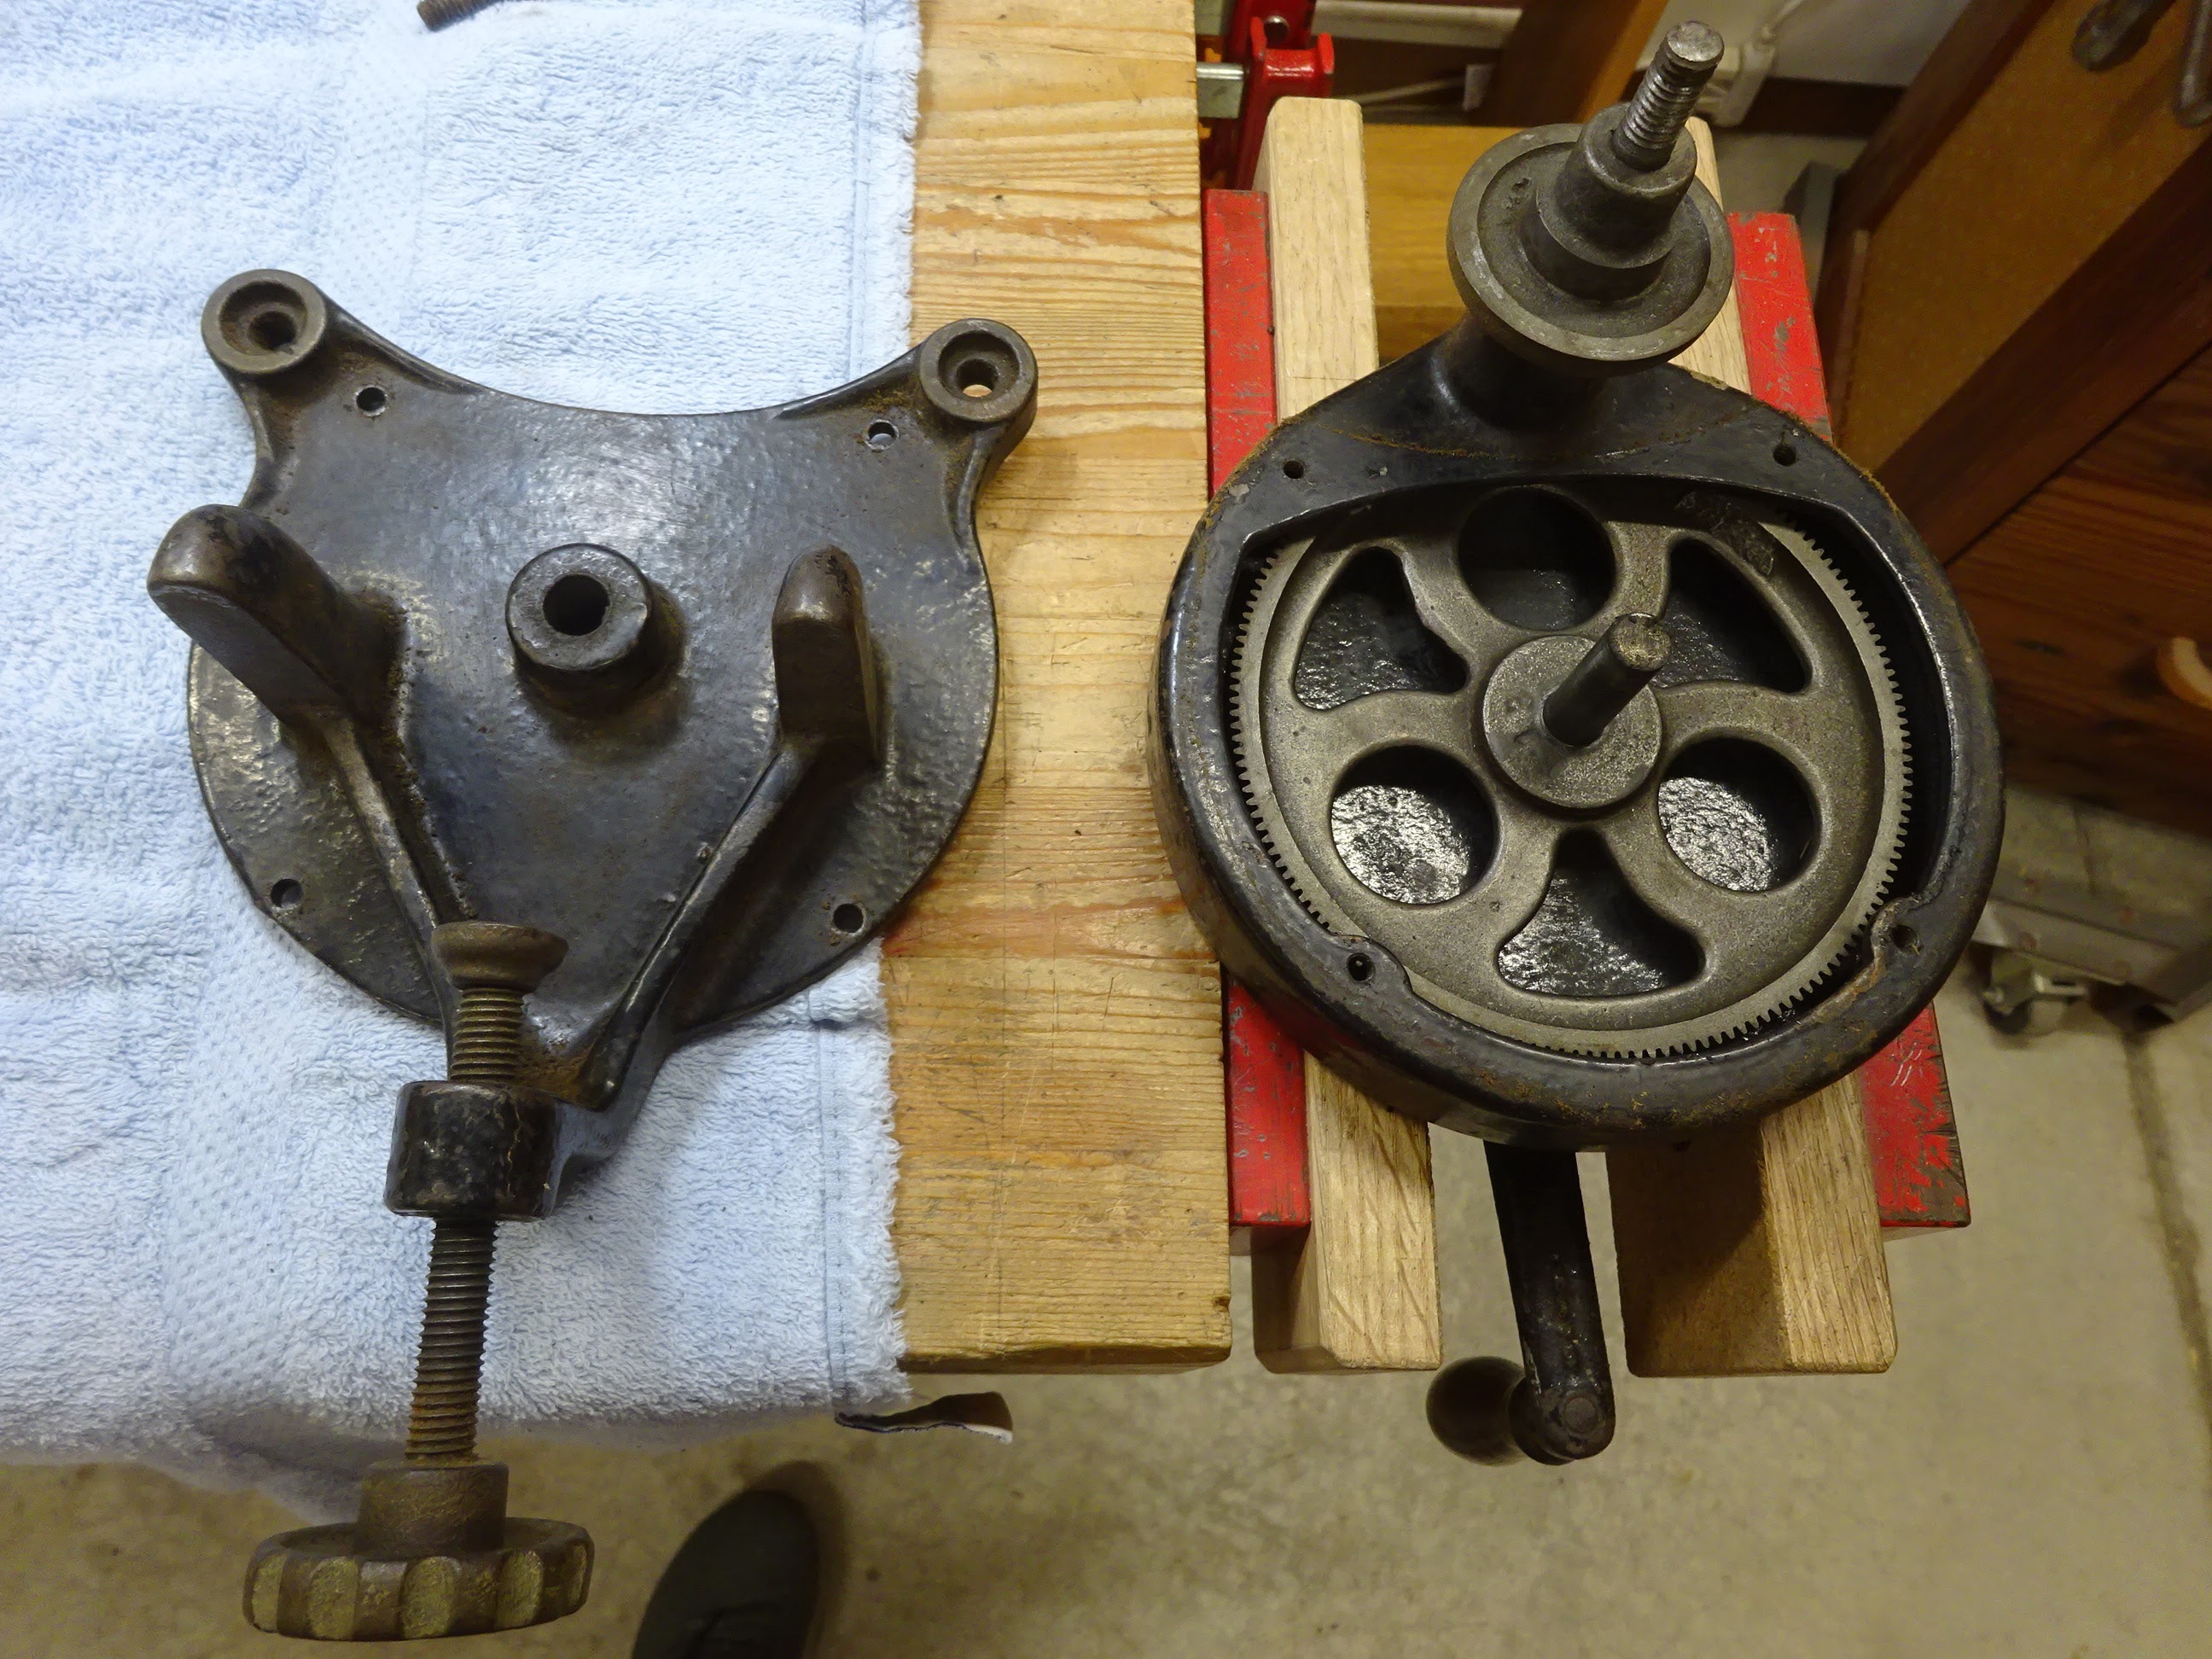
The inner works

Close-up of the large gear

Best as I could count, there are about 156 teeth on this gear and none are broken.  But the inside of this grinder was dry as a bone!  I mean there was virtually no evidence that there was ever any grease or oil in there.

I couldn't access the small gear, but I tried to count teeth through a small slit.  There might be 10-12 teeth, but I could easily be mistaken.  What I do know is that for every turn of the handle, the grinding wheel turns about 13 times - the math works out to having 12 teeth on the small gear.  This is the same turn ratio as for my other hand grinder.

Peering through an opening, you can see a bit of the small gear.

The big difference with this grinder and my other one is that the gear teeth are straight across - that is, they run 90° to the tangent line of the gear.

Gear configuration of my first grinder where teeth are angled relative to the tangent

When the grinder was reassembled and oiled, it was still a little rough.  But I could tell that there was a little play in the location of the large gear.  With the gear cover screws still undone, the large gear meshed better with the small gear if I physically moved it closer to the small gear.  So I was able to tighten the two upper screws with the gear in better position and then tighten the lower two screws and this seems to have helped.  The grinder turns much better now - not as smooth as I would like, but better.  Maybe the other grinder, having the angled gear teeth, is just plain smoother.

I noticed some wobble in the wheel when reinstalled.  The wheel wobbled both side to side and front to back (not concentric with the arbor).  The side to side wobble can be fixed with paper shims between the wheel and the flange.

Four thicknesses of paper at upper left, two at upper right took care of side to side wobble

Another shim (piece of soda can) was placed between the arbor and wheel
 to fix the front to back wobble

The above fixes were done with a different wheel than the one that came with this grinder.  I might have to use a different shim layout if I switch wheels.

Finally, If I do use the wheel that came with this grinder, I needed to clean it up.  I put it on the stove in an old frying pan filled with water and boiled it for about a half hour to an hour.  This cleaned a lot of the crap off the sides of the wheel.  I then used a stiff wire brush to continue the cleaning and now it is almost like new.

The wheel as found ...

... and after being cleaned up

So, now I have a second grinder.  It'll really come in handy when a different type of wheel is called for - no more switching.

Thursday, October 13, 2022

North Bros. #233H Driver

This North Bros. #233H Yankee Handyman screwdriver was the first tool I cleaned up from the items found at an estate sale a few weeks ago.  This post shows some inner workings and describes what was done to clean it up.

It's a small driver, about 10" long fully extended

In the center area, there is a switch that changes the spin direction of the bit.  With the switch forward, a push spins the bit clockwise to tighten a screw.  Center locks the push.  With the switch at rear, a push drives a bit counter-clockwise.

Center position  - push and rotation are locked out

Yankee Handyman

The heel end unscrews to get at the spring mechanism that returns the screwdriver to extended position after each push.  Many Yankee screwdrivers are found with these springs removed.  I read somewhere (a few years ago, so trust my memory or not) that users felt the spring-back unnecessary or possibly a safety issue.

End cap removed.  When installed, the cap surrounds the thin metal handle.

Unscrewing the spring cover allows the spring to come out

I'm pretty sure that's a wooden plug at the end of the spring - nice!

Looks like the handle is just sheet metal wrapped into a cone shape.
Or maybe it was damaged and was originally an intact cone.

This driver had tape wrapped around the handle.  I thought about taking the tape off to see what was underneath, but decided against it.  No doubt the tape was not original, but something had to keep the user safe from the edges of the wrapped metal handle.  Maybe if I had some extra bicycle handlebar tape or hockey-stick tape I'd replace it.

The center shaft has a thin tubular brass (or bronze or copper) piece surrounding it.
I couldn't remove it, but that may be what holds the handle on.
It was fit over the shaft like a slit-tube spring.

The inner works near the switch were interesting.  The parts in the following pics are pretty dirty.  All were cleaned up and oiled where necessary before reassembly.

Unscrew this nut from the end of the cylinder

It is free to slide up the shaft

After playing around, out popped this brass fitting that engages the threaded shaft.
Note the teeth are on the left end of this fitting.

Pressing the switch allows the cylinder to move forward, revealing the innards

The switch comes right off - it has a leaf spring on its underside.
The leaf spring presses on one of two funny-shaped plates (see below), depending on switch position.

Then there are these two interestingly shaped plates (one is removed).
They each engage a brass fitting, though not at the same time - it depends on the switch position.

Dental tool points to those two shaped plates.
Only one brass fitting is shown - the other slid to the right on the shaft
(it's hidden by the cylinder).

I spent some time cleaning up all these small pieces and getting rid of the gunk built up over the years. Dental tools, tooth brush, brass wire brush were all used.  After reassembling, there was some problem with the forward/reverse settings not fully engaging.  The driver would work perfectly first thrust, then lock.  I found that by holding the switch down while pushing, it worked fine.  So I took it apart again and found that by bending the leaf spring (on the underside of the switch) a little, the problem was solved.  It just needed to put a little more pressure on the engagement plates.

One last thing.  When putting it back together, a small piece fell out the opposite side from the switch and plates.

Hmmm, what does it do?

OK, that's where it goes (in that slot) and stays in place when the cylinder is replaced.
Its function (I believe) is to keep space between the two brass fittings.

After oiling the moving and sliding parts, the screwdriver works perfectly, probably as good as new.  One thing odd about this one, though.  The other push drivers that I've seen all have a locking mechanism that holds the shaft within the driver.  This one has no such mechanism, so the spiral shaft is always visible and subject to dust and crud.  So I cut a plastic straw to the length of the exposed shaft and then slit the straw lengthwise.  I'm using the straw as a cover to keep the shaft safe from dust when not in use.

Plastic straws have many handy uses

And finally, here's a shot of it all cleaned up, hanging out with some bits.

The chuck bit is really handy - it'll allow the use of any 1/4/" hex driver bit

These push drivers are great tools.  For the work I do, the longer ones seem to be more useful.  But this one will be a nice addition to the shop for when smaller work is done.

Thursday, October 6, 2022

Estate Sale Finds

Tool hunting has been very slow the last few years.  But checking Craigslist once a week for promising garage or estate sales can pay off - you just have to be patient.  A few weekends ago, I found some interesting things.  And if I had gotten there earlier, it might have been much better.

A jumble of tools

When I took this box of tools up to the sales person, he said "for the whole box ...... $20."  I said I didn't want to steal from them - I gave him $30.  Still a steal!

Here's what I got

There's nothing spectacular here, but I'm very happy about it nonetheless.

First is an unknown maker hand-cranked grinder

This grinder needs work.  The handle spins and the wheel turns, but when I go even a little fast, the gears sound terrible.  Hopefully it's nothing that a good clean-up won't fix.

#233H
NORTH BROS. MFG CO.
PHILA. PA.
MADE IN U.S.A.
PAT. - 103676

This small driver was also pretty rough.  With it, there were two small slot-head screwdriver bits and a chuck attachment so it can handle any 1/4" hex shank driver bit.

Next up was this 10" brace.  Markings included:
PINE KNOT    and
NO. 3410

The jaws were kind of bogus - I prefer the older jaws that have some type of wire spring

This brace looks OK.  I hadn't heard of the Pine Knot brand, but according to a post on Sawmill Creek, it was a brand of Belknap's.  Belknap, of Louisville, KY, was in business from 1840 to 1986 and was a competitor of Sears and Montgomery Ward (ref: Wikipedia).  I'm sure it'll clean up fine and be usable.  There was one auger bit, a 3/8" (#6), but it looks unusable due to filed-down spurs.  It was also by Belknap; the brand was called "Bluegrass".  The guy at the sale told me someone walked away earlier with the rest of the bits.  Dang!

Next was this large square with 12" blade.

Unknown maker 12" square

This thing looks awesome!  Maybe I'll see some identifying mark when I clean it up, but so far I can't see anything.  I like the brass inlay where the blade is held in the stock.

Brass inlay is a nice touch

UPDATE: I cleaned this up and found it's a Stanley (no model number).  It looks fantastic now.  The brass cleaned up great and I'm pretty sure the wood is rosewood and looks fantastic with a couple coats of shellac.  The square was slightly out-of-square and I did a little work on the blade and on the brass wear plate to bring it into better condition - not quite perfect, but pretty dang good.

Bright and shiny

Just before I left the estate sale, I looked in another box I'd not seen and there was this spokeshave.  And I'm thinking, how did I not see this before?  Again, nothing special, but should be functional.

Nondescript spokeshave

No. 151

The only indication of a maker is on the iron: Stanley.
It says "MADE IN U.S.A." - maybe it's a bit older than I thought.

UPDATE: The spokeshave is now cleaned up and works fine.  It took a long time to get a reasonably flat back on the iron.  It had never been flattened and the cutting edge was in horrible shape.  But it's sharp now and cutting fine.  It's probably no older than the 1970's (or even the 80's?), but the iron says "Made in USA".  Perhaps the iron was made in the USA, but it's hard to imagine the body was.

Finally, there was this little hammer.  I picked it up to use as a plane adjusting hammer.  One end has a Warrington-type striking face.

Nice little hammer with figured wood handle

There was no maker's name that I could make out - the 4" long head had lots of small dents.

I'll be cleaning these tools up over the next week or two.  If they're worthy of a few words, I'll write about the rehabs.