Thursday, September 30, 2021

Red Alder (Alnus Rubra)

My last two projects used red alder and I thought I'd write a little about the wood and my experiences with it.  I have a couple of books that talk about the most commonly used trees, but neither of them includes red alder.

Alder is a member of the birch family.  One of 10 species of alder in America, red alder is the only one that grows large enough and in abundance to be commercially useful.  It usually grows from 50-75 feet tall, occasionally reaching 100 feet.

Internet image: red alder tree

Red alder is the most common and important of the hardwoods in the Pacific Northwest, making up to 60% of the hardwood volume there (not sure if that means volume of hardwood out in nature or in commercial use).  It typically grows within 120 miles of the coast from central California up through coastal British Columbia and into southern Alaska.  Nearer the coast, it grows on cool and moist slopes.  When growing further inland, it is mostly near water drainages (water courses and wetlands).
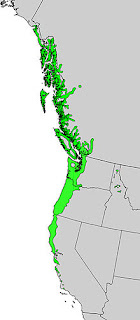
Image from Wikipedia:
Range of red alder in Pacific Northwest

The bark is gray to whitish, and fairly smooth.  With age, many white lichen spots grow on the bark, giving it a mottled look.  Tufts of moss will also grow on the bark.  The inner bark and wounds turn a red color when exposed to air, giving the tree its name. 

Red alder bark
(Image from nativeplantspnw.com)

While on a hike recently I thought I might have come across red alder.  But when I consulted my Pacific Coast Tree Finder pocket manual (reference below), it appears to have been white alder.  Most of the references I've viewed say that the leaves of the red alder curl at the edges, but none that I saw on the hike or in internet pictures seem to show that.

My copy of Tom Watts' Pacific Coast Tree Finder pocket manual

The page for red and white alder

The leaf from my hike looks more like the white alder

The tree is what is called a "pioneer" species.  It colonizes quickly after soil disturbance - either from flooding, logging, fire, etc.  It grows quickly, which it must, as it does not tolerate shade well.  If lots of seeds germinate, those that grow more quickly will shade out and stunt or kill the smaller trees.

Stands of red alder trees will be found with a dense undergrowth of bushes and ferns.  Its roots have nodules caused by a certain kind of bacteria that "fix" nitrogen in the soil, making it better for other plants to grow.

I read about many uses of red alder wood.  It is low in pitch, making it good for smoking meat and fish.  It is used for furniture, flooring, turning and carving.  Lower grades of the wood are also used for pulp, plywood and chips.

A small carving I recently did in red alder
(thanks to Mary May's YouTube video of same)

The twin shoe shelves I finished a few weeks ago

The coat rack recently completed

The wood is diffuse porous with nicely consistent grain.  I've attempted to take a photo of the end grain, but see Eric Meier's site (link below) for a far better picture at greater magnification.

End grain photographed through the 3X lens of my magnifying glasses

I found the wood very nice to work with hand planes as well as saws and chisels.  The end grain planed fairly easily, also.  However, the plane soles and saw plates needed constant oiling.  Otherwise, they would drag (more so than other woods I've used).  My research found that the wood has little pitch (not sure if that means not resinous), but something in the wood made the tools drag when not oiled.

A few other details: although the wood is described as moderately hard, I found that it can dent fairly easily.  Various sites say that there is little to no difference between heart wood and sap wood.  But some of the boards I used had fairly clear differences.  Not as stark as some woods, but the sap wood was definitely lighter.  Red alder has poor rot resistance.  I would not choose it for outdoor projects.  It might last several years outdoors if not in contact with dirt, but I have no experience with it for such projects.

My projects have been finished in shellac, which resulted in a beautiful honey color and it should darken with time.  I think the wood is quite attractive and will use it again if/when the chance comes.  From what I've read, the world will be seeing more red alder in the future as it has become more popular for furniture.


Sources:

Pacific Coast Tree Finder, 2nd ed. by Tom Watts (pocket manual for identifying Pacific Coast trees)

https://www.wood-database.com/red-alder/  (Eric Meier's great site)

http://owic.oregonstate.edu/red-alder-alnus-rubra  (info from a forestry products point of view)

https://www.naturallywood.com/species/red-alder/  (site promoting BC forest products)

https://en.wikipedia.org/wiki/Alnus_rubra  (usual Wikipedia stuff - lots of good info)

Friday, September 17, 2021

Coat Rack, Part 3: Finishing Up

Last time, I had cut the required dadoes, shaped the sides and dividers and glued a front "lip" to the shelf.  Here's a dry assembly of the rack.  The top will be glued to the upper edge of the back.

Dry assembly

As a reminder, the two dividers are housed in through dadoes in the shelf, and I added a screw to each from below.  The fronts of those dadoes are covered by the front "lip".  The shelf fits into stopped dadoes in the sides.  And the back fits into rabbets in the back edge of the sides.  The back is screwed to the rear edge of the shelf, as well as to the rear edge of the dividers.  The dadoes joining sides to shelf were later glued, and to give more assurance that they don't come apart I drove a few nails at an angle through the back and into the sides.  I pre-drilled first because the nails were close to the back's end.  Normally, I like to minimize metal fasteners, but this time I decided to use them.

Adding a few coats of shellac before glue-up

Rarely do I add  finish to a project before gluing it together.  But this time it seemed like it would be easier if I did.  I avoided any areas that would get glued and gave 3-4 coats of shellac, sanding lightly between coats.  after glue-up, I added a coat of paste wax.

Take a look at the grain on the piece that is glued to the upper edge of the back.  Holy schlamoly, what figure!  It really popped with the shellac added.  When you walk past it, the dark areas turn light and the light areas turn dark.  When planing it, I needed freshly sharpened irons with a very light set to avoid tear-out.

Another part (underside of shelf and front lip) showing spectacular figure

The glue-up was uneventful - only four dadoes needed to get glue.  Mounting it on the wall was fairly easy, too.  I drilled holes centered laterally in the first and third upper spaces, about 3/4" up from the shelf.  Then with the rack held level up to the wall, I used those holes to mark the wall for drywall anchors.  A washer and screw through each hole hold the unit to the wall.

And here it is, mounted on the wall and looking messy.  The extra hooks that I'll mount on either side of the current five hooks should arrive this week.

The piece in situ

Frontal view

Now it's on to something else, but I don't yet know what that will be.  Catch y'all  down the road.

Thursday, September 9, 2021

Coat Rack, Part 2: Joinery

Last post I had settled on a design and completed the stock prep.  This week was about getting parts to the right size and cutting joints.

I'll start off with a tip for an awkward sawing situation.  When cutting to length, the back overhung the bench by several inches (because I was too lazy to lower the back adjustable lip of my bench).  I needed to saw off about a half inch and the overhang leads to vibration.  So I clamped a thick stick of wood near the cut line and sawed away.  The stick removed the vibration and made the cut easy.

Cutting to length with no vibration

On to the joinery.  The side pieces get a stopped dado that will house the shelf, and a rabbet along the rear edge to fit the back.  The 3/8" deep dado was chopped out with a chisel and its bottom smoothed with a router plane.  After marking the extents of the rabbet with a marking gauge, the 3/8" deep, 1/2" wide rabbet was planed with a homemade 3/4" rabbet plane and an old D.R. Barton skew rabbet plane.

Stopped dadoes in the yet-to-be-shaped sides

The rabbet cut along the rear edge

The shelf had two through dadoes cut into it that will house the dividers.

One divider fit into its dado in the shelf

At this point I could partially assemble the coat rack.  Normally I like to minimize the use of metal fasteners in my projects, but I decided to add screws through the back to hold the vertical dividers as well as the shelf.  I also added screws on the underside of the shelf into each divider.

The back screwed to vertical dividers and shelf

View from the front (dividers were later cut flush with the front of the shelf)

Next, I glued on a small lip to the front of the shelf.  This will keep things on the shelf from falling out.

Gluing on the lip

Last thing for this update was shaping the sides.  I had made a template from some thick paper and transferred the shape to the sides.  The shape was cut out with a coping saw.  I've seen people use a two handed grip on the handle, but I like to use one hand on the handle and one on the far end of the saw.  It helps me keep the saw stable, level and straight.

When I sawed out the shape for the dividers, I cut away from the lines and pared back to them using an incannel gouge.  But for the sides, I cut closer to the lines, then used rasps, files and a scraper to smooth the curves.


Starting the curve cut with coping saw

Smoothing the curve with a sharp scraper

This project is in the home stretch.  I need to glue a top piece to the upper edge of the back, then assemble the whole thing and add some shellac.  We just ordered a couple extra hooks on which we'll hang some things other than coats - keys, purse, etc.  Hopefully they'll look OK with the current hooks.  I'll report back next time.

Thursday, September 2, 2021

Coat Rack, Part 1: Design and Initial Stock Prep

Immediately on the right as we enter our house is a metal coat rack.  A few years ago I embellished it by making cherry "leaves" that sort of match the motif of the rack, and sticking them on the coat hooks.  But it has always seemed like we need something more.  For one thing, we could use more hooks.  We also need a place to throw keys and (in the winter) hats.

The existing coat rack

It doesn't hold the keys - they're hanging on the door lock to the right

SWMBO wanted the design to incorporate the existing metal coat rack.  And she wanted the coat hooks to be at about the same height as they are now.  The width dimension is governed by the wall on which it will reside, which is about 36" wide.  The depth dimension should not be so great that people hit their noggins on it when entering the house.

An internet search gave me some ideas.  And I borrowed from a coat rack Bob Rozaieski had made earlier this year.  Here are some ideas that I messed with.

Version 1 - this is very similar to Bob's design

Version 2 - dumped the top, but the wife didn't like that the upper and lower
curves on the end pieces were similar

Version 3 - changed the lower curve to convex.  Nobody liked this.

Version 4 - Similar to design 1, but internal dividers have concave curve.  Meh.

Version 5 - Upper curve changed to convex.  No good.

Version 6 - lower curve squared off.  Just plain ugly.

Version 7 - Much like version 2, but the lower curve is smaller

I liked version 2 the best, but we settled on version 7, which is very similar.  Karene just didn't like the top-to-bottom symmetry of version 2.

Close-up view of version 7

From the sketchup model, I got my cut list.  I'm using red alder, same as the two shoe shelves I completed last month.

Cut list and a few detail drawings

Starting to break down the stock

Three of the parts I need are thinner than the (roughly) 3/4" thick boards, so I thinned them down using a heavily set scrub plane ( a repurposed #5 with a cambered iron), followed by planing with the grain and finally a smoother.

Traversing with a scrub plane to reduce thickness more quickly

Gluing up the 1/2" thick back

I've got all the parts to rough size now.  Next time I'll write about laying out and cutting the joinery, which consists simply of dadoes and rabbets.  The shelf will fit into stopped dadoes in the sides.  The dividers will fit into dadoes in the shelf.  And the back will fit into rabbets at the back of the sides.