This is part 2 of the posts about a Disston D-23 crosscut panel saw that I found at a garage sale a few years ago.
The handle was scraped (including the crud inside the carved leaves) and sanded and given a few coats of BLO/turpentine. It looks pretty good now, and I'm guessing the wood is apple.
 |
Handle removed and partially scraped
|
 |
The handle darkened quite a bit with the oil
|
The brass saw nuts and medallion were cleaned up with a wire wheel in the drill. The saw plate needed a lot of work. Remarkably is was almost perfectly straight. But it was pretty grungy. After scraping off the heavy gunk with a razor blade, sandpaper was wrapped around a flat block and used to remove a lot of the black oxides. On the left side I was careful not to affect the etch.
 |
Right side ready for sanding - this is a very messy task
|
 |
Sanding in progress - avoiding the etch
(etch area is darker more due to the lights than lack of sanding)
|
 |
| Then into a citric acid bath and here ready for more sanding with 150 through 400 grit |
 |
Left side
|
 |
Right side
|
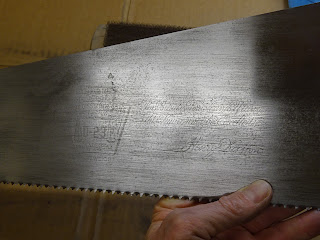 |
Etch still visible
|
OK, on to the sharpening. This saw was used a lot, though probably not for many years. It was not originally this way, but the tooth line was slightly breasted and I aimed to flatten it. Also, the teeth were not evenly spaced. This was an 8 ppi saw and I'm trying to get it back to proper spacing. The last four inches near the handle were particularly rough and I ended up settling for what I could get there.
 |
Filing straight across (no fleam) to regain proper shape
|
 |
Using a spacing template - note the template peaks are at the left side of the flats here.
I put pressure laterally left to "move" those teeth left. |
 |
A little further down, the template peaks are at the right end of the flats.
I used lateral pressure right to move those teeth right. |
 |
But at the rear of the saw, the tooth peaks were nowhere near the template peaks.
|
Just getting these rear-most teeth closer to proper position led to a large drop in tooth level, relative to the rest of the teeth.
 |
Held against a straightedge, you can see that the
last few inches of teeth drop away |
It took two rounds of jointing and filing just to get those last teeth in the ballpark, and even so they're not near perfect. Maybe with a lot of use and repeated sharpening I can get it more even.
When I got that as even as I could, I sharpened the saw with 20° fleam and 14° of rake. I did this very carefully as I have a tendency to end up with uneven gullets (cows and calves). But I went slowly, going from both sides and sneaking up on the disappearance of the tooth-top flats.
And here she is. The saw is still missing a saw nut, but I put the missing one in the middle - it had been at the bottom - and the handle is rock solid.
 |
Glamour shot
|
I made a test cut and it cuts beautifully. I can't imaging this saw will supplant my 100 year old D-115, but I'm looking forward to using it.


I have a bunch of saws to play with to get more sharpening skills but always move this to the end of the list. This will get a nice exercise for the winter period. What I find difficult is to get consistency across the blade length. Sometimes I applied mor pressure sometimes less, not easy with my fat fingers !
ReplyDeleteCrosscut saw sharpening can be tricky. Even if you use the same pressure and same number of strokes in each direction, you can end up with cows and calves. I've found what works for me is to approach it like other aspects of woodworking - lay it out carefully and cut (file) carefully to the layout lines. It does get better with practice!
Delete