This post might be a bit picture-rich. A lot of the pics were taken to help me put this thing back together the way it is supposed to go. I bought this vise a month or so ago from a nice woman who had to stop working wood (mostly carving) due to wood allergies. She lives on the Pacific coast where they get a lot of fog, so the humidity is much higher than where I live (very low humidity - I get practically no rust), so the vise developed a bit of rust while sitting in the back of her garage.
 |
| The Record No 53E with rusty main screw head and tommy bar |
 |
| Rusty alignment rods / slides - that can't be good for this vise's action |
There was a lot of caked on grease/dust/crud. Wood dust will hold moisture, which can't be good for the rust situation.
 |
| Crud at the front |
 |
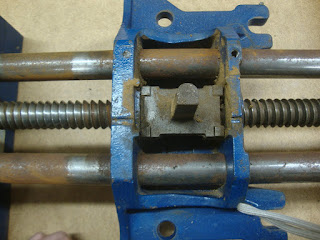
| Crud in the half-nut and its housing area |
 |
| Crud around the quick-release spring |
One of the first things I noticed about the vise was that one of the two bolts that fixes the half-nut cover bracket to the vise body had broken off.
 |
| Bold on right is not just missing ... |
 |
| ... as Bill Murray would say "It's in the hole!" |
First time I've ever had to do something like this. After removing the bracket I squirted some WD-40 into the hole and let it sit for a while. Then I hit the hardware store and bought a screw extractor. It's got a reverse thread. You first drill a hole into the existing screw with a standard bit, then you screw this little gem into the hole and it bites the inside of the hole and slowly the screw comes out.
 |
| For a few bucks my problem was solved |
 |
| Screw drilled out about 1/4" deep |
 |
| Voila |
This was WAY easier than I thought it would be. I've drilled metal only a couple times before. Before drilling, I gave the center of the broken-off bolt a tap with a center punch so the drill would stay centered. While I was at the hardware store I got a replacement 1/4"-20 hex head bolt - I love it when stuff uses off-the-shelf hardware.
I figured that the key to taking this vise apart was to remove the end bracket that holds the back end of the screw and two alignment rods in place. But to do that, I had to remove the pin that keeps the bracket on.
 |
| End bracket capturing the back end of screw and sliding rods |
The pin was a challenge to get out. I tried tapping it with a hammer, but that wasn't getting anywhere and I was afraid of mushrooming the end. A little research revealed that some pins are tapered so they only go one direction. This one measured the same 3/16" both sides, but one side was a little bigger at its end when measured in thousandths. A little ingenuity with a clamp solved it. Since my clamps have one swiveling pad I couldn't directly clamp the pin. So I drilled a 13/64" hole in a small piece of scrap wood, thick enough to take the pin in the hole. Then clamped down and the pin moved into the hole.
 |
| Left side of pin going into hole in the wood block |
Worked like a charm. Once the pin was flush with the main screw body, I used a small nail punch to get it the rest of the way out. This pin was interesting - it's got three slots at regular spacing around the circumference.
 |
| One of the slots in the pin |
It might be that these slots make the diameter slightly larger in the middle and make it act like a spring. Anyway, once the pin was out, the washers and end bracket came off easily.
Next the screw fixing the rocker bar was undone and the bar removed.
 |
| Rocker bar screw is at left |
And with that removed (and the cover bracket which had been removed earlier), the half-nut came out easily.
 |
| Half-nut in place |
 |
| Half-nut removed |
I also removed the main screw from the sliding jaw.
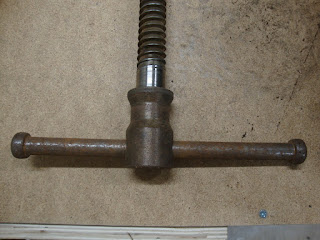 |
| Main screw and tommy bar removed |
The only thing that I couldn't get apart was the two alignment rods / slides. There are two covers on the front of the sliding jaw, but I can't get them off and I can't seem to unscrew the rods from the jaw. One of them turned about 1/12th of a turn, but no more.
 |
| One of the covers for the alignment rods |
 |
| And the other one |
If anybody knows that these are removable, please let me know how.
Next time, the clean-up, reassembly and some before and after pics.


You're going to be very happy with that vise.
ReplyDeleteThe funny thing about it Ralph is that I don't actually need it right now. I bought it because it was available and you never know when you'll find another as a decent price. If I ever have a larger shop and a second workbench that's where it will go. Or I could replace my Lee Valley QR large steel vise that is still relatively new. I'll have to think about it.
DeleteMatt, that's a great find.
ReplyDeleteI find it always exciting to dismantle tools and have a look how they are working. Always hoping to get it back together. Unfortunately I can't help you regarding your question about the alignment rods. Maybe Bob will have an idea.
Cheers,
Stefan
I like taking things apart too. But I really need to take pictures to remind myself of how things go back together. I wish I disassembled things more as a child - I think I would be better off now.
Delete