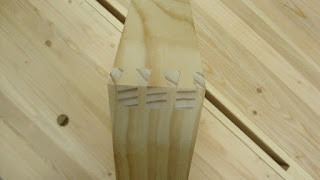
Regarding dovetailing, recently I mentioned a small issue when transferring the tail outline to the pin board. Sometimes it's tough to align the reference edges so that when the joint is completed the edges will meet properly. I often get an offset of a millimeter or so and have to plane one side to even them up.
 |
| Aligning the edges with a chisel |
Bob Easton mentioned a jig that David Barron did a video about (
https://www.youtube.com/watch?v=5I45mEWAJv4). So I decided to build the jig. Barron suggested making it from a stable hardwood, quartersawn if possible. I had some QSWO that was a table top in a prior life and squared up two pieces about 5 3/4" x 10" x 7/16" thick. Stepped out with dividers and marked 5 tails. Here, I'm using a backer board to extend the end grain lines to help me get a straighter cut.
 |
| Marking the tails |
I neglected to get any progress pictures while completing the DT, but it came out very tight. I've done VERY few DTs in hardwood and I'm thrilled about how these fit. They didn't fit right off the saw - there was some fitting involved.
 |
| Tight as a duck's you-know-what |
It's interesting to glue up a single dovetailed corner. I had to figure out a way to keep the joint at 90° while clamping the tails into the pins. I cut and planed a board to the proper length to support the free end and clamped to the bench.
 |
| An interesting clamping situation |
I had to tweak the position of the boards to ensure a 90° corner.
 |
| Bang on! |
After the glue dried, I checked the edges that I'll use as reference edges for square. This was done in both directions, squaring to the joint line.
 |
| Needed a little planing to make it right |
I screwed pieces of 3/8" QSWO to the reference edges, mitered at the corner, and sticking up about 3/8" from the jig surface.
 |
| The completed jig |
I gave the jig two coats of shellac and a coat of paste wax. To use the jig, cut the tails for your project board in the usual manner. Then the pin board gets clamped in the jig as shown below so that the end grain is even with the top surface of the jig and is pressed against the fence.
 |
| Pin board level with top surface and pushed left to the fence. |
Lay the tail board against the fence and adjust so the tails just overhang the pin board.
 |
| Tail board overlaying the pin board, both pressed against the fences to align their left sides |
Then while holding the tail board tight to the fence, scribe the tails on the pin board end grain with a pencil or (in my case) a knife.
 |
| Transferring the tail outlines to the pin board |
This test joint came out nice, though I didn't prepare my boards well to be able to see if the jig helped with the alignment issue. I didn't bother to square up the left edges, so they don't align perfectly well. But I'm confident this will help.
 |
| First test joint |
Making this jig was my first time doing multiple dovetails in hardwood. I'm very happy with how they came out and also very happy with how the jig works.


It's a nice jig and it should eliminate your annoying offsets. I made and used one for a while but I've gone back to using a ruler or a square to align my edges.
ReplyDeleteRalph, I guess time will tell if I use the jig long term. I do like it now, but maybe in time I'll go back to aligning the edges with the flat side of a chisel and resting the front of the tail board on the pin board and the back of the tail board on a plane that is laying on its side.
DeleteHi Matt,
ReplyDeletewell done. The DTs in Oak are looking good. I remember good about my first ones in Beech - patchy somehow. Anyway...
Got a question. If you are using the jig then you would use once the top edge and once the bottom as reference, or?
That means that you have to cut the tails pretty thorough. I'm usually referencing always to the same edge.
Hmm, have to think about it.
Curious to read how the jig will work in your next projects.
Cheers,
Stefan
Hi Stefan. I wasn't sure I understood your question, but maybe I do now. After finishing the layout of the first pin board (like pictured above), I can turn the jig around - vertical part goes horizontal and fence goes on the right side. That way, the reference edge of the tail board can always register against the fence.
DeleteHi Matt,
Deleteoh man. Yes you got my stupid question :-) Sure, turning the jig solves the "issue". Guess I had a knot in my brain.
Talk soon,
Stefan