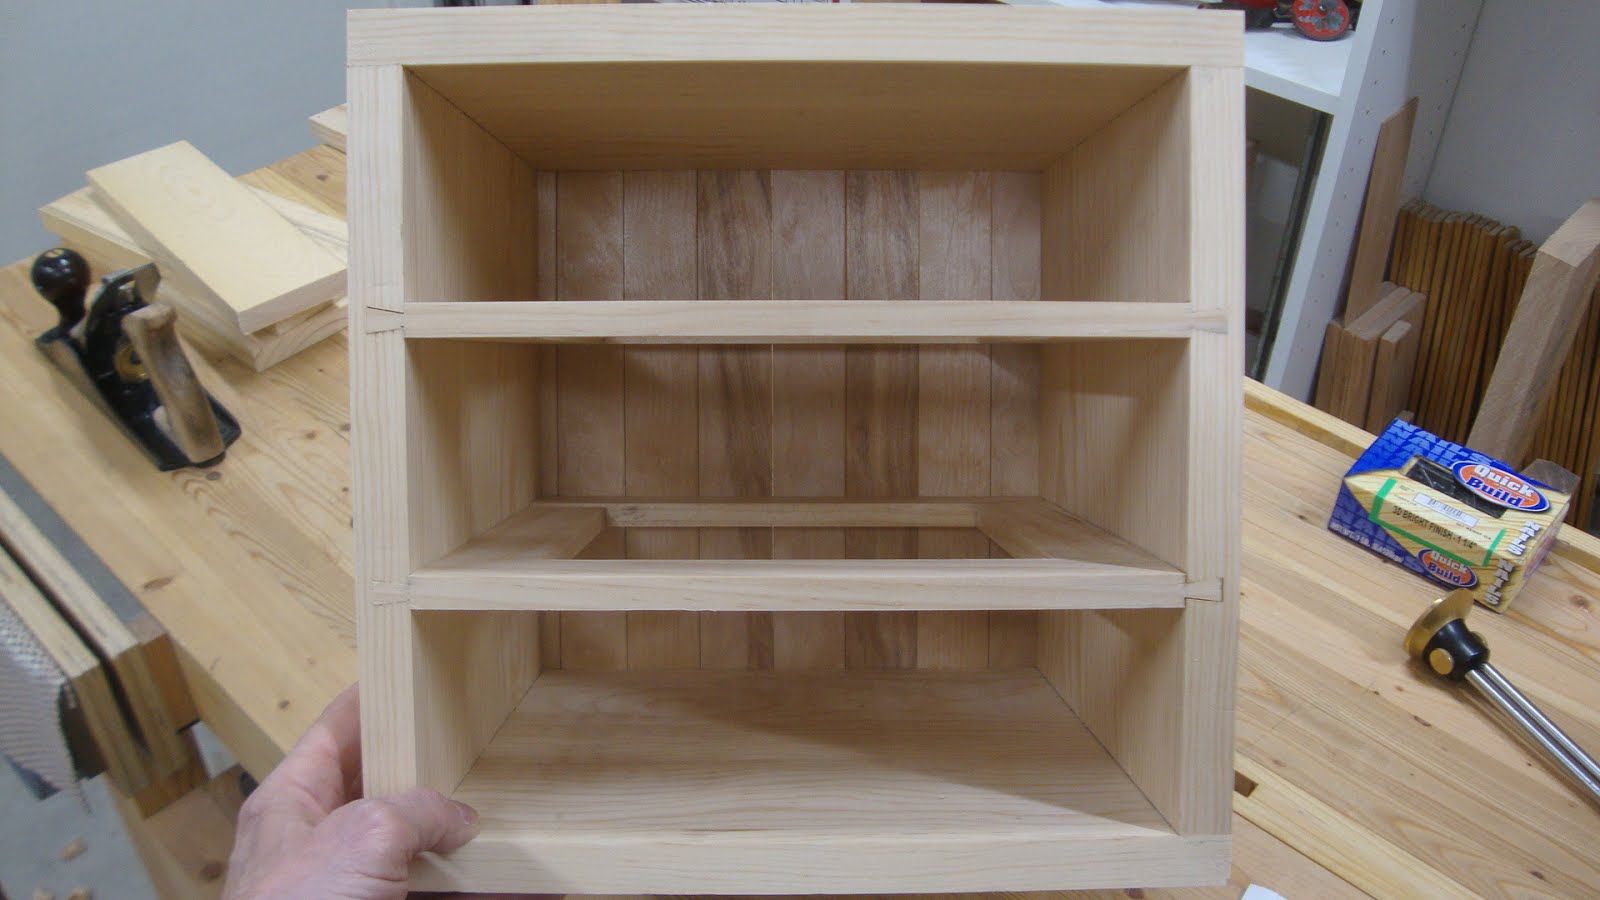
When I last posted, the carcase was glued together, the drawer dividers were installed and the back of the carcase was rabbeted to receive the 1/4" back boards. I used some wood that came out of my sister's old kitchen for the back. Each was about 1 1/2" wide x 1/4" thick and the length was planed to fit.
 |
| Testing fit of back boards |
Paper shims were used to give a little space between boards to account for seasonal expansion and contraction. 1 1/4" finish nails were used to affix the boards to the carcase and the nail heads were sunk into the boards with a nail punch.
 |
| Back nailed on |
I used the Sellers technique of pre-drilling the nail holes using a head-less nail as the bit. Worked great - no splitting even with these nails so close to the ends of the boards.
 |
| Back boards as seen from the front |
I spent a day or two milling the stock for the drawers. Scrap pine is used for the 11/16" thick fronts and poplar for the 1/2" thick sides and back - not sure yet what I'll use for the bottoms. I was going to buy some 1/2" pine for the sides, but it turned out that 3/4" poplar was cheaper than the 1/2" pine. So I had some planing to do to get the 3/4" poplar down to 1/2" and this was done in two stages to let the wood do its tricks before final sizing. On the first day the boards were planed to just under 9/16" and the next day re-flattened and planed to final thickness of 1/2".
I'm trying to use the drawer building techniques from "The Woodworker - The Charles Hayward Years". So the slightly oversized drawer front first got the bottom edge square to the front face and the left side square to the bottom edge.
 |
| Bottom edge square to face, left edge square to bottom edge |
The carcase must be very slightly out of square as there was a very tiny gap at the upper left side when fitting to the recess. That was fixed with a shim on the shooting board.
 |
| Tiny, tiny gap at upper left |
Next was getting it to length to fit snugly. With the front resting in position, the cut was marked and then planed on the shooting board to fit.
 |
| Bottom edge just barely fitting in recess |
Then it was just a matter of planing the top edge to fit into the opening.
 |
| Now that's a good tight fit |
To fit the sides into the recess, first the bottoms were made square to the outside faces and the front edges made square to the bottom edges. I'm marking this with "R" for right side and "L" for left side on the outside faces as in "The Woodworker".
 |
| Right side of drawer markings |
It was during the fitting that I realized a mistake. When I made the drawer dividers, I leveled the surfaces on which the drawers would slide. But I didn't level the underside of these dividers and with a tight fit, the sides can get hung up on the underside of the dividers.
 |
| Slight gap at front so that the left side could slide under the runner |
Good lesson learned for next time. Anyway, the sides were planed to a "hand tight" fit.
 |
| Left side in place |
I wasn't sure what to do about the length of the side because the bottom will be solid wood (not ply) and I needed to give some extra room at the back of the case for movement. I decided to make the sides 3/8" less than the depth of the interior. With the 1/8" lip on the half-blind dovetails at the front, that gives an extra 1/4" at the back. I'll have to install some drawer stops to keep the drawers from sliding too far into the case.
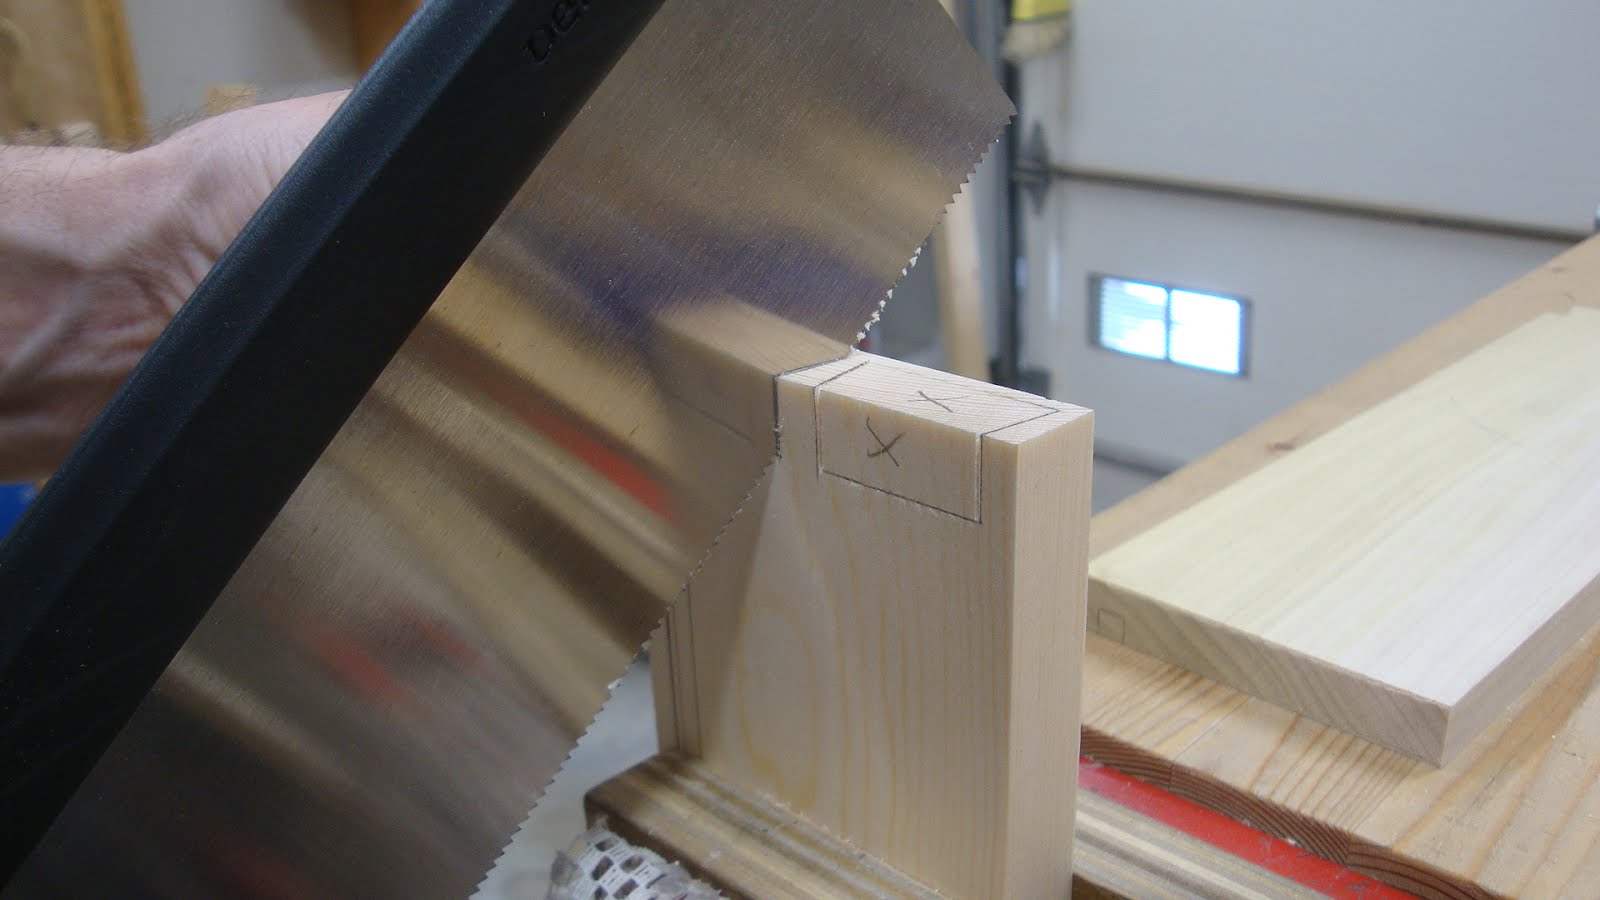
With the sides and back fitted (the back was fitted like the front - even though it will have less width eventually), it was on to the half-blind DTs. I set the baseline on the tail boards to about 9/16" - that will give the 1/8" lip on the 11/16" thick front.
 |
| Front DTs laid out |
In the pic above, you can see I marked where the groove will go. I needed to do this to know where to lay out the DTs so the groove won't show when assembled. Cutting to the lines and chopping and paring the waste went well. Poplar is SO MUCH BETTER than pine for chopping and paring. What a difference!! It's soft so the chisel takes big bites, but there are no hard and soft rings so the fibers don't get crushed.
Then the tail board was used to mark the pin board.
 |
| Marking the half-blind DT on the drawer front |
I sawed inside the lines, angling the saw.
 |
| Sawing to the lines |
Then is was chop, pare, chop, pare, chop, pare ...
 |
| Paring some waste |
When I was close to the baseline, I held the front vertically in the vise and with chisel in the gauge line pared the remainder.
 |
| Paring the last of the waste |
With a little fitting, I got a good fit. This is only the second time I've ever attempted half-blind DTs and I'm thrilled about this. My confidence is definitely growing.
 |
| I'll take that any day |
The left side went just as well - even a little better.
For the dovetails at the back, I needed to do a bit of thinking. The drawer back eventually will not be full width - its bottom edge will be flush with the top of the groove so the drawer bottom can slide under it and into the grooves in the sides and front.
 |
| Layout of the back end of the sides (ignore the right-most line) |
I'm having a hard time describing this, so pictures will have to do. In the following picture, the back will be cut to width so that its bottom will be flush with the top of the groove.
 |
| Joint at the back - the drawer side has the groove marked with an "x" |
And here's where it stands. Good tight joints all around.
 |
| Drawer assembled without bottom |
One thing is bothering me. There is a slight discrepancy in the levels of the bottom edges of the front and sides. I'll plane them flush today, but I hope it doesn't make the drawer out-of-square with the drawer recess.
Until next time ...


Good progress, im impressed. Meanwhile.... mine is...
ReplyDeleteSeriously, good works!
Bob
Thanks Bob. It helps that I can really focus on this. Not a lot of other distractions - except for house cleaning, laundry, blog reading, cat petting, etc.
DeleteGetting dovetails to go together off the saw still makes me giddy. The dovetails being off slightly is either you sawed the pin/tail a little off (I don't think it was this)or your initial line up for marking was off. I use a square to make sure the two line up.
ReplyDeleteI'm still cutting my pins shy of the line so I can pare a bit. I'm too nervous about trying to get it right off the saw and getting big gaps instead. So for now I'll pare. As far as your comment about using a square to line the two pieces up, I use a chisel along the side of the pieces to line them up. I saw something on Shannon Rogers' blog not too long ago - he uses two boards dovetailed together at a good 90° and each board has a fence and you can slide the boards up against the fence to align them. If I ever work with better wood that won't twist on me, maybe I'll try to build one of those. I thought it was a great idea.
DeleteI first saw that trick , using a guide board, for lining up the boards to be dovetail on David Barron site http://davidbarronfurniture.blogspot.ca/ Cant remember exactly where, but he had basically two boards dovetailed 90 degrees and a small fence running on each on one side to align the boards to be marked/dovetailed.
ReplyDeleteBob
Thanks Bob. I just looked at David Barron's site and saw him use the board on one of his videos. That's exactly the type of thing I saw on Shannon's blog and something I'd like to build.
DeleteHi Matt,
ReplyDeletegreat progress. One remark regarding the discrepancies at the bottom edge. Personally I often have the problem that the outer pins are out of level because my dovetails are too tight and so I push the pins out of level.
Maybe you will double check this.
Cheers,
Stefan
I hadn't thought about that Stefan. That's a great point. I'll make sure to check on that. I can try holding a straight-edge against the pin board to see if the pin is being pushed out. I'll be posting some more information later today (hopefully) about fitting dovetailed boards together.
Delete