A number of years ago my sister gave me a dining table and six chairs that had once belonged to my grandmother. Other than the fact that they were Nana's, they are not that special - not valuable antiques or anything. I scraped some finish off one leg and I think it was made of poplar. I used these chairs in my old house for several years, but when I moved a few years ago they went into storage. The chairs had been kind of rickety for many years and about 5-6 years ago I took one apart with the intent that I'd someday reproduce it. That day is finally here.
When I disassembled the chair, I labeled all the parts. This was fortunate since my memory isn't what it used to be.
 |
| The dining chair - all parts laid out |
They've been sitting in a box, first at my old house and for the last 3.5 years in storage.
 |
| Box-O-Chair-Parts |
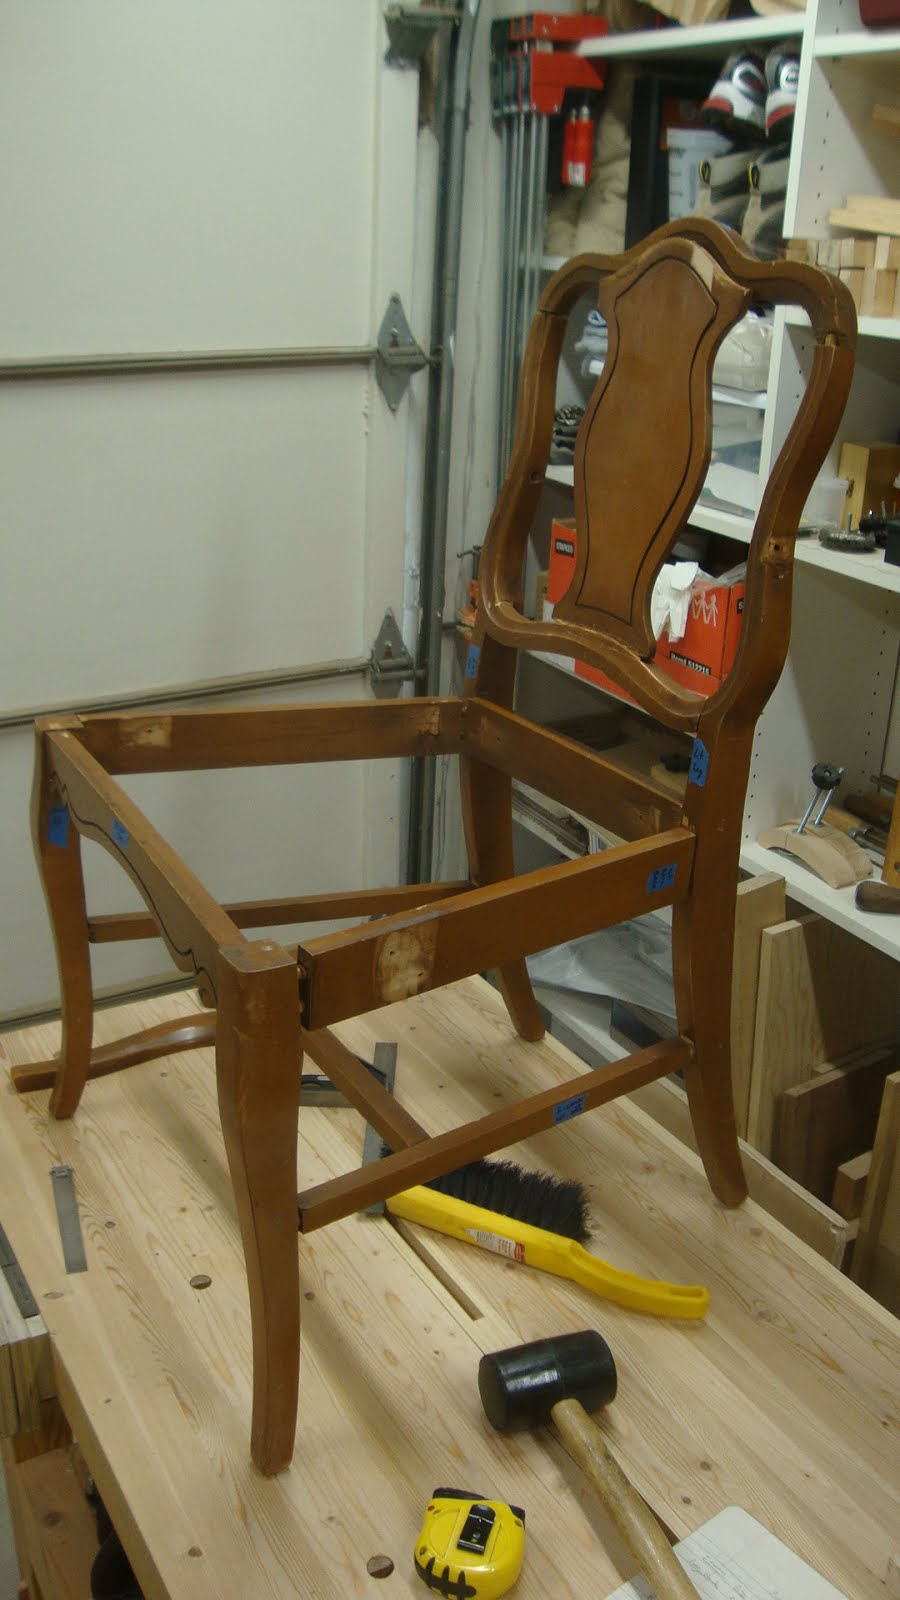
Here is the chair partly assembled.
 |
| The chair assembled minus the arms and seat |
The parts of this chair seem small in relation to the parts I used for the "Sellers" dining chairs that I built earlier this year. The original rails are of 3/4" material and I plan to use 7/8" for the new chair.
The original was put together with dowels, but I'm planning to use M&T joints whenever possible.
I got one of the other chairs from storage today to use as a model and get some measurements from. The front legs are 18 1/2" apart and the rear legs are about 13 1/2" apart. So, like the Sellers dining chair, the side rails are angled front to back. There are some interesting features to this chair that will really stretch my current abilities.
 |
| Another chair fully assembled for comparison |
Here is a side view of the chair showing the degree of curvature in the back.
 |
| Side view |
One of the tough things to figure out about this chair is the layout of the back legs. At seat level, there is 13 1/2" between the legs.
 |
| Back view showing distance between back legs |
 |
| Closer view at right side |
At the level of the lower rails, it about a 16th of an inch less.
 |
| Distance between back legs at lower rails |
 |
| Closer view at right side |
And at the floor, it is only about 13 3/16".
 |
| Distance between back legs at floor |
 |
| Closer view |
This could be explained if the side faces of the legs were slightly out of parallel with the front-back centerline of the chair. But it also could be that the loose joints and many years of use have twisted the legs out of their original position. In either case, it will make the construction far easier if the legs' side faces are parallel to the chair's front-back centerline. And that's how I'm going to lay it out and build it.
Another interesting tidbit about this chair is the connection of the back leg to the side rail that supports the seat. The back leg is curved and in the original that curve mates with a rail that has a square end. I'll be making sure there is a nice flat portion of the leg at this location.
 |
| Not such a good connection |
Here's another challenge. The following picture is of the left side of the chair looking down from above. You can see the upper side rail that connects the front leg to rear leg. But closer to the floor is the lower rail connecting front leg to rear leg (see the arrow). It's at a different angle from the upper rail. Because of the curvature of the lower part of the rear leg, the lower rail is about an inch longer than the upper rail and that changes the angle. That means the shoulders of the lower rail will be at a slightly different angle than those of the upper rail. Same for the tenons.
 |
| Left side of chair viewed from above |
Finally, look at the backrest. It comprises the two rear legs (the side uprights are the upper extents of the rear legs), a lower and upper backrest rail and a captured panel.
 |
| Backrest detail |
The panel will have it's own challenge when it comes to cutting the channel that is offset about a half inch from the perimeter. In addition, the panel is captured in stopped grooves in the curved upper and lower backrest rails.
 |
| Upper part of panel set in groove in upper rail |
 |
| Lower part of panel in it's groove |
 |
| Closer view of the channel at lower right of panel |
Now look at the joinery of the backrest. The next picture shows the lower backrest rail joined to the upright (the rear leg). You might be able to see that the rail is only about half the thickness of the leg at that point. Not sure why that was, but I might match the thicknesses of the two parts.
 |
| Lower right area of backrest |
The part I've been struggling with is where the upper rail joins the upright.
 |
| Upper right area of backrest |
This joint, like all the others on the original chair, was joined with dowels. I've been thinking about whether the joint would be better if the upright was longer and the upper backrest rail joined into it from the side (think "vertical" joint line instead of horizontal).
I'd like to get some feedback on this if anybody is still reading and wants to chime in.
I'm going to make this out of poplar, which I think was used on the original. I've got to go get some wood and start getting it to size. More later ...


I've a piece of a sideboard that my grandmother bought after WWII. It was throw away and I managed to save a part of the top. Can't bring my self to use it or toss it.
ReplyDeleteDowels are cheaper and easier to do than a M/T. That is what I would do on that joint.
The funny thing about this project is that I plan to sell the table and chairs after the chair is completed. It'll be a shame to get rid of Nana's table and chairs, but space is so limited and I don't see a need for them in the near or distant future. I will, however offer them to members of my family first.
DeleteHi Matt,
ReplyDeletethat sounds like an interesting project and I'm really curious to read about your experiences. E.g. I'm excited about the grooves in the round parts. I've done a triangular table last year and had some fun with angled tenons.
Whenever I can I would spent my two cents.
Cheers,
Stefan
It'll really be fun to figure out how to do some of these things that I've never done before. It might take a while, but I'm up for the challenge.
DeleteInteresting chair you got there. Yes, there are a few deceptively looking easier joints intjere. So all dowells probably mean, meant for fast production. Look carefully at where they drills the dowels. If any place show signs of weakness, improves on it.
ReplyDeleteHi Bob. Still cruising around the country? Many of the dowel joints have cracks and all are loose. The maker even pinned many of the dowels for good measure. That's why I wanted to use thicker wood and m&t joints.
Delete