Thursday, March 27, 2025

Making a Marking Gauge with Wooden Thumbscrew

This is the culmination of the wooden screw rabbit hole I've been in for several weeks.  It started from a Worth marking gauge I was given some years ago, the screw from which didn't fit the inside threads in the fence very well.

It all started from this

It turned out that the inside threads were the problem - they got wallowed out a bit and the screw would no longer hold.  So with my experience a few years ago making larger wooden screws and with the help of some online videos, I figured out how to make threads of the appropriate size: 3/8" major diameter at 10 threads per inch (3/8" - 10, for short).

To pull it all together, I made a new marking gauge.  The major challenge with this one was making the wooden thumb-screw.  I'll get to that in a little bit.  But first, I made a prototype marking gauge fence from scrap wood to see if I could create inside threads through the top and extending to the mortise that houses the beam.
I needed the prototype marking gauge to be at a specific height in
the threading box, so I planed a scrap piece and super-glued the fence to it.
Then ran the tap through the fence to make the inside threads.

And it worked very well.  Here's the original wooden screw
in that tapped hole - a nice snug fit.

Later I made a fence blank from walnut and repeated the procedure on the real thing.

Here's the walnut fence getting threaded

and I got a nice fit here, too

The walnut took the threads pretty nicely

Next I tested a 3/8" diameter piece of walnut to see how well it would take outside threads.  I had soaked it in mineral oil for a few days, and it worked out pretty well.

Testing a 3/8" walnut dowel for outside threads

And it fits an inside thread nicely

With that adding confidence, I laid out a wooden screw on a walnut blank.  I was careful to lay out precisely to keep things aligned.

Laid out the shape using the original as a guide

Then sawed and rasped the to-be-threaded end a little oversize and
tapped it through a dowel plate for a fairly accurate 3/8" diameter.

The extra material on the right in the above picture is so I could mount it in the threading box.  I formed that into a 5/16" diameter so I could use one of the couplers I'd already made (I realize that might only make sense if you had read the previous posts about threading small diameter wood).  Then I cut the outside threads and tested them in the walnut fence.

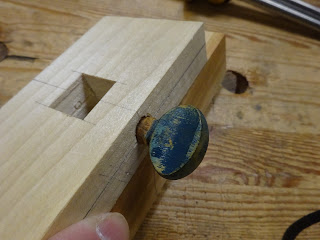
It fits nicely and it locks the beam solidly!

I cut off the extension on the back end and shaped the thumbscrew head similar to the original.  I also cut off about 1/2" of threads so that there's only about 1/8 to 1/4" of threads above the fence when the screw locks the beam.

At this stage, there's just a little shaping to do and then some coats of shellac.  Like my last marking gauge, I added wax to all outside surfaces, except the bottom of the beam.  That exception will help ensure the beam won't slip in its mortise during use.

It's looking like a marking gauge

I added measurement lines on the side of the beam that is visible to me (a right-hand dominant person) when in use.  I find the lines very useful on the original Worth gauge, and I don't know why more marking gauges don't have this feature.

I laid out these lines carefully - they go out to 6"

Almost forgot to mention - I made the pin from an old 3/32" drill bit.  It was annealed (though it was still very hard after annealing) with a torch and sharpened using a drill and hand-crank grinder.  It was a little loose in the 3/32" hole in the beam, so I bent it a little bit and now it holds well.

And here is the glamour shot.  When the screw is tightened, the beam will not go anywhere.  It clamps as solidly as a rottweiler on a postman's leg.

It's a beauty

I'm done with wooden screws for now.  It's time finally to move on to other things.

Saturday, March 22, 2025

Threading Small Diameter Wood - Part 3

Last time, I had some success threading 1/2" dowels and fitting them into 1/2" wooden nuts.  I had used a three sided box with dadoes that housed blocks.  One block holds a machine screw and nut with a specific pitch.  The end of the screw was modified to hold either a dowel ready to have outside threads cut, or a tap ready to cut inside threads in another block.  Another block simply gets an inside thread cut into it or it houses a cutter to cut an outside thread on a dowel that is fed into it.

Here's the box set up to cut outside threads on a dowel

After some experimentation, I made some improvements.  First, I wanted to angle one of the sets of dadoes so that the cutter mounted to it would cut outside threads at the proper pitch angle.  For the 1/2" - 8 threads and the 3/8" - 10 threads that I'm working with, this angles turns out to be around 5 degrees.  Without this angle, the V-shaped threads cut into a dowel would not be symmetrical: one side would be more vertical and the other side more angled.

This shows the angled block to account for the pitch angle.
The previous picture shows a straight-across block.

Second, I realized that my outside thread cutters were cutting a much wider thread than I want due to cutter angle and geometry.  So I modified the cutters to make a narrower cut (no pics of that).

Third, I made improvements to the methods of connecting the screw to a dowel.  Originally, I had used a piece of rubber hose and hose clamps, but these tended to slip.  Later, I made wooden couplers that used set screws to lock the screw and dowel in place.

Here's an early experiment with 5/16" tap cutting inside 3/8"-10 threads
in a block.  The machine screw has 3/4"-10 threads and the coupler is
made from plastic tubing, hose clamps and a split wooden ring to adapt the
5/16" dowel to the 3/4" ID plastic tube.

Now is where I get into 3/8" diameter screws with 10 threads per inch.  I use a 5/16" dowel for cutting inside threads.  In earlier experiments I just drilled a hole through a 5/16" dowel and stuffed a cutter in the hole to make a tap.

The little cutter was made from a steel hinge, rectangular in cross section
and fit tightly into the round hole drilled through the dowel.

That worked, but after the first use, the hole got wallowed out and the cutter wouldn't stay in place.  So I decided to try a different way to hold the cutter in place.  This method uses a set screw in the end of the dowel to lock the cutter in place.  But as you'll see, there were issues.

Drilled, tapped and put a set screw in the end of the 5/16" dowel.
Before tapping the hole, I fit the dowel into a 5/16" hole drilled in scrap.
This kept the dowel from breaking apart as I tapped.

Made a new cutter from an old 1/8" drill bit

After annealing, it shaped easily with hack saw and files

But after a few times tuning it into a (hopefully) new nut, it was destroyed.
This one was made from relatively soft red alder.

I made another 5/16" dowel from beech, hoping the harder wood would hold up better.  Then I ran it through another 5/16" pilot hole and it worked without getting destroyed.


Got the sample 3/8" screw through the nut

Some success!

The threads were very tight.  I'm pretty sure the problem lies in the profile of the external threads on the screw.  I'm using a 60 degree cutter, but I think the angle at which it is presented to the 3/8" dowel makes the effective angle greater than 90 deg.

After working on cutter geometry a bit, I got back to the screw to dowel connection.  The coupler is a block of wood with a 3/4" hole on one end and a 3/8" hole in the other.  Then I drilled a hole through the coupler and the 3/4" screw, as well as through the coupler and the dowel.  Both are pinned with wood pegs.

The new coupler has a 3/4" hole on one end ...

... and 3/8" hole on the other end.  After the screw and dowel are inserted,
a hole is drilled down through both and pinned with a small wooden peg.

First tried a very dry beech dowel.  It worked, but the beech didn't take threads well

I had soaked these two red alder dowels in mineral oil for a few days ...

... and this one took the threads far better than the dry beech.

Fits in the tapped threads in a block

But there's a problem: a flat spot with barely any threading

It turns out that the 3/4" screw is not sitting in it's block perpendicular to the block.  It's probably a few degrees off 90, so I shimmed the nut in the block and got it somewhat better.  The result of this problem is that the back end of the threaded piece wobbles as it is fed into the cutter and one side of the dowel gets much less threading than the rest.

Look at the difference in how these two took threads

Finally, I broke down and bought a couple things to help the situation.  The first was a 5/16" brass rod to make a new (practically indestructible) tap.  Similar to the above beech tap, it has a hole drilled and tapped down the center to take a 10-24 set screw.  The cutter for the tap is housed in a 1/8" hole drilled through the diameter of the rod.

Brass rod drilled and tapped - carefully to keep it centered

I also purchased a 12" length of 3/8" - 10 lead screw.  This was much easier to deal with than the large 3/4" screw.  And it also fit into tapped holes I had already made in blocks that fit the threading box.  And because the threaded blocks were aligned properly, the lead screw has very little runout.

Brass tap on left and 3/8"-10 lead screw on right.

The lead screw and brass rod have shallow drilled spots to allow
the set screws to engage them and hold them tight with no slippage

And this worked out great - got a nice thread in the block that fit the screw well

Well established 3/8"-10 inside threads

And here's where it ties back into the thing that started this rabbet hole.  The marking gauge that got me thinking about small diameter wooden threads is shown in the next picture.  The threads on the wooden screw fit perfectly in the tapped holes.

The wooden screw that started this rabbet hole fit perfectly!

With this success, I'm making a new marking gauge: one that holds the beam in the fence with a wooden screw.  And I'll share that next time.

Thursday, March 6, 2025

Threading Small Diameter Wood - Part 2

Man, I had a lot of trouble writing this blog entry.  It has been tough trying to come up with a coherent story.  But here goes.

Last week I had taken a 1/2" dowel and, after careful layout, used a square file to file about an inch of threads into it at a pitch of 8 threads per inch.  Then I made a wooden nut and was able to screw the threaded wooden dowel into it.

A 1/2" x 8 tpi screw into a tapped hole

The method of making the nut involved a block with an angled kerf cut in it, into which a metal plate is inserted to engage the spiral slot sawn into a 7/16" dowel.  The dowel was fitted with a cutter which, when rotated in the block, can cut inside threads in a workpiece that is clamped to the block.

The tap without a workpiece

The tap with a workpiece ready to get an inside thread

A couple years ago, I made some larger diameter wooden screws and nuts.  To cut the external threads, I made a screw-box based the one in Roy Underhill's "The Woodwright's Workbook".  But this time I'm trying something different.  A guy named Paul Hamler has a YouTube video where he shows his method of cutting wooden threads for miniature plow planes that he makes.  I'm particularly interested in what he shows at about the 22 minute mark.  In this blog post, I'm borrowing some ideas from that video.

Like last post, I'm working with 1/2" diameter dowels for outside threads, 7/16" dowels for making inside threads, and I'm making 8 threads per inch.  This method takes advantage of a large 1" diameter metal bolt that happens to have 8 threads per inch.  By attaching a wooden dowel to the bolt and running the bolt through a captive 1" x 8 tpi nut, I can advance the dowel at the proper rate to cut 8 tpi threads.  And I hope to be able to cut both outside and inside threads!

This block helps capture the nut

First, I had to find a way to attach a dowel to the bolt.  I started by hacksawing, drilling and filing a 3/8" slot, about 5/8" deep, centered in the end of the bolt.  Holy crap - that was a lot of work!  Then I made a wood block with one end shaped to fit in the bolt's slot and a 7/16" hole in the other end to secure a 7/16" dowel.  Both connections were pinned with wooden pegs.

3/8" wide x 5/8" deep slot cut into the end of the 1" screw

Wood block shaped and later pinned to the bolt

I had to give this a try, so I clamped things to the workbench and gave a trial run.

A trial run at cutting inside threads

The dowel was fitted with a small cutter

And after a few passes, iteratively increasing the cutter's depth, it worked!
Here a 1/2" x 8 tpi wooden screw was turned through the new nut.

After that, I realized I could more simply attach the dowel and bolt by filing a couple of flats on the dowel and pinning that directly to the big bolt.  The two flats were made 180 degrees apart on the end of the dowel, so that it would fit into the bolt's slot.  A 3/16" hole was drilled through the bolt and dowel to hold the dowel in place.

Attaching a dowel to the massive 1" x 8 tpi bolt: note the
hole drilled down through bolt and dowel, pegged with 3/16" dowel

I also made a three-sided box with dadoes on opposing sides to house blocks that hold the different items needed for cutting threads.

Here's a box with captive 1" x 8 tpi nut.  One of the other slots in
the box will house a block with a cutter to cut the threads in a dowel.

The nut is recessed into the block and secured with a cover

The next thing I needed was a method to attach a V-cutter (for cutting outside threads) to a block that the dowel is fed into.

Here you can barely see a clamp for the cutter.  The clamp is just a small
piece of hardwood with two holes for bolts to tighten it against the cutter.
T-nuts on the back of the wood block provide purchase for the bolts.

Here's the cutter clamped to a wood block, starting to cut some threads

An action shot shows the shavings coming off the dowel

The resulting screw threads in some (very soft) redwood

But it fits the internal threads of the test block

Here you can tell I decreased the outside diameter of the dowel too much.
It made for a fairly loose fit in the nut.

On another test piece, made of harder wood, after cutting the threads
I chucked the dowel in a drill to file the threads for a better fit in the nut

Ready for a test fit ...

... and it fits great!

Top is the screw that I filed by hand.  The other three, from different
woods were cut with the rig shown above.

This is getting too long (again), so I'll add one final thing.  I made a nice improvement to the clamp that holds the cutter for outside threads.

A block holds the cutter and a set screw in the back can advance the cutter

Here's the cutter, the clamp block and you can see the hole for the set screw

In use, an Allan key turns the set screw ...

... advancing the cutter from not cutting ...

... to cutting deeper and deeper with each pass


End note: after all this, I found that you can purchase "lead screws" of a more reasonable diameter and the right thread pitch, lead screw nuts, and couplers that would handle the job of attaching the screw to the dowel much more efficiently.  Oh well, I guess I like to do things the hard way - with stuff I already have on hand.