Thursday, August 29, 2024

Making a Schwarz "Short Back" Chair, Part 3

So I've got the seat, legs and arm/back support sticks prepared.  The next part to make was the arm bow.  I figured I'd do a prototype to work out the kinks.  With a prototype I can use mismatched and totally unsuitable woods.  This arm bow is made up of three pieces (eventually it was five pieces).  The middle piece is a 1 5/8" thick chunk of redwood and the rest is 3/4" red oak laminated to make pieces wide enough.  The parts are joined using barefaced tenons on the redwood piece and the oak is glued to that, kind of like a lap joint.

Redwood sitting on the arm bow template with two angled ends

The ends have had a 3/4" thick section removed underneath

The oak was glued into the removed section (big rabbet?),
creating that lap joint

You can see in the above photo the special clamping blocks that pull the joint together as the clamp pressure is increased.  These worked OK, but the adhesive-backed sandpaper that was supposed to keep the blocks from sliding didn't work perfectly - the adhesive slipped.  But in the end it worked well enough to get a good glue joint.

Here's the (mostly) shaped arm bow

And here it is roughly in place, positioned using the arm bow drilling jigs

Unfortunately, it seemed like the arm bow was way too short.  It started out 10" along a centerline from the inside curve at the back to the tips of the arms.  I half-lapped on another 3" piece to make the arms 13" deep.

An extension piece on each end added 3" to the arms
(shown before shaping)

The next step was to figure out how to bore the holes through the arm bow, in a direct line to where the holes in the seat need to go.  I had laid out the hole location in both the arm bow and the seat.  The key to getting the chair together is to get the arm bow holes to line up with the seat holes.  I noodled about this for quite a while and tried a few things before I got it right.

First idea: using a straight stick from seat to arm bow to align the auger bit to.
The right side of this stick (where my finger is pointing) is aligned with the 
arm bow hole and seat hole locations.

Using this method, I had to place the bottom of the stick a distance forward of the seat hole location that was the same as the distance from the arm bow hole location to the front of the arm bow (about 1 1/4").

Boring a hole in the arm bow, lining the bit up with the stick

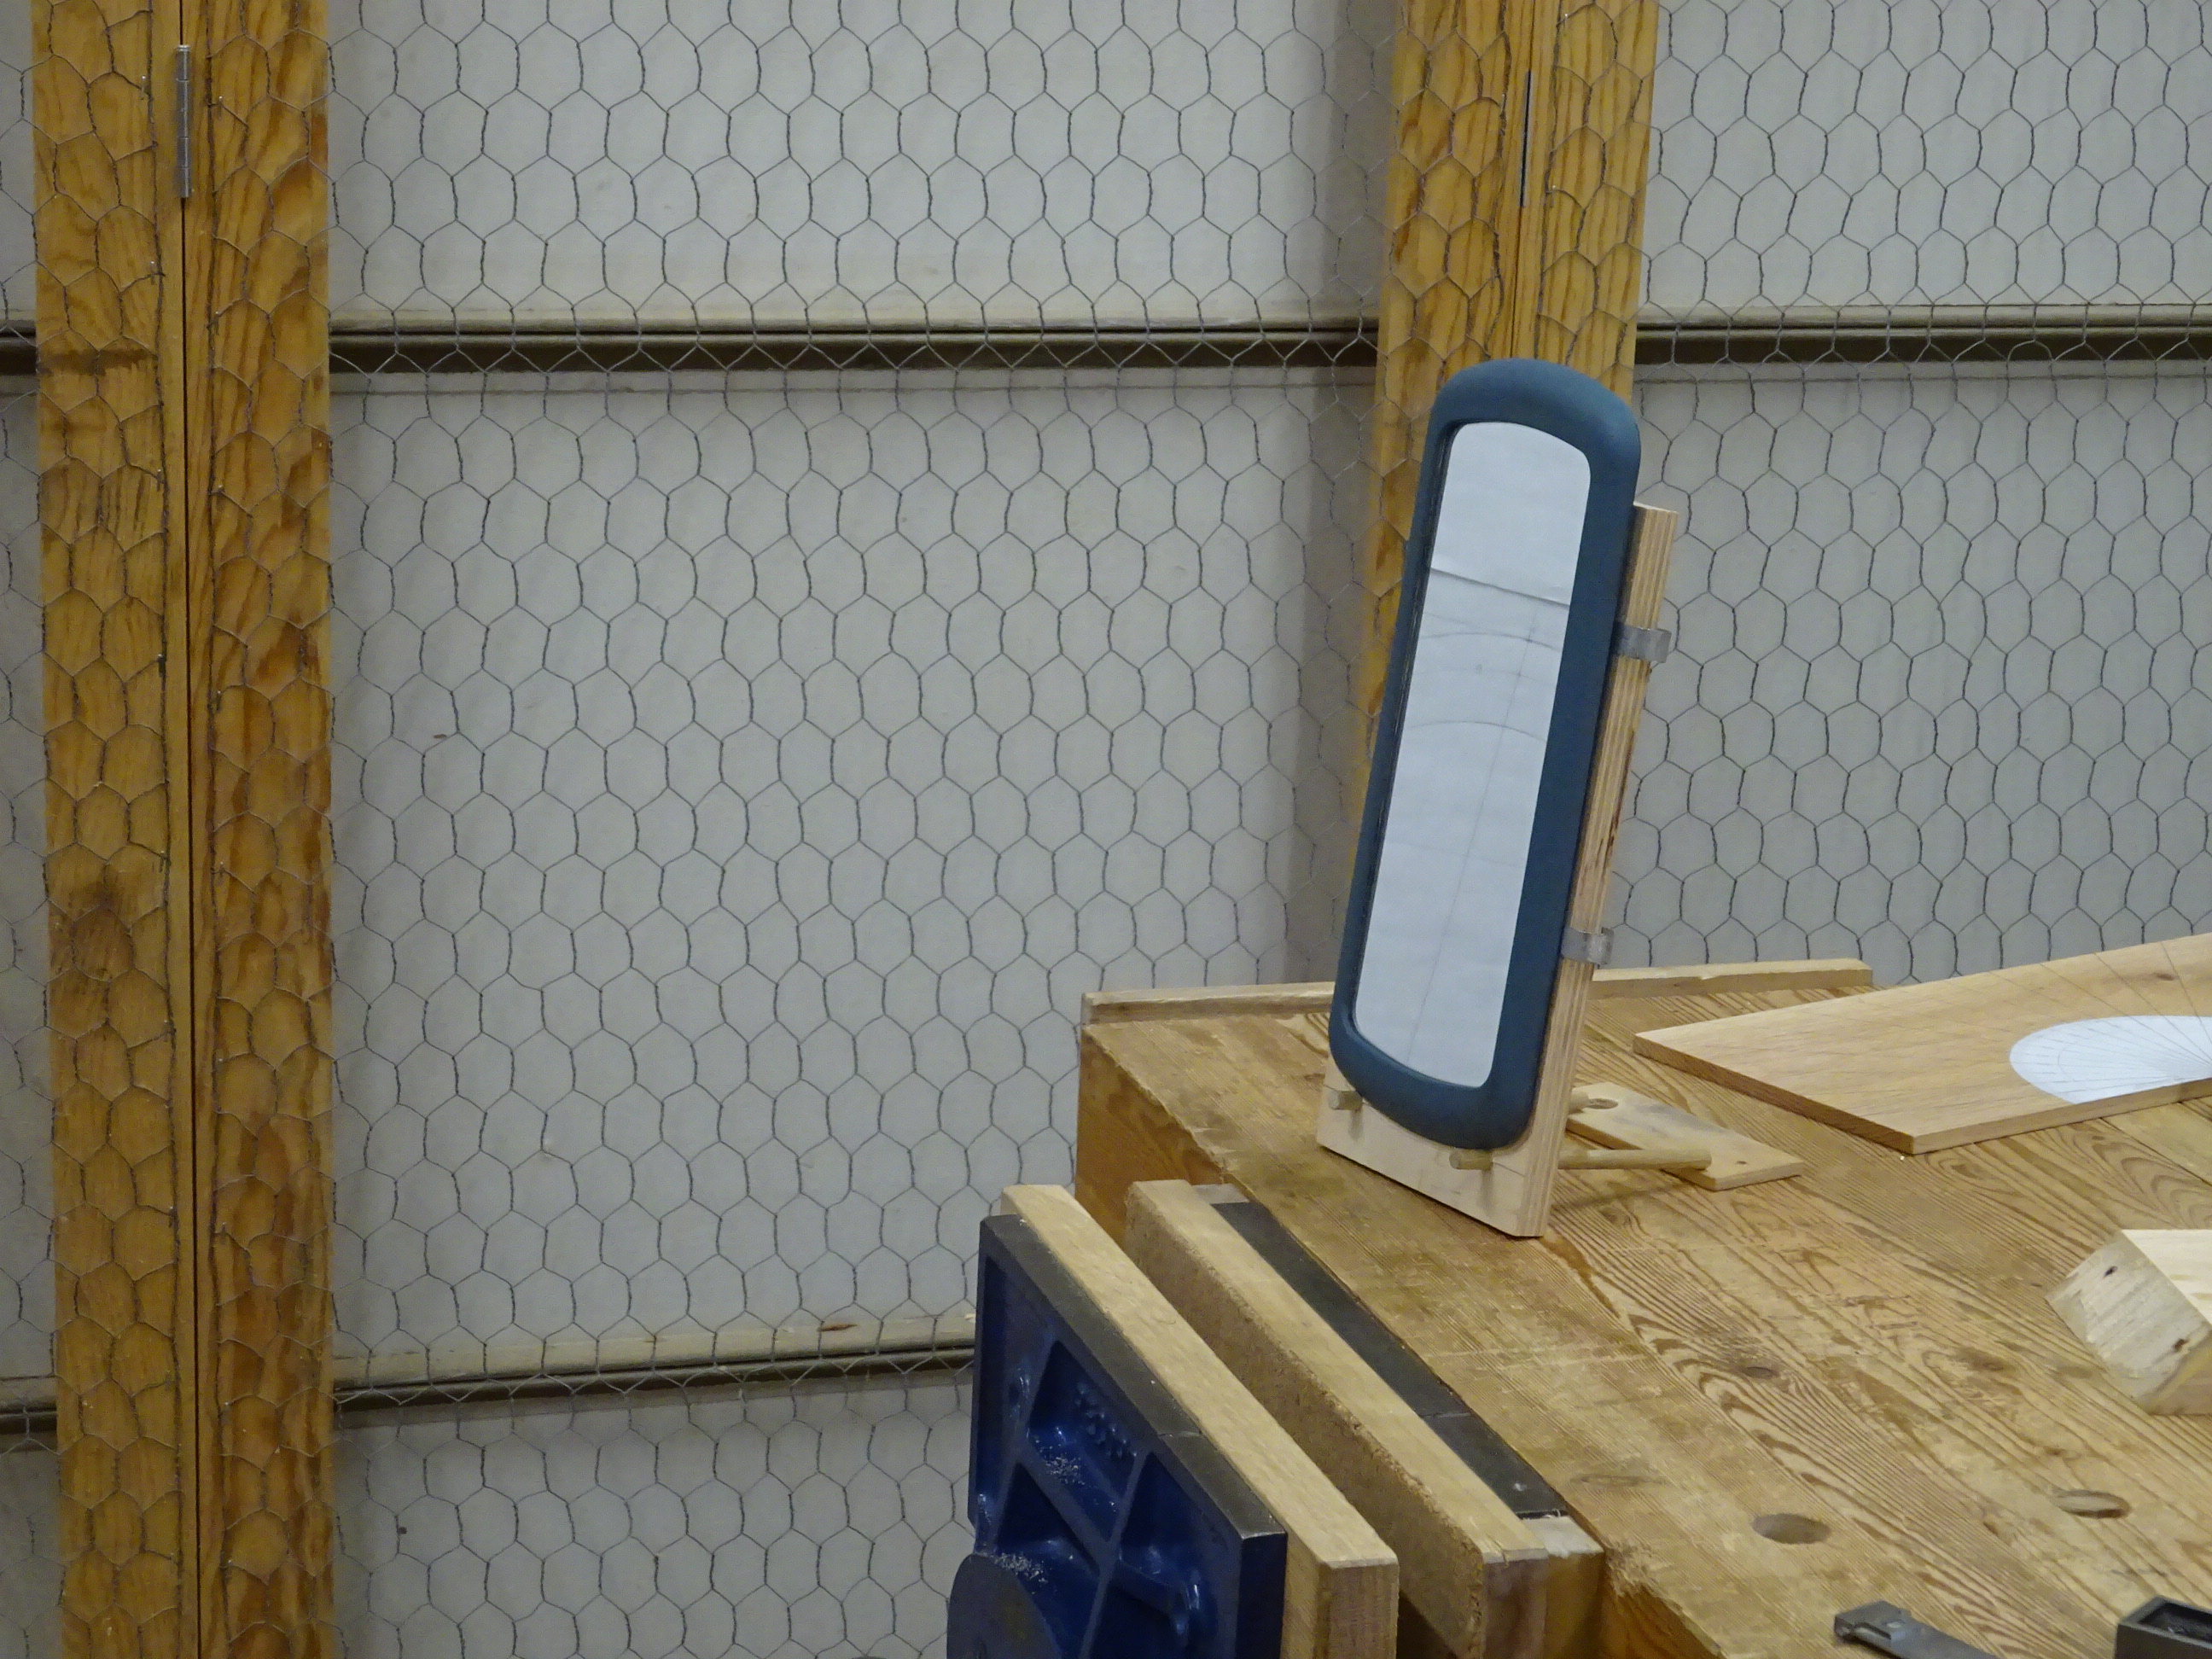
I also had a mirror on the workbench giving me a view from a right angle
to see if my bit was lined up with the stick

But this method left too much to chance, as evidenced by the arm bow holes not coming close enough to being in alignment with the seat hole locations.

My next idea was to use a special stick with one end pointed so it could sit in a small hole (made with an awl) at the seat-hole location.  The upper end of the stick had a glued-on extension to help point the auger bit.  This also wasn't quite right.

This stick has a point in line with one side and an a triangle-shaped
extension at the top end 

Here's another method I tried.  I'm trying to line up the holes in arm bow
and seat using a ruler and square.  This also wasn't the answer.

After trying several things, I realized that I could line up the bit
in this direction (left and right in this view) fairly well by eye.
But I still needed something to dial in the front / back lean of the bit.

It took a few days for this to gel in my mind, but here's the solution.
The stick has a point at the bottom end (left in pic).  The two extensions that are
glued to the stick are 5/16" different in width.

With this stick, the upper extension can rest against a 5/8" auger bit, bringing the bit in better alignment with the seat hole location.  The width of the two extensions was large enough for the stick to clear the arm bow when in use.

The stick in use.  It's not easy to see in this picture, but the bottom
of the stick has a point sitting in a tiny hole at the seat hole location.

Note that the auger bit has to align well with the edge of the upper part of the stick

Finally I was getting holes bored in the correct alignment!  Most of the arm bow holes were bored before getting this stick right, so they're not aligned properly.  This arm bow was a prototype, so I'll be making another, and that'll be in another post.

Tuesday, August 20, 2024

Making a Schwarz "Short Back" Chair, Part 2

Last time I wrote about the legs and seat.  Still much to do with them, but this post is about the sticks.  This chair will have 12 sticks - 6 long and 6 short.  I'm using red oak that I got from a neighbor's kitchen remodel.  I looked for pieces that had straight grain along the edge and cut on the face along the grain direction to get pieces that followed the grain fairly well.

Note the slanted direction of the grain.  There's a pencil line along one of the grain lines.
I cut along those lines to get straight grain pieces.

Some reasonably straight-grained pieces squared up to 3/4"

Here's a stick sitting in a cradle waiting to be planed.
Lines are drawn on the sides to plane down to.

Planed to the lines to make them octagonal

Then take off the corners with three scrub plane strokes
to make them almost round

The short sticks will get 5/8" tenons on each end, so I put them through the rounding plane that I made a few months ago.  I did a test run first with a test piece and that was a good idea because the tenon came out at an angle from the rest of the stick.  For that test piece, I clamped the stick upright in a vise and turned the rounding plane onto it.  I found that I really need to put the rounder in the vise and turn the stick into it, concentrating on keeping the stick in the center of the rounder's entrance.

Taking a long stick to 5/8" diameter.  If I started the rounding plane this way,
the end of the stick might be angled.  I had to start the sticks as shown below.

The test stick (above) has an angled tenon.
The one below is nicely centered.

Rounder in the vise, stick being rotated into it.
I can see whether or not the stick is centered in the opening.

Turning a long stick into the rounder, concentrating on
keeping it centered in the opening

Here's a close-up, where I can see the even gap all around the stick entering the rounder

The sticks were to have a small bulge, centered between the arm and the seat.  After rounding the tenons of the short sticks, I used a scrub plane, then a block plane, scraper and sandpaper to smooth the curves.

Here's the short sticks (and one long stick) shaped

Tapering the bulge with a scrub, followed by block plane,
being very careful not to go into the tenon area

A curved scraper removes most of the remaining facets

Later I'll taper the long sticks above the arm from 5/8" to 1/2".  So far, this has been the easiest and most fun part of the project.  I've run into issues with making the arm bow and boring the holes through the arm and into the seat.  But that's a story for another post.

Thursday, August 15, 2024

Making a Schwarz "Short Back" Chair, Part 1

I have Chris Schwarz' "The Stick Chair Book" and particularly like the Comb-back chair.  A few months ago, he showed a variation of his chair in a blog post that he (unofficially) called a "short-back" chair.  It's very similar to the Comb-back, but with a shorter back section.  I've wanted to build one since then, and I'm finally taking the time.

As always, I'm trying to make this with materials I have on hand.  Because of that, some parts might not have the dimensions of Schwarz' chair, but I think that'll be OK.  For instance, I'm using some table legs that I got from Freecycle.  They're not tapered octagonal, but tapered round.  And the diameter at the large end is a little smaller than called for in the plans.

The legs, one has had its finish shaved off

I don't know what type of wood these legs are made of.  It could be a softwood, not sure.  But the grain is reasonably straight and I'm sure they'll be up to the task.  I'll get back to the legs later.

The seat is taken from the top of a table someone was getting rid of.  It's softwood laminated together and there are several knots.  The tabletop was about 1 3/8" thick, a little thinner after I planed away the finish.  I wanted it to be closer to 1 3/4", so I glued on some 3/8" strips to the bottom.  These strips will be hidden nicely later when I chamfer the lower edge of the seat.

When laying out the seat, I ran into some potential issues with knots.

Bottom of seat with initial layout sketched

But look where this knot ended up!  I don't want to have to bore through
that for a long or short stick, so I reoriented the seat and started again.

Here's the seat top after reconsidering the orientation.
That big-ass knot is now near the eraser end of the pencil
and the spindle deck is clear of knots.  No doubt it will be a pain when
hollowing the seat, but I'll deal with that when the time comes.

Bottom of seat - here's that big knot now.

Gluing on 3/8" strips to the bottom to thicken the seat

I'll get to more on the seat and legs later.  Next up is making the short and long sticks.

Sunday, August 4, 2024

Garage Sale Finds

Twenty five bucks!  And I could've gotten more stuff for that same $25, but I just can't handle too much "stuff" around the shop.  These things are REALLY grungy and have not yet been cleaned up.  Here's the haul.

A small box of tools

And all laid out

The Stanley #5 is far from a collector's item, but it alone is worth $25.  And then the Starrett combination gauge with square/45 degree, protractor and centering heads is worth far more than that!

The #5 is probably a type 16 to 19, though I can't tell for sure just yet - I'll investigate further when I've cleaned it up.  It has "VICTORY" and "MADE IN USA" written on the iron, indicating post WW2.  It's also got a bogus excuse for a replacement screw at the front of the tote.  The depth adjuster is black plastic or hard rubber - possibly leftover parts from the shortages during WW2.  I have a feeling it'll clean up to be a nice user.

Stanley #5, type 16-19 (probably)

The Starrett combo gauge will also be a nice user.  I really love Starrett stuff.  The ruler needs a bit of work and the three heads are gnarly with dirt and oil and sawdust, but I'll get to that stuff later on.

L. S. S(tarrett). Co.
Athol Mass. U.S.A.

I was really hoping to find more than one auger bit, but they said somebody had just walked away with a bunch of them.  This one is 11/16" ("11" stamped on the square tapered shank) and the lead screw and spurs look to be in good shape.  And it's from Jennings, not Russell Jennings or any other combination of Jennings.  Not sure that says how old or good it is, but I think it'll work like a champ.

C. E. JENNINGS & CO.  No 10
(it took a while to find this marking)

Next is a Stanley #51 spokeshave.  I've got a couple of #151 (or equivalent) shaves with the two depth adjuster nuts, but I've never had one of these older style without the adjusters.  I realize that the adjusters were a major improvement, but I couldn't just let this spokeshave sit there, so I added it to the box.  The blade says "STANLEY" and both the blade and body say "MADE IN USA".  I'll see how well it performs later.

Stanley No 51

Then there was this little pair of pliers/cutters, Stanley #84-120.  It says JAPAN on the other side, so probably made in the 60's to 80's.  But they are in great shape and I needed something like this.

Stanley pliers

Then there were the files.  The little box of Nicholson (made in USA) files made my eyebrows jump when I saw it.  At first I thought it was a box of triangular needle files for sharpening very fine saws, but each file is different.  I have some similar files and I use them all the time.

Box of Nicholson files
The tangs have stamped: NICHOLSON - USA and "2XF" (double extra fine?)

Bottom to top profiles: round, oval, thin diamond, square tapered, 
half round with safe other side, flat tapered and triangular

The other files I grabbed include a Grobet riffler-type file, two triangular files (a 4" double extra slim Nicholson made in USA and a 6" slim taper file of unknown make), and a knife-edge file.

A few files

Lastly, there were a couple of triangular sharpening stones, one fine and the other a bit more coarse.  You never know when these might come in handy.

Triangular sharpening stones

All for 25 bucks.  I don't always get the chance to get out to garage sales, but this one was fun.  I could have spent a couple more hours there just looking at all the stuff.  There were two scroll saws - one by Dremel and one Craftsman.  There was a Craftsman bandsaw/sander (huh?) - I'd love to get a bandsaw, but this one didn't seem to be that solid.  There was at least one powered grinder.  And so much more.

All for now.  Maybe I'll post later about cleaning some of these up and trying them out.