Thursday, May 25, 2023

Tyzack Sons & Turner Backsaw

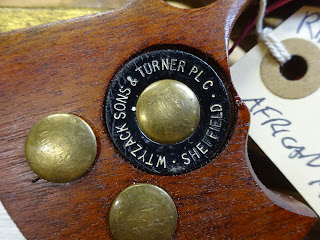
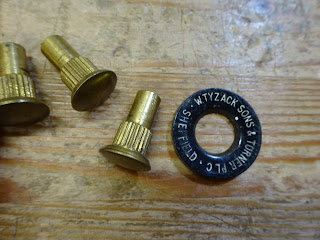
I mentioned in a recent post that I found this saw at a garage sale.  It's by W. Tyzack Sons & Turner PLC, and the seller thought it might've been from the 1950's or 60's.  He's probably right, but could be later based on the interesting "medallion".

The saw as-found

Can you call it a medallion if it's not made of metal?

It's some kind of plastic that fits around an ordinary saw bolt.

The owner had made his own handle for it and also included the original handle.  His African mahogany handle looked very nice, but it didn't fit my hand well - in fact, he said it was too big for him, too.  The part that the hand wraps around was way too thin.

I don't own any, but I've seen saws where the saw plate at the front is shallower than at the back.  This saw was like that, but when I looked closer, I saw that the front of the plate was just pounded further up into the brass back.

Back end - a little over 1/4" extends up into the brass back.
Due to where the brass back sits in the handle's mortise, it couldn't go any further up.

At front the plate it's jammed way up near the top of the slit.
I tapped the back up to even it out with the back end.

The brass back is massive, so the saw is relatively heavy.  I sanded the back and the plate.  They didn't need much, but they look better now.  The saw plate had a little curvature to it, but I was able to bend it back into straight.  Then I put the original beech handle back on.

On the underside of the lower horn was a past owner name (not the seller)

Original handle reinstalled

This still didn't look right to me, so I removed the handle, scraped and sanded it, and did a little reshaping.  I like it much better now.

Added the notches (large arrows),
eased the lower horn (medium arrow) where heel of hand touches, and
eased the sharp transitions (small arrows) that I just didn't like.

After a couple coats of BLO and a good sharpening, she's ready to go.  I kept the teeth at 12 tpi rip, though I might change that later.  I've made a few test cuts, and it felt ... OK - nothing special.  Only time will tell if I like it.

Left side

Right side (clocked screws, just because ...)


Saturday, May 20, 2023

Tool Collectors Meeting June 3

I realize not many people read this blog and of those that do, few live near the San Francisco Bay Area, but I just wanted to put this out there.  Even though I'm not a collector, I belong to an organization called PAST Tool Collectors.  This organization was formerly known as Preserving the Arts and Skills of the Trades (PAST).  I've picked up some nice tools at the tool shows.  I don't seem to have any pictures from a show, but below are a few things I picked up for almost nothing last October during an auction at the show.

Spofford braces and portable saw vises

Some interesting saws

PAST is a group of people who just plain love old tools.  We love looking at them, talking about them, comparing what we've got, and many of us enjoy using them.  Think of it as a smaller, more local version of M-WTCA.  Much earlier in its life, PAST was a west-coast affiliate of the Early American Industries Association (EAIA-West).  The members still hail from all over the west coast, though mostly in CA.

PAST is having its Spring tool show on June 3 at the Veterans' Memorial building in Spreckels, CA.  This being the type of organization that appeals to - ahem - "more experienced" folks, time has had its predictable effect on membership.  I'm hoping that this important organization will continue for many years as a strong club and getting some new people to attend would help.

Here's the deal.  Membership in PAST is $25 per year.  Anyone who joins before the Spring tool show will have that show included in the membership fee.  A show typically costs $15-$20 and lunch at the show is included.

I am neither an officer in PAST nor a sales / marketing person - just a concerned member.  To get more information, please see their website at pasttools.org.  If you contact anyone at PAST, please make it the e-mail address on the "Upcoming Events" page.

I'm looking forward to seeing the people and the tools, and I hope some of you might make it.

Thursday, May 18, 2023

Weaving a Seat With Danish Cord

A few weeks ago I made a post and rung stool from fresh-cut wood.  The following picture was taken about that time when I was just experimenting with some cord weaving.

The post and rung stool with an initial experiment in weaving

That was about a month ago.  I started on the seat again, but I'd been hung up on what to do.  The two types of weaving I considered are like in these two photos from the internet.


Internet picture
Pic form Caleb James' site
    

Danish cord is expensive stuff and I didn't want to be wasteful.  The pattern on the left uses less cord, but typically uses nails.  The pattern on the right uses more cord and a few tacks.

Most of the cord seats I've seen with the first pattern use L-shaped nails on the insides of the rails to turn the direction of the cord.  This avoids the waste associated with cord going fully front-to-back or side-to-side under the seat.

Showing use of the L-shaped nails used on the stool I made in early 2022

The second pattern is more common using other materials like rush or other material thicker than Danish cord, and it uses only a few tacks.

There are two reasons I didn't want to use nails on this post and rung stool.  First, I just like to avoid using nails if I can.  And second, my rungs are only 7/8" octagonal and there really isn't enough room to use them.

After thinking about it for far too long, I went with the first pattern, but modified for not using nails.

The initial experimenting did allow me to work out some spacing issues.  For the front-to-back cord, I found that it would look good with 5 or 6 loops around the rung between each full front-to-back cord.

Front left leg of stool is at shown in this photo.
Two extra wraps (four total) at furthest left front-to-back wrap, then 6 wraps around the rung,
then two full wraps and another 5 or 6 wraps around the rung.

Continued this pattern across the seat (ignore the left-to-right pattern for now)

There are two issues with this.  Notice where the rung joins the post that it necks down from 7/8" to 5/8".  Two pics above here you can see a naked rung as well as a wrapped rung that show this.  It causes The first couple of wraps to follow that necked-down shape and I don't want the succeeding wraps to slip over the first two.

The second issue with this is that under the chair, after I've completed two front-to-back wraps and 6 wraps around the front rung, I have to angle the cord to begin the 6 wraps around the rear rung before continuing with the next two full front-to-back wraps.  It's not an issue for looks because it's on the underside, but when I go to weave the left-to-right cord it's unclear how this will affect things as I get further to the back.

Underside shown: pencil pointing to the angled cord

In the end, I just went for it and figured out these issues on the fly.  First, to avoid the necking down problem, I added a couple extra loops of cord around the rungs and tacked them in place.  This helped level the ends.

View from above showing how it fills in the tenon area

View from inside showing how it was wrapped and tacked

I don't know if the terms "warp" and "weft" apply to all kinds of weaving, but I get a kick out of using them, so here goes.  To make the wrapping easier for the warp (front to back wraps), I made something to help control the cord.  I saw something like this on Caleb James' and others' websites.

Made from 1/8" thick plywood:
note the two holes under the left coils with cord going through to help keep it from unraveling

I hadn't planned this, but the size was right to sit it on lower rails - very convenient!

So I started wrapping.  I saw a video where they put four full warp wraps at far left and at far right, but two everywhere else.  So that's what I did.  But when I got to the right side I found I didn't have an odd number of front-to-back groups of cord.

Here I'm counting - 12 groups
Note that I considered putting the weft through just two of the four in the right-most
group of warp cord (essentially making it 13 groups), but later decided against that.

Here I've started the first few rows of weft after fixing the warp.  For the fix,
I unwrapped several warp rows and adjusted the number of rung wraps to get 13 warp groups.

The warp ended up not perfectly symmetric, as there is a lone group of four at the far left and all other groups are of two.  In hind sight, it would have been fine with just two everywhere.

Getting close to complete.  The last few rows of weft are tougher to weave.

Weaving the rest of the weft went fine.  Note that I'm weaving on the underside of the seat also.  Because of the angled cord that I mentioned earlier, I tried to do something to ease the transition.  At the beginning and the end of weaving the weft, I went over and under every pair of warp cords.  Near the middle, I went over and under two pairs, then three pairs, then back to two pairs so that the angled cords had somewhere to go.

The underside - see the angled warp cords?

You can also see in the above picture where I tied off the beginning and end of the weft.  These are simply tied to a pair of warp cords.

Here's two pictures of the completed seat from above, the second taken after adjusting the spacing of the warp cords. It didn't make a huge difference, but I'm happier that I took the few minutes.

Before adjusting

After adjusting the spacing

And the final product.

Ta da ...

This was a fun project.  Just a few months ago, the wood was a living tree.  When it fell in a storm, I took a couple logs and made the posts and rungs.  Weaving the seat was the icing on the cake.

I probably mentioned this when I posted about a Danish cord stool in early 2022, but weaving this cord is tough on the hands.  Near the end, I used an old pair of bicycle gloves and that helped.

Last note: After completing the warp, the seat doesn't feel like it's tight enough.  But when the weft goes in, it really tightens it up and becomes quite firm.

Thursday, May 11, 2023

Garage Sale Finds

Once a year my town organizes a city-wide garage sale, where people can have their sales listed on a downloadable sheet.  It includes the addresses, a map, and a short list of things they have for sale.  I saw one listing that indicated they have an antique hand plane.  Key word: "an".

When I got to the house, I saw not just one plane, but many planes (wooden and metal), many saws and many other things.  The owner was moving to the East Coast and wanted to thin out his collection.

If I was a collector, I would have spent far more money than I did.  But I'm not a collector (I swear, I'm not a collector), so I just bought a few items.

The things I picked up

There's a roll of double-sided tape for 50 cents - so many uses for this stuff.  Then there's an unopened can of milk paint from The Real Milk Paint Company - $2 (color: "black iron").  I've bought a couple of their products before.  I don't paint my projects much, but I like their milk paint.

There's a protractor head for a combination square, made by Union Tool Co. of Orange, Mass.  It didn't have the blade, so it was $1.  I'll write more later about using this with the blade of my Starrett combo square.  There's a small bubble level on it (on the back side in the pic below), a nice feature.

Union Tool Co. protractor head for a combination square

Then there was this cute little marking gauge, made by Sanderson (England).  I would have left it behind, but it was just $2, so I grabbed it.  I'm pretty sure it's made of rosewood.

Next to one of my homemade gauges for size comparison

Pretty sure that first letter is supposed to be "S"

Upon further examination, there is a pin on the fence, in addition to the pin on the beam.  My guess is that this gauge is for scribing circles using the fence pin as a pivot.

Pointing to the pin on the fence

Arc scribed on a scrap piece

It can leave a rough scribe mark, so maybe I'll file the pin into more of a knife edge.  This little gauge had a problem, though.  The thumb screw that tightens the fence onto the beam just spins in its hole.  I fixed that with some epoxy in the formerly-threaded hole, followed by a run-through with a 1/4-20 tap.  Good as new.

Fixing the tapped hole

Lastly, there was this small backsaw from W. Tyzack Sons and Turner.  Thirty bucks for it.

0.024" thick plate, 10" plate length, 12 tpi (13 ppi) rip filing

The owner thought this was from the '50s or '60s

The owner had made a very nice new handle for it from African mahogany, but he also kept the original handle with it.  That seems like something I would do - in case the next owner might care more about the original condition.  The handle he made is too big for my hand, so I may go back to the original, but spiff it up a bit with some judicial shaping - oh well, there goes the original condition.

The saw seems quite heavy.  Front-heavy to be more precise.  The brass back is massive.  Made me wonder if this saw was not the saw that came with this medallion.  I also saw a small amount of waviness to the plate at the tooth line.  I'll post later about cleaning it up and sharpening it.  If I use it as a dovetail saw, I'd prefer smaller teeth.  I'll consider re-toothing it.

Well, that's it.  Just when I was losing faith in finding things at garage sales, this happens.  I guess you just gotta keep trying and keep your eyes open.

Thursday, May 4, 2023

A Rustic Post & Rung Stool With Green Wood

I needed a project to use the fresh-cut wood that I split out last month.  The inspiration probably came from some Follansbee work I've seen, but I'm not sure.  I've thought about these post and rung stools for a while.

I took four of the split billets to make the posts.  At first I tried to use the drawknife to work on them.  But there were knots and inconsistencies in the wood that made that very difficult.  So I ended up using the hatchet, a scrub plane and a course jack plane to get them roughly 1 5/8" square, then octagonal.

Planing to roughly square

First two octagonal posts

Two posts octagonal, two square awaiting octagonizing.
Note the difference in color; the two octagonal changed color overnight.

Since the billets were anything but straight and regular, there are some areas on the octagonal sections that are still in their split state.  Here's something interesting.  When the wood was first split, it was fairly light in color, but turned an orange-amber color over the course of a few hours.  Then the wood sat for a couple of days.  When I planed it up, the newly exposed sections stayed fairly white.

For the rungs, I got the parts to about 7/8" square with planes, then octagonal with the drawknife.  The 5/8" tenons were made with the drawknife.

With one surface flat (left side), drew the size I needed

Layout lines and a sizing stick guided my hatchet work

Then a plane made them ~7/8" square and drawknife got them octagonal

Marked the ends with a 5/8" circle and a line showing growth ring direction

Then used drawknife to make 1 1/4" long tenons
(the tenon shown is round - not how I made the rest)


Note how I left octagonal facets on the tenons.
My thought is that these will dig in to the mortise walls for better hold.

Then chamfered the ends to help them ease into the mortises

Six long and six short rungs

Ideally, the rungs would be very dry when fitted to the mortises of the relatively wet posts.  That way, when the posts dry and shrink, the mortises would tighten around the tenons.  But I had no great way of drying the rungs (and no moisture meter either).  I waited a few days and they felt fairly dry.  They also seemed lighter (per volume) than the posts, so I went for it.

When I was ready, I bored the mortises in the posts and glued up the front posts with their connecting rungs right away.  Same with the rear posts and their rungs.  After letting them sit overnight, I bored the holes for the side rungs and glued them up.

With post clamped level in the vise, bored the holes for the long rungs.
The rope by my right elbow is a plumb line that I'm using with a mirror to judge fore/back plumb.
The large square on the bench is used to judge left/right plumb.
I later changed this method to be a bit simpler. 

Gluing up the front legs and their rungs

One of the things I've seen in other people's work is the use of overlapping tenons to lock in half of the rungs.  I tested this out on some scrap to see if there would be any problem boring a mortise that partly cut into a tenon of a neighboring rung.

Bored a hole and glued in a stick, then on an adjacent face bored  
another hole that overlapped the first hole.
At the bottom of this mortise, you can see where the auger bit cut
part of the first tenon.  There was no problem boring through it.

So then I bored the mortises for the left side and right side rungs.  I got creative when boring so that those holes would be at right angles to the first sets of holes.  Mirrors, squares and levels were used to complete the task.  Even so, I got some of them a little wonky, so the stool glued up a bit out-of-square.  Noticeably out-of-square for me, but probably not for anybody I'll show it to.

Leg near bench is clamped lengthwise and that clamp is held in the vise.
The level showed the leg was parallel to the ground.
Note the other leg - it's cantilevered way out in no-man's land, 
so I used a spring clamp and a stick to support it. 

I used that stick and spring clamp to adjust the outrigger leg
so the whole assembly was parallel to the ground.

Here's one of the holes bored, intersecting the tenon of the adjacent rung.
Apparently that rung didn't get fully seated in its mortise. 

The glue-up was a little stressful.  It was a challenge pulling all the joints tight.  A big hammer and plenty of clamps helped.  The stool didn't clamp up exactly square.  It's a little rhomboid when viewed from above.  It also had a little twist in it - I had to shave the bottoms of two legs to get it to sit nicely on the floor.

I really didn't have a solid idea of what I would do for the seat, but I wanted something woven.  I researched cattail rush, but now is not the time for harvesting rush.  I know I could buy some, but wasn't ready for that.  I had some Danish paper cord left over from a project last year and started using that.

The stool, with seat getting started

I ended up ordering more cord to finish the seat.  Maybe I'll write more about doing the seat in a separate post.