In the not-too-distant future I'm slated to build some cabinets that will be our entertainment center. The thought is three side-by-side cabinets, each about 36" tall, made of cherry. I'd like to dovetail the corners of the cabinets and while I've done some small scale dovetailing, I've not done a row of DT's more than a few inches long. These cabinets will probably be 15 - 17" deep.
So I bought myself a couple lengths of 1x12 pine to practice on. I straightened one edge and squared the end as best as I could, but I didn't remove any cup or get the boards consistent in thickness.
 |
| One of two practice boards |
 |
| Pic showing amount of cup I'm working with |
A closer view:
 |
| This is probably about 3/32" gap at the center of the board |
I figured I could clamp a straight piece of wood to my board to remove any cup and that's what I did.
 |
| Clamping a straight piece of wood to remove cup |
My first step was to lay out the tails with a caliper. I left 3/8" on each end and set the calipers by trial and error to step out 8 tails. Those with a lot of DT experience do this without thinking, but for me, I really have to think about what I'm doing. The caliper setting includes a tail plus a pin. You start from the far left edge of the board and step off eight sections until you reach the mark that is 3/8" from the right edge. These eight steps give you the right side of each tail. Then you start at the right side and step left to mark out the left side of each tail.
 |
| Stepping out the tail layout |
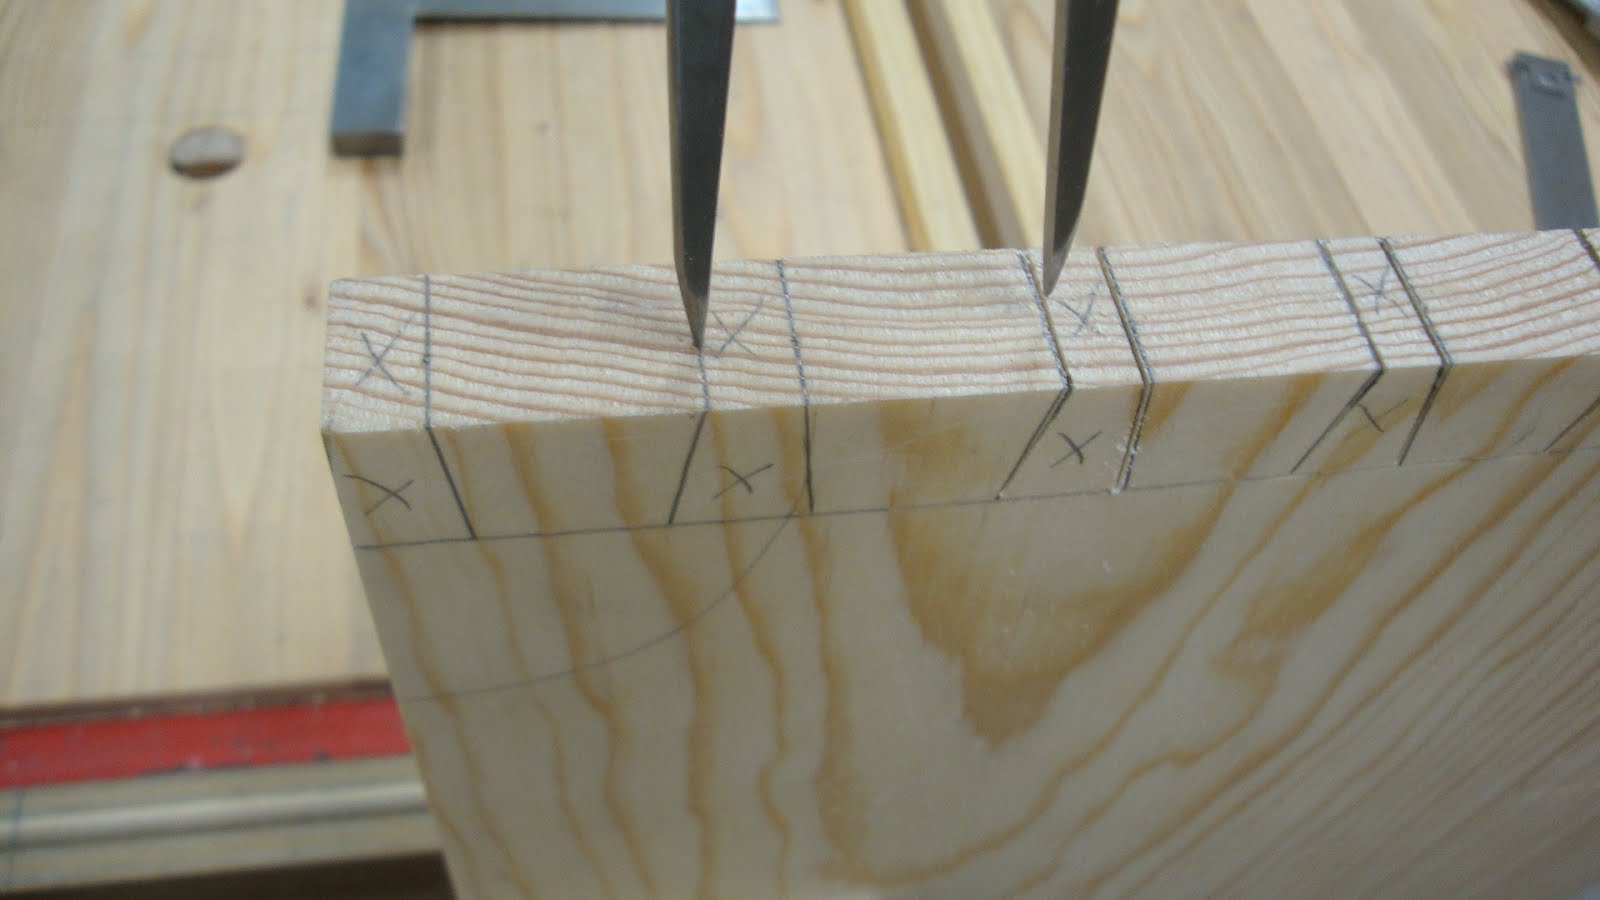
After marking the end grain, I used a Sellers-style DT marker to mark the angles on the face grain. Then the sawing began. I have a lot of work to do on sawing straight. I'm using a 14 TPI gents saw (a $5 garage sale find) that I recently sharpened and in this pine it leaves dust and debris on my side of the board that hides the layout line. I have to wipe/blow away the dust every few strokes. I got close to my lines, but you can see from these pics that it's not perfect.
 |
| A little slanted from the layout line |
 |
| Great on the left, not so great on the right |
To anybody new at dovetailing - ALWAYS mark the waste (in my case with an "X"). I can't tell you how many times I've either cut on the wrong side of a line or much worse, removed a dovetail when I was supposed to remove a pin recess!!!
In the past, I have chiseled out the waste, but I wanted to try sawing out most of it and chiseling the rest, as Schwarz writes about in "The Joiner and Cabinet Maker". After sawing to my lines, I used a "Knew Concepts" coping saw to remove most of the waste and then pared with a chisel to the base lines. Chiseling was much harder than I thought it would be. Maybe because this is pine and I had more than a few thousandths to chisel out - more like 3/32 to 1/8". My chisels are freshly sharpened.
 |
| Pin recess #1 removed |
Once the pin recesses were removed and the bottoms cleaned up, it was time to mark the pin board. I clamped it to the front of my bench to remove the cup and laid the tail board on top of it.
 |
| Pin board clamped to front of bench |
 |
| Tail board in place to mark pins |
I squared the lines on the face of the board using my small machinist square.
 |
| Squaring the lines |
I sawed on the waste side of the lines, getting as close as I could to the knife line without go over it.
 |
| Sawing to the lines |
And later sawed out the waste with the coping saw.
 |
| Sawing out the DT recesses |
After paring out the bottoms of the recesses to the layout lines, it was the moment of truth. Fitting the tail board to the pin board. The first fitting went in a few millimeters.
 |
| First fitting - too tight |
I decided to make some pencil marks on the leading edges of the tails.
 |
| Pencil marks on tails |
This would allow me to see where the tight spots were on the pins - judging where the tails were rubbing on the pins.
 |
| Tell-tale marks showing where to remove tight spots |
After several go-rounds with fitting, marking and paring sidewalls of pin recesses, I finally got the tails to seat in the pin board.
 |
| Final fitting |
This doesn't look too bad, especially for not cleaning them up and removing all pencil lines. But when you look closer, the left side of each DT had a gap. EVERY one of them!
 |
| Gap on left side - all tails had this same gap |
Thinking about the cause - this was probably due to one of two things (or both). First it could be me not sawing straight on the pin board. But just as likely is that when paring away thin shavings on the sidewalls of the pins I was too aggressive at the tops. The gaps get smaller as the tails get deeper into their recesses.
I'd love to hear any comments about this. Any suggestions for smaller gaps? Meanwhile I'll keep practicing.
Hi!
ReplyDeleteFor small tiny gaps, I use shavings and some times sawdust with glue!
Thanks Antonio. Not sure yet if I'm going to glue this joint, but if I do I'll try something like that.
DeleteIt is good to practice first, and then do it again. With cherry you'll have to be spot on. With pine's compressibility an ok fit will go, not so with cherry. The most important thing with dovetails is the square top cut. The angle doesn't mean that much if you are off your lines. From the pics it looks like you did good on the square and succumbed to the 'one more swipe' syndrome.
ReplyDeleteI was pretty happy with how square my cuts across the tops of the tails came out (across the end grain, that is). I didn't do it this time, but for a square top cut there's a trick I learned from a Sellers video. It is to add a backer board and extend your layout lines. This added length can go a long way to getting a straighter cut. Now if I can only get my vertical cuts straight and to the lines ...
DeleteWhen something happens on "every one of them," it's likely a repeated error, such as working too close to a line on the side where the light is excellent and not so close where the light is not so good ... or positioning your body optimally on one side, but not the other.
ReplyDeleteActually, you're doing great and all you need is practice. After about 11,000 dovetails, anyone can make a good one. :)
I'll look into that. I've decided to make three more sets of DTs like this one and make a box. Only 10,975 more DT's and I'll be ready for prime time. I better get started! - LOL.
ReplyDeleteHi Matt,
ReplyDeletethis is a great write up. And it's describing a lot of issues most of us had or have.
Personally I'm using that backer board method from Mr. Sellers you mentioned above to saw straight. That helps me actually to saw more precisely.
I'm struggling too with being wrong on one side. My dovetails are always fine at the right side and not too bad on the left side.
With pine I made the experience to do one shaving less when it comes to correct your pins or dovetails and it doesn't look bad anymore when it will be glued (because the glue let the fibers swell).
But as Bob and Ralph said... practice will help.
Stefan, who has to build 6 dovetailed drawers and lot of pieces to practice.
Thanks Stefan. Others have mentioned about how pine will compress a little and how glue will swell the fibers. Probably next week I'll glue the dovetails together and see how they look after cleaning up.
Delete