Wednesday, October 25, 2017

Experiment With a Bow Lathe - Part 2

Note: this post was written before posting part 1 of this series, so none of the comments I received in that earlier post were incorporated this time.  When I get back to lathe experiments, I plan to work more on an ad-hoc bungee spring lathe.

In part 1 I made the bow lathe and started learning how to use it.  The turning was rough.  Tools would dig in and gouge the wood.  I started thinking that one of my practice pieces was rather skinny and was flexing between the points.  Without some kind of "follower" to keep the wood from flexing, there was not much chance for a good result.

So I got an octagonal pine leg blank that I recently made for practice that was about 11" long, 1 1/4" diameter at the widest spot, tapering to 7/8" at each end.  My earlier practice pieces were about 17-18" long and 1" diameter.
The octagonal tapered leg on the lathe
This was working a lot better, as I seemed to have better control over the material removal.  Could be because it was more stable between the points or could be because of how nicely octagonal it was.
One side turned round-ish, then flipped end-for-end and ready to work on other side
I put pencil lines on the leg so I could gauge progress.  I also cut my tool rest in half from earlier experiments.  The longer tool rest wouldn't fit between the puppets when turning this shorter piece.
Using a gauge with some success
After I got the leg fairly round, I thought I'd try something a little different.  I've never seen anybody do this, so you be the judge on it.
Using a block plane to smooth the spinning leg
This actually worked OK.  It's not going to give me any fancy coves or beads, but for simply trying to smooth a round leg, it worked fine.  There's probably a reason I've never seen anyone try this, but I don't know what it is.
Also tried using a scraper
The scraper also worked, albeit very slowly.  I wasn't getting any fluffy scraper shavings - only fine dust.  Only a few millimeters of scraper are touching the leg at any time.  I also used sandpaper to help smooth the surface.

The result here was far better than my earlier attempts.  But the surface finish of the leg is still not very good.
The overall shape was OK, but that was probably because I had a perfect octagonal shape to start with
Here are a few closer-up views of the leg.  I would not use this on a project.
General roughness
Some of the gouged areas
More gouges
Well, this is exciting.  I got a far better result than I did with my first blog post on this lathe.  Gotta get back out there and keep at it.

I don't know that a bow lathe will be the answer to my desire to have compact turning capability.  But it was a fun experiment.  Eventually I'd like to build some kind of flywheel treadle lathe that I can attach to my workbench.  But for now, at least I'm learning a lot.

I'm off for a little R&R - catch you all on the flip-flop.

Saturday, October 21, 2017

Experiment With a Bow Lathe

I've never done any turning before, either motorized or human-powered.  I've been thinking for a while about building some kind of human-powered lathe.  But I don't have the space for a free-standing spring pole lathe or flywheel treadle lathe, so I'm trying to figure out how to build one that uses my workbench as the "ways" of the lathe.

One very small solution is the bow lathe.  In this style lathe, the rotational motion of the stock is produced by a bow and string.  The string is attached to two ends of a stick and wrapped around the stock in between.  My left arm is the motor.
The bow, with string wrapped around the stock
On the far end, the string has a knot in it and rests in a V-shaped cutout.  On the near end is a similar V-groove, but I also sawed a little notch out of the side of the stick to help lock the string and keep it from loosening.
The near end (the end I hold on to) with V-groove and notch
Close-up of the locking notch
The two "puppets", the uprights with protruding pins that hold the stock, are 2x? scrap boards with hanger bolts in them.
The movable puppet is attached to the vise's movable jaw.
The vertical piece is glued to a horizontal piece that is bolted to the movable jaw.
The other puppet is a board screwed to a plywood base, fastened to benchtop with holdfasts
The pins are 3/8" hanger bolts with the wood screw ends filed to a point
The machine screw end goes through a hole and is fastened with nuts and washers on both sides
The stock to be turned is held between the two points
The tool rest is a piece of T&G 2x6 glued to a base that can be clamped to the benchtop
Tool rest in place, ready to turn
I have the string wrapped around the stock so that the stock rotates towards me on the pull stroke.  I started with a scrap piece of maple about 1" octagonal(ish).
Starting to turn the maple - it was rough going
I'd never turned anything before, so I looked at a couple videos (of powered turning) to get an idea of how to hold the tools and how to present them to the wood.  I have four crummy turning tools that I found at a garage sale last year and I sharpened them before starting.
The lathe tools - 2 gouges and 2 skew chisels
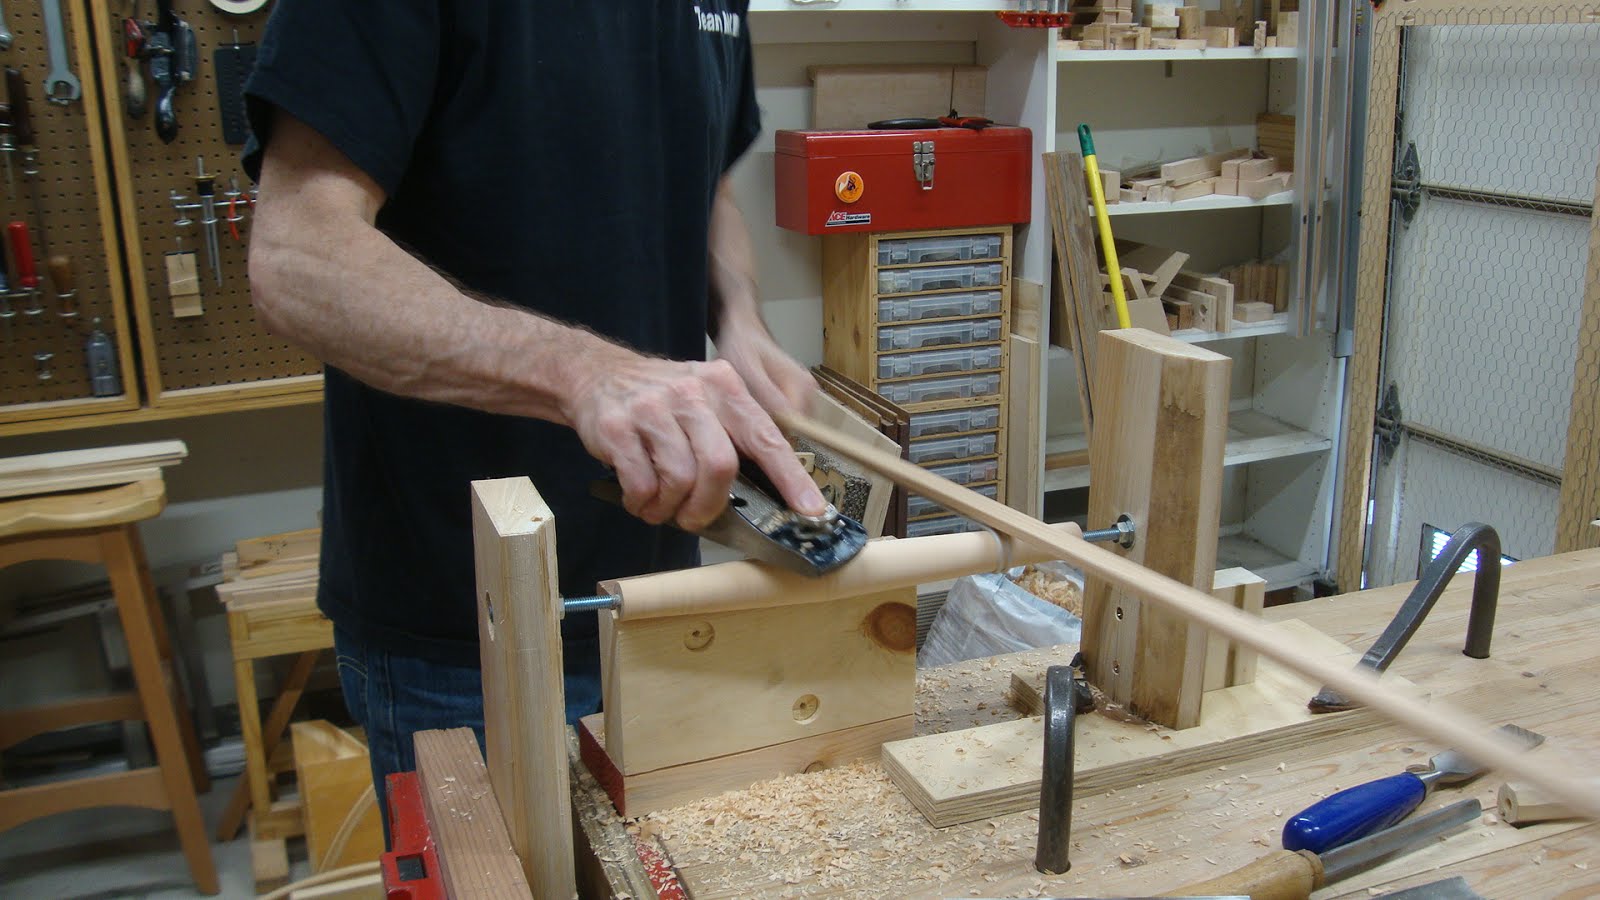
The author using the bow lathe
After using this lathe for a few minutes, I saw a need for three immediate improvements.  First, the bow hurt my hand, so I rounded all edges, cut it down in size and sanded it.  Second, the points were not filed very evenly and they were quickly widening the holes in the ends of the stock.  This would make the stock a little loose.  I could bring in the movable jaw, but I just kept making the hole larger and eventually it needed to change.

My solution was to change from the hanger bolts to 5/16" (because that's what I had) all-thread.  I filed off the last 1/4" of threads, then chucked it in a drill and ran that bald end over a file to get a reasonably cylindrical 1/4" rod.
The new points with 1/4" rod end
Drilled 1/4" holes in the ends of the stock to accept the new points
So far, this is working far better.  As a note, both ways of doing this required a drop of oil on the points to minimize vibration and noise.

The third problem I had was with the tool rest.  You really need a smooth top of the rest for the tool and your fingers to slide smoothly and my T&G board was quite rough.  So I sawed off the tongue, planed it smooth and glued on a piece of hardwood.
The upgraded tool rest with smooth top and rounded edges
And how are the results?  Well, not so good.  I can remove a little material, but getting any reasonably consistent diameter is not happening.  Also trying to get any shapes is a joke.  Without a second hand to stabilize the tool, it tends to dig in and stop the works.

At this point I don't know if my tools are bogus, my technique is bogus, or the lathe is bogus.  But I'll keep working on it.  Rome wasn't built in a day.

Friday, October 13, 2017

Sellers-Inspired Step Stools

I don't have a lot of space to be storing scrap wood "that I'll eventually use in just the right project".  Yeah, right.  So I've been trying to use up some scrap wood and a good start is making a few step stools.  I gave away the three stools pictured at the end of this post on Freecycle.org and the response was so immediate that I'm using a bunch more scrap and making 5-6 more.  Lots of pictures, so I'll let the captions do the talking.
Leg stock started round 1 1/4" diam.  Made marks where the bulge will be.

With 7/8" circle marked on ends, planed from bulge marks to end
You can tell when you're done that facet when you nick the 7/8" circle
Top view of same showing the nick of the circle
Four sides done
Starting to round the corners left over
Just about there
This leaves many facets from the plane
But with spokeshave ...
... and curved scraper (in wooden holder) ...
... we get a nice rounded leg without using a lathe
Marking a found table top that will become three 9 x 15" oval stool tops
Marking hold locations and sight lines
Jig to align bit and brace
Always helps to mark things to avoid mistakes
Jig lined up with sight line
Easy to see I'm lined up in this direction
But I used a mirror to check the angle in the other direction
First time using the mirror trick - worked nicely, though the mirror is a bit large
Some tops I sawed close to the oval layout lines and then chiseled and planed to shape
Others I sawed relief cuts and then chiseled and planed to shape - first method was quicker I think
Legs fitted into the holes with a lot of patience.
Test fit, find where it's rubbing, scrape a little in those areas, repeat
After glue-up, shimming the legs so the top is parallel to benchtop
Scribing the legs ready to cut to length
Legs were glued and wedged into the holes.
Three coats of shellac used as finish.
One of the stools I experimented with octagonal legs (left in pic).
Octagonal, tapered, bulge in center.
Turned out that was far more work for little if any benefit.
I'm now in the process of making 5-6 more stools from scrap and found wood.  I've found that one reason I'm so slow is that using found wood requires a LOT of extra work to get useful parts.  Some of these stools will go to a local school where the kids need a little help getting up to the sinks.