Friday, June 25, 2021

Low Plant Stand

By the rules of our HOA, we have to keep plants off the surface of a balcony.  My wife has been working in the room just inside our front balcony and wanted something nicer to look at.  So she asked me to make a low stand for some plants that she'll be putting out there.  

The completed stand, on the balcony

This post will include some pics of the joinery used to make the stand.  As usual, I made this with joinery that was far more than needed.  She would have been happy with pieces of wood screwed together, but where's the fun in that.  I use just about any piece I build to practice the skills.

The pieces, ready to be joined

The plant stand is basically four legs and four aprons, with five shelf boards running the length.  However, the shelf pieces were almost four feet long and 3/4" square in cross section, so they needed some support in the middle.  I made two more legs, with a rail between them that had five notches to fit the shelf pieces.

The two extra legs and the rail that connects them

Joined with m&t.  The outside "shelf" on these legs supports the long apron

The short aprons are mortised to take short tenons on the ends of the shelf boards

Here's the five shelf boards connected to the short aprons

The corner legs are joined to the aprons with m&t joints


After the rest of the stand is assembled, the center rail assembly can be added

Center rail fits in from below

Gluing up a long apron with two legs ...

... but I added the rest of the assembly to ensure the
legs would not get clamped cockeyed

Doing a couple of dry-fits was a good idea before glue-up.  A certain order makes it much easier.  First, glued the long aprons to their legs.  I didn't have clamps long enough, so used dogs in the bench and in the moveable jaw of the end vise.  When those had set, the shelf boards were glued into the short aprons and those were glued into the long apron / leg assemblies.  The center rail and middle legs were glued in later.

This project was finished with a coat of BLO thinned with turpentine and that brought out a nice color in the reclaimed oak that I used.

Now it's on to another honey-do: a couple of shoe shelves.

Thursday, June 17, 2021

Making a Wooden Screw and Nut: Part 4

Following some suggestions on the previous blog entry from Sylvain and Paul, I worked on the shape of the cutter.  But first, I changed the angle on the front end and played with some other things.

I had the angle at just under 10° (Roy's book suggested about 10°)

Filed it to somewhere closer to 25°

Screw blank was still contacting the cutter midway on the lower bevel

After moving the cutter back 1/8" (by cutting that amount off the back end), I actually got it to cut a little bit.

Started cutting, but still wasn't right

Moving the cutter back made the vertex not align with the internal thread peaks

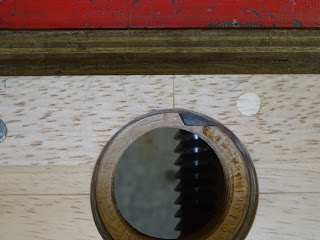
Another view: the bottom of the V should align with the peaks of the internal threads

So I angled the mortise in which the cutter resides and got some hope.

The screw box cut the blank, but this external thread
failed to engage in the internal threads of the screw box
so the cut was not helical

I made a few more similar adjustments, and I was cutting a bit more, but really it was not close to what it should be.

Gnarly, horrible, useless threads

At this point, I set it aside for a few days.  When I went back, I used the suggestions from Sylvain and Paul to shape the underside of the cutter differently.  And I started looking at some angle questions.

First, I ground more of the underside of the cutter to give more clearance for the screw blank

I got to thinking about how a cutting angle changes depending on where on a circle a cutter is positioned.  In the following two photos I'm holding the cutter on the screw that I had cut with a chisel a few weeks ago.  The leading edge of the cutter is at the "top" (defined by the picture below) of the circle and it is perpendicular to the radius of the circle where the leading edge contacts it.


Side view of same

But if I move the leading edge of the cutter away from the "top" and angle it down a bit, like I did for the screw box, the angle of presentation of the cutter changes and I'm no longer cutting threads where the facets of each thread are at 90° to each other.

If I move the cutter to the right and angle it down, ...

... the cutter no longer will cut a 90 degree trench

For this reason, I moved the cutter back to its original position: cutter up closer to the "top" of the circle and perpendicular to the radius at that contact point.  After that, I checked the position of the cutter with respect to the screw that I cut with a chisel (and I know fits in the screw box).

Checking how the cutter tracks with a known screw

A closer view shows the cutter tracking in the trench of the existing thread

With the relief that I had ground on the underside bevels of the cutter, as well as the adjustments noted above, I cut a bit of thread.

Not cutting deep enough

I made a couple more adjustments to the depth of cut by shimming the cutter to angle it down slightly and tried again.  This time I'm using a poplar blank that had been soaking in mineral oil for a week.  BTW, the cherry blank used in previous work had also been soaked in oil.

Got some threads ...

... and they look good but are still not right

When I cut the thread in the picture, I could no longer turn the blank into the screw box.  I think it's because I'm still not cutting deeply enough, so the "valley" of the thread is getting caught on the peaks of the internal threads in the box.

At this point I decided I had to put this aside for a while so I could get to some other projects.  But I'm getting closer.  When I get back to it, I'll work on some smaller screws.  Perhaps 2 1/8" OD was too big for a first attempt.

Tuesday, June 1, 2021

Making a Wooden Screw and Nut: Part 3

Making the screw box has been an exercise in frustration.  At the end of the last post, I had threaded the hole in the rear block and was trying to make a cutter from a too-small piece of steel.  I ended up buying a short length of 1/2" x 1/4" O-1 steel and was able to make the cutter from that.

The interior shape is almost complete here

With the first attempt at a cutter, the interior and exterior facets extended back 1" from the front edge.  This time they only go back 1/2".  I think this will help in two ways.  First, there will be a greater angle at the cutting edge, which will strengthen the edge.  Second, the escapement is supposed to cover the entire inside "V" shape and having that shape go back 1" would make the escapement larger than I'd want.

The new cutter was shaped with hacksaw and files.  Later it was honed with a triangular stone and a strop.  It's a whole different thing trying to sharpen a V-cutter.  So far, I'm not satisfied with the overall cutting edge I'm getting.

With this new cutter, I had to deepen the mortise in which it will reside.  I made it deep enough so that the bottom of the "V" was in line with the peak of an inside thread in the rear block.  In the picture below, I still need to make the mortise a little deeper.

Positioning the cutter to get the vertex of the V to line up with a thread

The workpiece to be threaded has diameter of 2 1/8" and this block started out with 1 3/4" inner diameter.  You have to cut away the first thread or two to allow the workpiece to get to the cutter.

First thread or two cut away

But when I insert the piece to be threaded, it doesn't contact the cutting edge!

Workpiece inserted, but contacts the cutter halfway along the bevel

Pointer shows where the workpiece hits the cutter

Per Sir Roy's book, I was aiming to have the leading edge of the cutter roughly lined up with the centerline of the block.  It seemed like I needed to move it to the right to get the workpiece to contact the cutting edge.  In the pic above, I've already shortened the cutter by 1/8", moving it to the right by that amount.  And I'm still contacting the cutter's bevel.  It looks like I'll need to move it back more, but then, due to the curvature of the hole, I'll need to move it down a bit to allow it to cut a full thread.

If there is any reader out there who can shed some light on proper positioning here, please leave a comment.  I could use some help on this.