Thursday, July 28, 2016

Dovetail Alignment Jig

Regarding dovetailing, recently I mentioned a small issue when transferring the tail outline to the pin board.  Sometimes it's tough to align the reference edges so that when the joint is completed the edges will meet properly.  I often get an offset of a millimeter or so and have to plane one side to even them up.
Aligning the edges with a chisel
Bob Easton mentioned a jig that David Barron did a video about (https://www.youtube.com/watch?v=5I45mEWAJv4).  So I decided to build the jig.  Barron suggested making it from a stable hardwood, quartersawn if possible.  I had some QSWO that was a table top in a prior life and squared up two pieces about 5 3/4" x 10" x 7/16" thick.  Stepped out with dividers and marked 5 tails.  Here, I'm using a backer board to extend the end grain lines to help me get a straighter cut.
Marking the tails
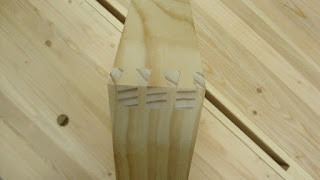
I neglected to get any progress pictures while completing the DT, but it came out very tight.  I've done VERY few DTs in hardwood and I'm thrilled about how these fit.  They didn't fit right off the saw - there was some fitting involved.
Tight as a duck's you-know-what
It's interesting to glue up a single dovetailed corner.  I had to figure out a way to keep the joint at 90° while clamping the tails into the pins.  I cut and planed a board to the proper length to support the free end and clamped to the bench.
An interesting clamping situation
I had to tweak the position of the boards to ensure a 90° corner.
Bang on!
After the glue dried, I checked the edges that I'll use as reference edges for square.  This was done in both directions, squaring to the joint line.
Needed a little planing to make it right
I screwed pieces of 3/8" QSWO to the reference edges, mitered at the corner, and sticking up about 3/8" from the jig surface.
The completed jig
I gave the jig two coats of shellac and a coat of paste wax.  To use the jig, cut the tails for your project board in the usual manner.  Then the pin board gets clamped in the jig as shown below so that the end grain is even with the top surface of the jig and is pressed against the fence.
Pin board level with top surface and pushed left to the fence.
  Lay the tail board against the fence and adjust so the tails just overhang the pin board.
Tail board overlaying the pin board, both pressed against the fences to align their left sides
Then while holding the tail board tight to the fence, scribe the tails on the pin board end grain with a pencil or (in my case) a knife.
Transferring the tail outlines to the pin board
This test joint came out nice, though I didn't prepare my boards well to be able to see if the jig helped with the alignment issue.  I didn't bother to square up the left edges, so they don't align perfectly well.  But I'm confident this will help.
First test joint
Making this jig was my first time doing multiple dovetails in hardwood.  I'm very happy with how they came out and also very happy with how the jig works.

Monday, July 25, 2016

Workbench Top Re-Flattening and Making a Scratch Stock

I've been aware for a while that my benchtop has gone a little out of flat.  I built the bench last fall from kiln dried Douglas fir so I thought it wouldn't move much.  Over time the top has shrunk a bit and twisted a little.  I don't need the top to be perfectly flat, just reasonably flat so I can test boards for twist by laying them on a flat surface.
Above bench, looking down: right front leg proud of top by 2-3 mm
When I assembled the bench, the front face of the front legs was flush with the edge of the top.  As Chief Inspector Clouseau said to the lady whose priceless Steinway piano he just ruined, "Not anymore".
High spots at back left, front right and center along slotted strip show up lighter after a couple passes
I'm fortunate to have a Lie-Nielsen #8 jointer.  This beast is 24" long and works fantastically well.  I took a few strokes diagonally across the bench and I can see it was removing certain high spots.  I also used the plane on its edge to show where high spots were and removed them with a #4.
Looking for high spots
After taking the surface down to bare wood and tweaking with winding sticks and a little more planing, I was happy.  I've got a brand new surface, reasonably flat.  I can probably do this many more times (if needed) before I risk having the top edge of the metal vises coming too close to the benchtop.


I've been wanting to make a scratch stock for years.  I've used the Sellers "poor man's beading tool" and that worked OK, but I'd like a tool with a bit more versatility.  Bob Easton had a "Google Books" link (somewhere in his blog site) to an October 1999 "American Woodworker" article by Tom Caspar about making and using a scratch stock.  My tool is based on that article.

Started with a piece of 1" thick x 5 3/4" long x 2 1/2" wide maple salvaged from a junked table undercarriage.  Squared it up and marked out the scratch stock.
Marked and ready
Cut carefully to the lines so very little clean-up was needed
Drilled 3/16" holes (and later countersunk) for some 10-24 machine screws
Made the holes 3/8" on the other side and chiseled out the shape for the nuts
Screws and nuts fitted
Then I cut the block in half, cleaned up the sawn surfaces with a #4 and did a little shaping to ease the corners and edges for comfort.  The underside of the arm gets curved a bit so that the tool can be angled slightly in use.
Underside of arm (facing up) curved with rasp and file
For the cutter, I used an old (really crappy) no-name saw that I got from a garage sale a couple years ago.
Cut off a piece of the saw blade
Filed off the teeth and got a flat edge
Rubbed it out on sandpaper to clean up the sides
Used a saw file to start a V groove, then a round 7/32" chainsaw file to cut a half-round profile
Cutter all done
Cutter installed
The cutter was a little wider than I needed and the bolt upper right in the above picture interfered with its placement.  So I filed a little cut-out so that it would straddle the bolt and sit at the right location.  And here's the first test drive.
Test cut in pine scrap
It worked fine, but got hung up a little on the soft and hard growth rings.  I'll have to try a harder wood soon.  But with a tiny bit of sanding, the bead was looking great!  I also tried a stopped cut to do a corner.  This time I used a wheel-type marking gauge to scribe a line before using the scratch stock.  Probably didn't need that with the grain, but definitely needed it cross grain.  This came out OK, but not perfect near the corner.
A little ragged near the corner
I noticed that you have to clean the tool often, and I did this with a knife point.  Tiny dust-like shavings get stuck in the corner as can be seen in this pic.
Mound of dust in the corner just above cutter
And another one from the To-Do list bites the dust.  Hoorah!

Friday, July 22, 2016

Making a Panel Gauge - Part 2

I've never been good with metal work.  I thought about buying an X-acto knife blade to use for the cutter in this panel gauge, but I decided to make a cutter from a piece of one of my thicker (0.039") card scrapers.  I hope the metal is good enough to hold an edge.
Hacksawed a bit over 5/16"
Filed it to a width of 5/16"
Then filed one end to a point and started putting an edge on one side
And got the final profile - all with a straight single-cut file
I used an off-cut from the stem of the gauge to practice mortising for the cutter and wedge.  This turned out to be very important.  In the following picture, the mortise on the far right was my first attempt.
First mortise at right, final practice try in center
I was a little worried about blowing out the wood to the right of the mortise when chopping and that's exactly what happened.
Can you see the end grain protruding?
So I decided to first drill out the hole with a 1/4" drill bit and then pare away the waste with a 1/4" chisel.  The mortise is 5/16" wide.  On the bottom it is 5/16" long and on the top it is 13/32" long.  The wall closest to the end of the stem is straight and the other wall is angled.  I took my time and pared carefully.

When it was time for the real thing I marked very carefully, drilled the hole, and pared away.  BTW, I started the mortise about 3/4" away from the end of the stem.
Mortise layout on bottom
And on top
Drilled from both sides to avoid blowout
Chiseled out the waste
Used an auxilliary light to see the inside better.  See the hump in the middle?
I pared away until a chisel laid on the wall was flush with top and bottom edges.  With the mortise cut it was time to fit a wedge.  I had a small oak scrap, already at 5/16" width and cut the angle to get an approximate fit.
Tight fit on bottom ...
But not so good on top (mind the gap!)
I tweaked the wedge until I got a tight fit top and bottom.  Then I trimmed the wedge and the back end of the cutter to get the lengths I wanted.
This cutter isn't going anywhere!
There are a couple important points about this picture.  First, the wedge sticks out of the bottom of the stem a little bit.  This allows you to overhang the cutter but not the wedge at the end of the bench.  A light tap loosens the wedge.
Tapping the wedge to loosen the cutter
On the other side, the wedge sticks up higher than the cutter so you can tap it to tighten the cutter in place.
Tapping the wedge to tighten the cutter
For finishing, I gave all parts two coats of shellac.  Then the stock and stem (except for the side that opposes the wedge) got a coat of wax.  What a difference in how the stem slides in the mortise!  No wax on the wedges so they will hold better.
Shellac drying (how exciting!)
In use, to tighten or loosen the stem at a certain location on the stock, it takes just a tap on the bench.  But it really holds TIGHT.  It's no wonder wedges were such an integral part of woodworking shops for centuries (and still are in some shops).
Tightening the wedge
Loosening the wedge
In use, the rabbet cut at the bottom of the stock will slide along the straight edge of a board.
Slides nice after waxing
And the requisite glamour shot:
The finished product
I almost forgot - I drilled a 9/32" hole in the other end of the stem for a tight fit with a pencil when I want a pencil line instead of a knife line.  If I ever use skinnier pencils or if the fit gets loose I'll put a screw in from the side to tighten it down.
Turn the stem around and use pencil for a non-knifed line
And there you have it.  Another "to-do" list item done.  Finally!  Now I have to wonder how and where to store this ...

Edit: I'd appreciate it if anybody can recommend whether or not I should harden and temper the cutter.  Thanks.