Thursday, February 23, 2017

Making a Socket Chisel Handle Without a Lathe

I'm not well informed when it comes to chisels.  I know there are many types - bench, firmer, mortise, paring, etc.  Aside from mortise chisels, I don't know what the differences are between types.

A year or two ago I found a couple chisels at a garage sale.  Both are about a 1/4" wide (not exactly 1/4" though, for whatever reason), one has no handle and the handle on the other is loose.  So I wanted to experiment with making a new handle.  This post will be mostly pictorial of making a practice handle from pine for the shorter of the two chisels.
Stiletto at top, unknown brand bottom
Maximum I.D. is 31/64", bottom is about 1/4"diameter, depth is 1 1/16"
Don't remember where I picked up this tip, maybe from Jonathan White of The Bench Blog, but you can model the taper of the socket by stuffing aluminum foil in it.
Stuffing foil in the socket to model the size
Approximating the angle at about 13.5° with an angle finder
The math geek in me made me do this, too, and got nearly the same angle
So I set a bevel gauge to half that angle
I prepared a blank of pine 1 9/32" square and just shy of 7" long.
After finding the center of the socket end, marked lines 1/8" away from center in two directions
Used the bevel gauge to mark the angle on opposing faces to about 1 1/4" from the end
Verifying that the angle looks about right
Then sawed to the lines
Knowing it would be tough to mark the newly sawn faces with that same angle, I measured the shoulder of the already sawn area and it was 3/8".
Drew lines from the endgrain marks to the 3/8" point at the shoulder
This resulted in a "squared cone".  Marked edges to start roughing in a round.
Once the shape got closer to round, I used the chisel's socket to refine the shape.
Stuffing the cone in the socket and rotating ...
... results in marks where more needs to be removed
I then used a curved scraper to remove the dark marks.  I repeated this many, many times until I finally got a fairly even covering of dark markings on the wood.
Done.  The line near the base of the taper is 1 1/16" from the end,
same as the depth of the socket
Handle blank fitted - not perfectly straight
With that done, I needed to shape the handle.  I like the look of the "London pattern" chisels with octagonal handles.  So ...
On butt end of handle blank, I found center and inscribed a circle
Used a 45° gauge to define the extents of lines for octagonizing
and drew those lines on the faces
Then planed to the lines, getting a decent octagonal shape
Decided on transition points
Used chisel, rasp, file and sandpaper to smooth the curves
And here it is, next to the other chisel.
The new handle seems much too long
I suspect this chisel is a paring chisel based on its length.
Here they are next to a standard bench chisel

I don't know if paring chisels typically have shorter handles, but when I repeat this exercise in a harder wood, the handle will be shorter.  Maybe not quite as fat, either.

This was a fun exercise.  Once again making due without the tools most people would say you must have for this.  My handle might not look as nice as Jonathan White's gorgeous handle, but it's a start.

Tuesday, February 14, 2017

Making a Cabriole Leg With Only Hand Tools

It sure would be nice to have a bandsaw.  Even nicer to have space enough for a bandsaw.  But we make due.

I was reading in volume II of Lost Art Press' "The Woodworker: The Charles H. Hayward Years" about cabriole legs.  This is something that I've thought about trying for a long time.  So try I did. This is not for any larger project or anything - just strictly to see if it's possible with my current skills and tools.

I prepared a piece of poplar 2" square and just over 16" long.  Made a template from cardboard by laying out a grid and roughing in a shape.
Leg blank and template
The template was cut with scissors and laid on the leg blank to copy the shape on two adjacent sides.
Copying the shape on the blank
Marking the shape and waste areas
It's important that you get the adjacent face marked properly - it would be easy to mark it backwards so that the leg would turn out to be like something Picasso might do.  The "knees" of each side should be touching each other.

For the straight section at the top of the leg, I used a marking gauge to define the lines and sawed to the lines with a 10" rip backsaw.  Then, lacking the bandsaw, I used the fret saw to saw the shaped areas.
Curved parts cut away
It's tough to saw to the lines front and back with this saw.  I was off the lines and sometimes over the lines, but got it done.  Fortunately this poplar cuts fairly easily.

Cutting the waste out from one face removes most of the template lines from the adjacent face, so You have to replace them.  But there's a catch.  When the template is placed in curved areas, it does not give the same lines as it did when the face was flat.
Template placed on curved face
When you press the template in here, ...
... it shortens up the template so it doesn't sit in the right place at top
So I just drew in a little of the template at bottom, readjusted the template to draw a little at top and fudged the in between parts.
Readjusting the template to get the proper lines at top
Hayward gives a great description of how to deal with this in one of the cabriole leg articles.  I chose to be less rigorous as this was just a practice exercise.

Anyway, cutting out the second face is helped by keeping the off-cuts from the first face.  They can be used as aids in clamping in the vise.
Ready to saw second face to shape, using
off-cuts to help secure the piece in the vise
Forgot to get a picture of the leg after these cuts, but it really starts looking like something after using only the saw.

I decided to make the pad on the bottom of the foot next.  When I laid out the shapes on the leg blank, a circle was laid out on the bottom of the leg blank.  The extents of the circle were marked in the directions parallel to the faces and then the 1/8" depth was sawed.  This was followed by chisel work to round out the pad.
Round pad - you can still see the sawed lines at extents of circle
From there it was a lot of chiseling on the foot to get close to shape.  I used the clamp-in-a-vise method for work holding.
Shaping the foot
The Hayward article says that the cross sectional shape of the leg should be round at the foot and pad (in fact, most cabriole legs are turned on a lathe first to shape the pad and foot) and round up to the smallest part of the "ankle".  Midway up the leg it is a rounded square and up by the knee, it is mostly square with rounded over edges, a bit more rounded in the front corner.

The spokeshave was used to smooth some rough saw marks and start the rounding.
Spokeshave used to round over corners
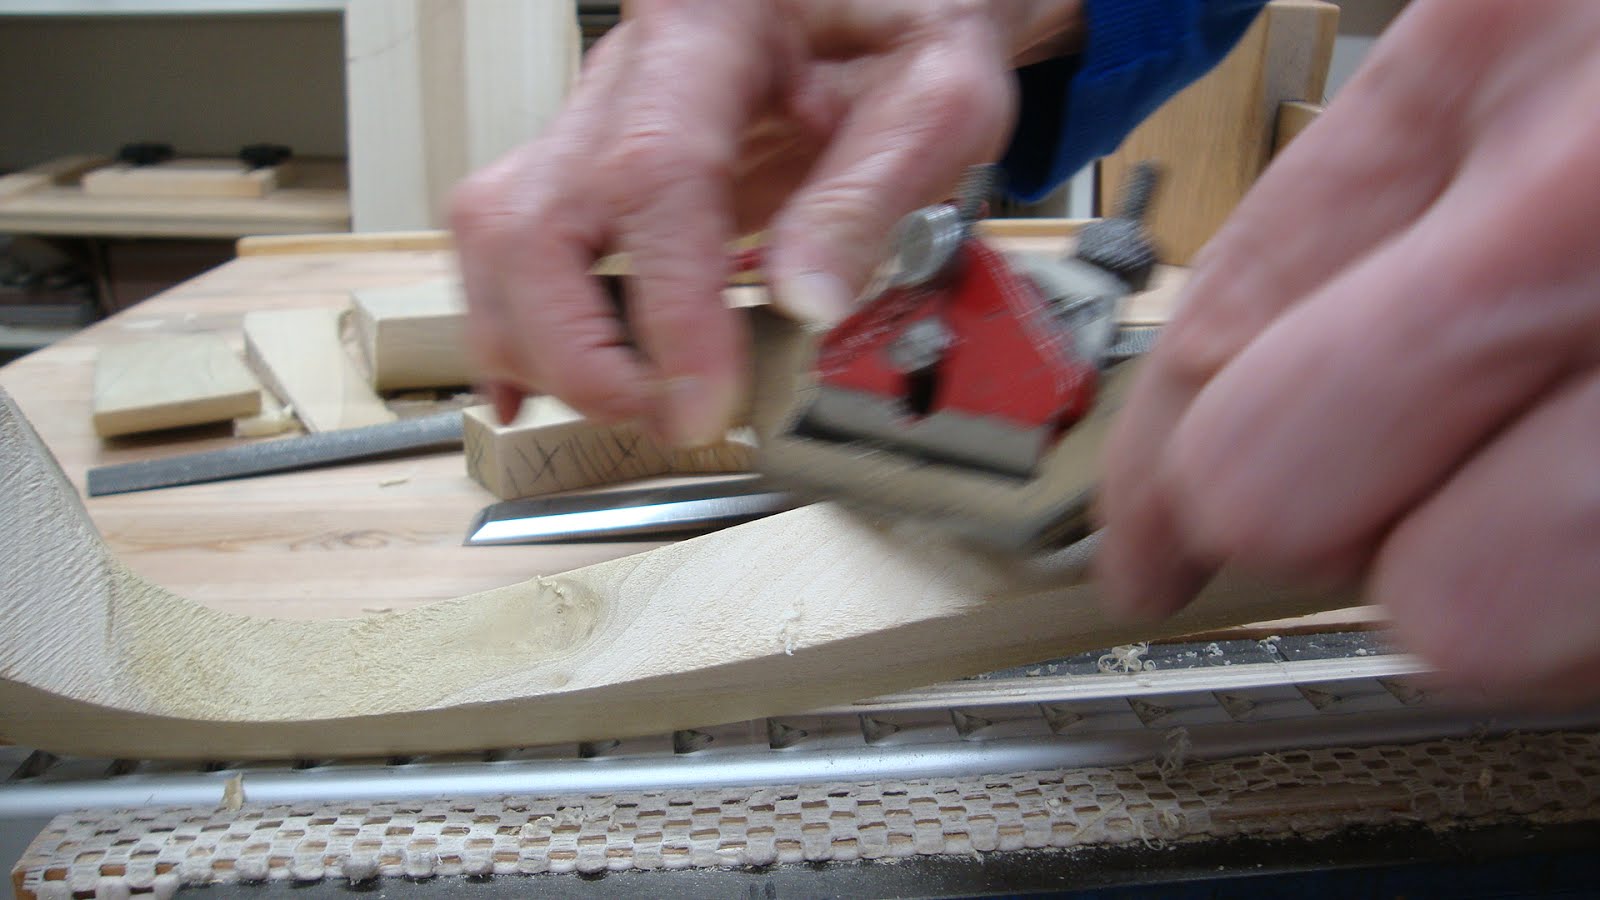
Also used rasps and files to get into place the spokeshave couldn't go, but got no pictures.  Later it was scrapers to smooth some of the marks left over from the spokeshave, rasps and files.
Scraping away some minor facets
I made what Sellers calls a "chair devil" a few years ago and this really helps scrape some areas.  The chair devil has one end concave and one end convex.
Using the chair devil to smooth the underside of the foot.
A closer view - this tool really helped here
One of the key things when making a cabriole leg is to look at it from different points of view as you go.  This helps guide where you remove more material and try to make it symmetric.

Finally, here is the leg after some sanding.
The finished leg
Standing, viewed from left
Viewed from right


Here's the bottom, showing fairly round foot and pad.
Foot and pad viewed from bottom
And the foot viewed from above looks fairly round.
Foot viewed from above
Finally, the perimeter of the foot at its widest part should be level with the ground.  This is definitely not perfect, but for a first attempt I'll take it.
Front view of foot
The whole thing probably took about 5-6 hours, including some butt-scratching and short breaks.  I think the "ankle" is too thin to support any significant weight.  If I do this again in a real piece, I'll make the ankle thicker, especially if it's from a soft wood like poplar.

I didn't try to make the "ears" that blend the leg in with rails of the piece they are part of.  That would be another challenge.  This was a great skill builder exercise.  For anyone out there thinking they can't do a cabriole leg (with or without a bandsaw), I say "yes you can!"

Thursday, February 9, 2017

Twin Small Boxes Within a Box

Before I get to the project, I've gotta gloat over meeting a woodworking giant.  I recently visited my sister in Salem, MA.  So what does a woodworker do before traveling?  He looks for woodworking places of interest that he might visit while there.  It turns out that Phil Lowe's shop, the Furniture Institute of Massachusetts, is just a few minutes away in Beverly, MA.  Even though it was a holiday, Phil was "puttering around" in the shop and agreed to show me around.
Phil Lowe and some chump
We chatted for about a half hour.  He talked about work-in-progress in the shop and he showed us many pieces they were working on.  Talk about gracious.  What a nice guy and what a thrill it was to meet him.

On to the project.  A year or two ago, we helped my wife's workmate/friend pack and move.  He gave me some wood that was just going to be thrown out.  Some beech from a chair and some unknown wood from a kitchen drain-board or something.  Well, I made a small dovetailed box from the mystery wood and it sat unfinished since then.  The box was not even glued up.  A top and bottom were made from the beech, but never attached.  It was time to get it out of the shop.
The box
The box is an unusual size - 9 1/2" wide, 4" deep and 5" tall.  After gluing the main box dovetails, I glued the top and bottom on.  Then I marked through the upper-most dovetail and separated a lid from the main box.  There's an issue with cutting a lid off like this.  This wood was so soft that the fibers crushed when chopping out the tails and pins.  This leaves hidden caverns in the recesses.  Hidden, that is, until you cut through them to make a lid.
Exposed (and filled with sawdust/glue) caved in section from chopping
This wood isn't pine.  Something different, but I don't know what.  Some photos below will show face and end grain - maybe someone will know what it is.  Maybe balsa?

I hinged the lid with 1" long, 3/4" wide cheap brass hinges.  I'm concerned the tiny screws wont hold well in this soft wood, but so far they feel OK.
Those are some TINY screws
I made a couple lid supports that hopefully will keep the lid from pulling the screws out.
Lid supports
These supports were glued on with a superglue, as I had no good way to clamp them up.  When the lid is up, the supports hold it at 90°.
Lid opened and supported
Since the box is unusually deep, I decided to add some smaller boxes to fit inside that will sit on small support rails I added to the inside front and back.
One of the small box support rails inside the main box
The twin boxes that fit inside are from oak that used to be a bathroom cabinet stile or rail.  It was interesting making the dovetails on these small pieces and they came out easier and better than anticipated.
Twin small boxes, each 4 1/4" x 3" x 2" tall
I didn't take many pictures of the construction process on this project, but I did something different gluing up these small boxes.
Taped cauls to the tail boards for directed force when clamping
This worked very nicely and the boxes came out great.
Small box clamped up
After gluing a piece to the bottom, cleaning up the joints and rounding edges, they were done.
One corner of a small box
And they fit nicely inside the main box.  They sit up about 1/4" higher than the main box rim so they can be grabbed easily.
Sweet!
Showing the rail that they sit on
I finished the boxes with two coats of shellac and a coat of wax.  I didn't add wax to the interior bottoms, though.  I added a "felt-like" product called Suede-Tex that I had bought several years ago.  You paint the bottoms with the green adhesive (being VERY careful not to paint the sides), then add this felt-like green dust, and let it set.  The extra dust can be brushed out later and it leaves a surface that looks like a felt lining.  For painting the adhesive, I used a cheap "acid brush" on which I had cut the bristles to a point to help getting into the corners.
Faux felt
Another shot
And finally a glamour shot or two.
The finished box
Another shot
A fun project for sure.  And it got some clutter and wood scraps out of the shop.  Bonus!