Thursday, February 15, 2018

Shaker Two Step Stool, Part 3: The Real Project

Building the prototype 2-step stool was quite helpful in figuring out a few construction details.  But where it really helped was in figuring out how to glue up the beast.  Not that that stopped me from making a near-disastrous screw-up.  I'll get to that later.

Here's the build in pictures and captions.
Got the parts glued up from smaller boards, then to proper dimensions
Back to front: 2 rear side pieces, 2 front side pieces, 2 steps, 3 rails
Marking the rear side pieces for dovetails
Checking the dovetail shoulders for square
I spent some extra time making sure my dovetails were cut square to the face.  The only "square" that would fit in between tails was a depth gauge, which was square enough.  I pared the walls with a chisel until satisfied.
Checking the dovetail sidewalls for square
Transferring tail outlines to pin board end grain
Carefully sawing the pins
Sawed out the waste and later chiseled to the base lines
Dry fit looks good (after some minor fitting and paring)
The rear step and the front step dovetailed
Before I continued, I transferred the dovetail baselines to the three rail pieces.
Rail (top) sitting on a dovetailed step, showing common shoulder lines
After the rails were dovetailed and fitted into sockets in the sides, I glued up the rear and front side pieces.
Two sides cooking in the clamps
Before finalizing the project and gluing up the whole thing, I decided to fill all the exterior nail holes.  I had punched the nails through with a small nail set, which enlarged the holes.
Example of nail holes
Holes drilled out to 1/4"
Plugged with 1/4" plugs cut from off-cut scrap
Plug glued, cut flush and planed smooth
Can you tell how many plugs are in this piece? (at least 3)
I then cut the arches in the sides that form the feet (no pics).  After rehearsing the glue up, I got to it in two stages.  First stage was gluing the upper step, rear rail and front upper rail to the sides.  The lower step and rail were in place dry to help keep things aligned.
Stage 1: top step, rear rail and upper front rail
Note the cauls used to force the tails down into the pin recesses
And wouldn't you know it?  As I was hammering the top step's dovetails onto the side piece's pins, I noticed too much resistance and a split starting in the step.  Turns out I had the top step rotated 180° from proper position.  Arrgh!  I quickly pounded the thing apart, added more glue and got it right.  The split was not complete and will be inconsequential with the step glued to the sides.  I can't even see it in the finished piece.
Stage 2: bottom step and lower front rail glued to sides
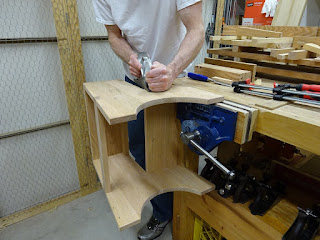
It was challenging to figure out ways to clamp the stool to clean up the joints
Gave it three coats of shellac
These were some of the few dovetails I've done in hardwood.  I took care with them and they are some of the best dovetails I've done.
Upper left corner
Upper right corner (discoloration from old nails/screws can be seen)
Lower left corner
Lower right corner
Rear rail dovetailed into the side
Final glamour shot
Not bad for wood that was destined for a landfill.  It definitely takes a longer time to work with wood like this - removing old finish, filling nail holes, etc. - but it's really satisfying.  This is going to be a really useful addition to our house.

Saturday, February 3, 2018

Shaker Two Step Stool, Part 2: The Prototype

I don't normally do prototypes of the things I build.  But I got some pine boards in the load of oak I got from my neighbor's kitchen demolition.  And it was just enough to make a full-sized prototype of the two-step stool.
Some of the wood that came out of my neighbor's old kitchen
Last time I wrote about some design considerations and settled on this design.
The not-quite-final design
I didn't bother taking any construction pics, as this was just a prototype.  But here are some finished pics, showing some of the design features.
Steps are at 9" and 18" heights
Back edge is angled for stability (wider at bottom)
Front edge has matching angle for looks
The steps are 15" long - plenty of room for two feet
The lower step is just under 7" deep ...
... while the upper step is just under 6" deep
I had intended for the two steps to be the same depth.  But the way I laid this out, it didn't quite work out right - I'll fix that in the final version.
The cut-out in the sides that creates the feet is 10" wide, 3 1/2" high
That leaves 4 3/4" of wood connecting the back of the stool to the front of the stool
Besides the two steps that are dovetailed into the sides, there are three rails that connect the sides.  There is one under the front of each step and one in the back.
Cross-rail half-dovetailed into the sides - also glued to the underside of the step
Cross-rail in the back, fully dovetailed into the sides
And here's the final piece
I know it's just a prototype, but I finish planed all surfaces before final glue-up, cleaned up the dovetails and later (after the above picture) gave it three coats of shellac.  I also planed smooth all the joints and rounded corners.  I can't help myself.

I did learn a couple things.  First, I'll adjust the final design so that the two steps are the same depth.  The second thing has to do with the construction.  When I fitted the cross rails, I took the baseline directly from the partially-assembled stool (the dovetailed steps were already in place).  Thinking back on it, I should have put my two steps and three rails together and marked them for their baselines at one time.  As it was, the rail baselines were a bit wider than the step dovetail baselines.

Lastly, these dovetails came out as good as any I've ever done.  I was very careful to check that I sawed the tails perpendicular to the board's surface, and adjusted with a chisel when I didn't.  This gave me a better "template" to transfer the outline of the tails to the pin board.  They fit fairly well off the saw, with only a bit of adjusting needed.  Let's see if I can do as well in oak!

The step stool is rock solid!  Next post I should have the "real" one finished.