Friday, January 31, 2020

Side Table, Part 9: The Grand Finale

The blog police were knocking at my door.  Apparently in my post about the drawers I didn't include the obligatory picture of the drawers, each one pulled out a little more than the one above it, to show off the dovetails.  So here it is.
Dovetail glamour shot
The backs of the drawers are inset 2 1/2" from the back ends of the sides, enabling them to be "full extension".  The weight of the drawer will be supported by those last 2 1/2" of drawer side resting on the runners (or kickers) above them.
Fully extended
On to the finish.  After I gave the outsides a couple coats of shellac to seal the wood, my wife painted.  This side table will live in a spare bedroom / office that has a "coastal" theme and she chose the colors accordingly.

The first coat was of a thinned grey, applied with a foam brush, thin enough for the wood grain to show through - not a lot, but a little.  After it was dry, it was sanded lightly with 320 grit paper.
First coat of paint
Left side - you can still see the grain running vertically
Two additional colors were added, using a technique called "dry brushing".  She dipped a bristle brush in paint, dabbed the brush on a paper towel to remove most of the paint, and applied the remaining paint on the brush to the project in a fairly random pattern.  These colors were added, not with total coverage, but fairly sparsely.  First was a very light blue.
Light blue added
After letting it dry and doing some light sanding, she added white using the same technique.  That was followed up with some light sanding, but firm enough in a few spots to get almost to bare wood.
White added
When she was done, I gave the top three coats of a water-based acrylic finish for protection.  Then I put on the drawer pulls that she had picked out.  The drawer pulls were also "wavy", furthering the coastal theme.
Pulls finally installed
And here it is in its final location.
The table in its new home
Ta da ...
A great project, but so glad it's finally done.  In the end, I'm very happy with the way it came out.  It took long enough, but hey - it kept me off the streets!

I kept a log of the time spent on this project and here are a couple of statistics.  These are approximations, as each day I wrote down a rough estimate of how much time was spent on different aspects of the project.  I didn't include design and drawing, which probably took 5-10 hours.  Or the painting and topcoat, which probably took a few hours.

Total time: 178 hours
Percent of that in stock prep: 32% (far less than I had thought)
Percent of that in layout/joinery: 46%
Percent of that in glue-ups: 4%
Percent of that in finishing: 3%
Percent of that in other aspects: 15% (Fitting drawers, shellac, foot prototyping and making)

I've got to get faster at this.  Now it's time to get to some other things.

Thursday, January 23, 2020

Side Table, Part 8: Drawer Details, Top and Finishing Up

The drawers fit into their openings pretty well right after the glue-up, but there was still some work to do.  The top two drawers needed a little planing on the upper edge of their left side to slide more smoothly into the back of their recesses.

I added stops so that the drawers won't slide too far into the cabinet.  It was helpful to remove the drawer bottoms so that I could mark where the stops should be glued down.  I slid the drawer slowly into the opening and got it flush with the cabinet front, then marked a pencil line behind the drawer front.
First drawer stops installed
Had to be creative in clamping the stops for the bottom drawer as the feet got in the way of spring clamps
After the drawers were fitted, I planed up stock for the top.  The stock started out just over 4/4 thick and after planing the glued-up top, it was a hair over 7/8" thick.  Notice that the grain is running in the direction of the shorter dimension.  The cabinet is about 18" wide and 24" deep.  This way, end grain will be along the sides of the top.  I thought about this orientation a lot.  Since the cabinet sides are solid panels (not frame and panel) with grain oriented vertically, the top will not have a cross-grain problem with the sides.
Choosing the show face and alignment, planed those surfaces true
Top glued up and in clamps - underside shown here 
 I had wanted to put a progressive radius round-over around the edges (with a fillet on top), but the wife nixed that in favor of a simple underside chamfer.  I used a scrub plane and smoother to create it.
Marking for the chamfer
I like how it came out
I'll be attaching the top with two screws through each of the three top rails.  This was an interesting exercise.  I had not made any allowance in the top rails for this before installing them.
An earlier picture showing the three top rails
Drilling the holes from above was not the problem - countersinking the holes on the underside of these top rails was the problem.  With good advance planing, I would have drilled holes and countersunk them before the rails were installed.  At first I used a countersink bit with my fingers, and while this worked, it was slow and hurt my fingers.  So I tried making a countersink from a screw that could be twisted and pulled from above with a drill.
Filed three cutting facets on the screw head, put the screw through the hole from below,
then chucked the threaded end in the drill and pulled up while spinning.
That worked, but not well.  What worked better was using a combination pilot-hole-and-countersink bit that had a hex shank with a socket wrench to provide the twist motion.
The solution was still slow, but much faster than the others I tried
I realize that an alternative to countersinking the screw heads is to cut away little notches on the top edge of the drawer back so that the drawer could slide under the screw heads.  But I really preferred to have the screws countersunk.

Anyway, with that done I finally attached the top and had a look at the overall cabinet for the first time.
First look - drawer fronts have one coat of shellac
I really wanted to make wooden drawer pulls for this cabinet and I had made a prototype, but the wife has a specific idea of what she wanted.  So drawer pulls have been ordered and should be here in a day or two.  My wife is going to paint this cabinet gray, then wipe on another color, with incomplete coverage to give a streaky effect.  She painted that mini chest of drawers that I made last year similarly, so I think it will look good.  But first I'm going to seal the wood with a couple coats of shellac.
First coat of shellac going on
Not sure when the painting will be done, but I'll put up a couple final pics when it's complete.  I'm really glad this is finished.  I've been working on it for over two months!  I'm still quite slow and I think about 60-70% of the time is spent on stock preparation.  Now I can finally get to some other things.

Thursday, January 9, 2020

Side Table, Part 7: Drawers

Ralph (The Accidental Woodworker) asked for more details on the Spanish windlass that I used to bring the carcase into square.  I have no idea where the name comes from.  But it's basically a loop of string or rope that, when twisted, pulls together the two places to which it is attached.  Many frame saws (bow saws?) use the same principle - you know, the saws with a wooden "H" frame and a blade held at the bottom between the two uprights.  At the top, a string is looped around the upper extents of the uprights.  A stick is used to twist the loop of string, making it tighter with each twist, thereby tightening the blade.
The rope is looped around the upper left and lower right clamp heads
As the rope is twisted, it pulls the corners closer
Note that there are two sticks used because of space constraints.  I used the short stick to wind the rope, then a longer stick that has one end sharpened to a point is inserted next to the short one.  It's length makes it hit the drawer dividers, so the twist can't come undone.

A couple notes before getting to the drawers.  First, I permanently attached the feet with glue and screws.
Screw holes pre-drilled

First pic with the feet attached
Second, I glued and screwed the kickers along the top edge of the carcase.  Glue was used only in the first inch or two.  These were installed between the top rails and will keep the top drawer from tilting down when it is opened.
The right front kicker screwed in place
Drawer construction has been going nicely.  The first two drawers are just about finished - just a little bit more fitting to do.  The drawers take a lot of time because I have to prepare the stock (by hand) before the building can begin.  The drawer fronts are 3/4" thick poplar and the sides and back are ~7/16" thick soft maple.  The bottoms are a nice 1/4" plywood.  The maple was a bit of a drag, I had to remove a fair bit of twist.

It starts with fitting a drawer front tightly into the front of the carcase.
Top drawer front tight in its opening
Then the drawer sides are planed to width to fit into the side of the drawer recess.  The sides are attached to the fronts with half-blind dovetails, but I'm using a technique that makes it easy to hide the groove for the bottom.  The bottom "tail" is a straight dovetail that extends to the bottom of the drawer side.
Tails marked, ready to cut
Transferring tail shapes to drawer front
Then the tails sockets were carefully cut into the drawer front.
Note the penciled lines showing the location of the groove to be ploughed
I might have been able to house the groove within a normal dovetail.  But I like to have a certain thickness for the end pin and a standard DT might have left a thin pin.  I also could have made just one side of that tail at the usual angle instead of making it a straight tail.  Oh well, hindsight ...
A dry-fit allowed me to flush up the bottoms of the sides with the bottom of the front.  Then I could plough the grooves.
Using the old woody plough
The back of the drawer fits into dadoes in the sides.
First chopping ...
... then routing to a depth of 1/8"
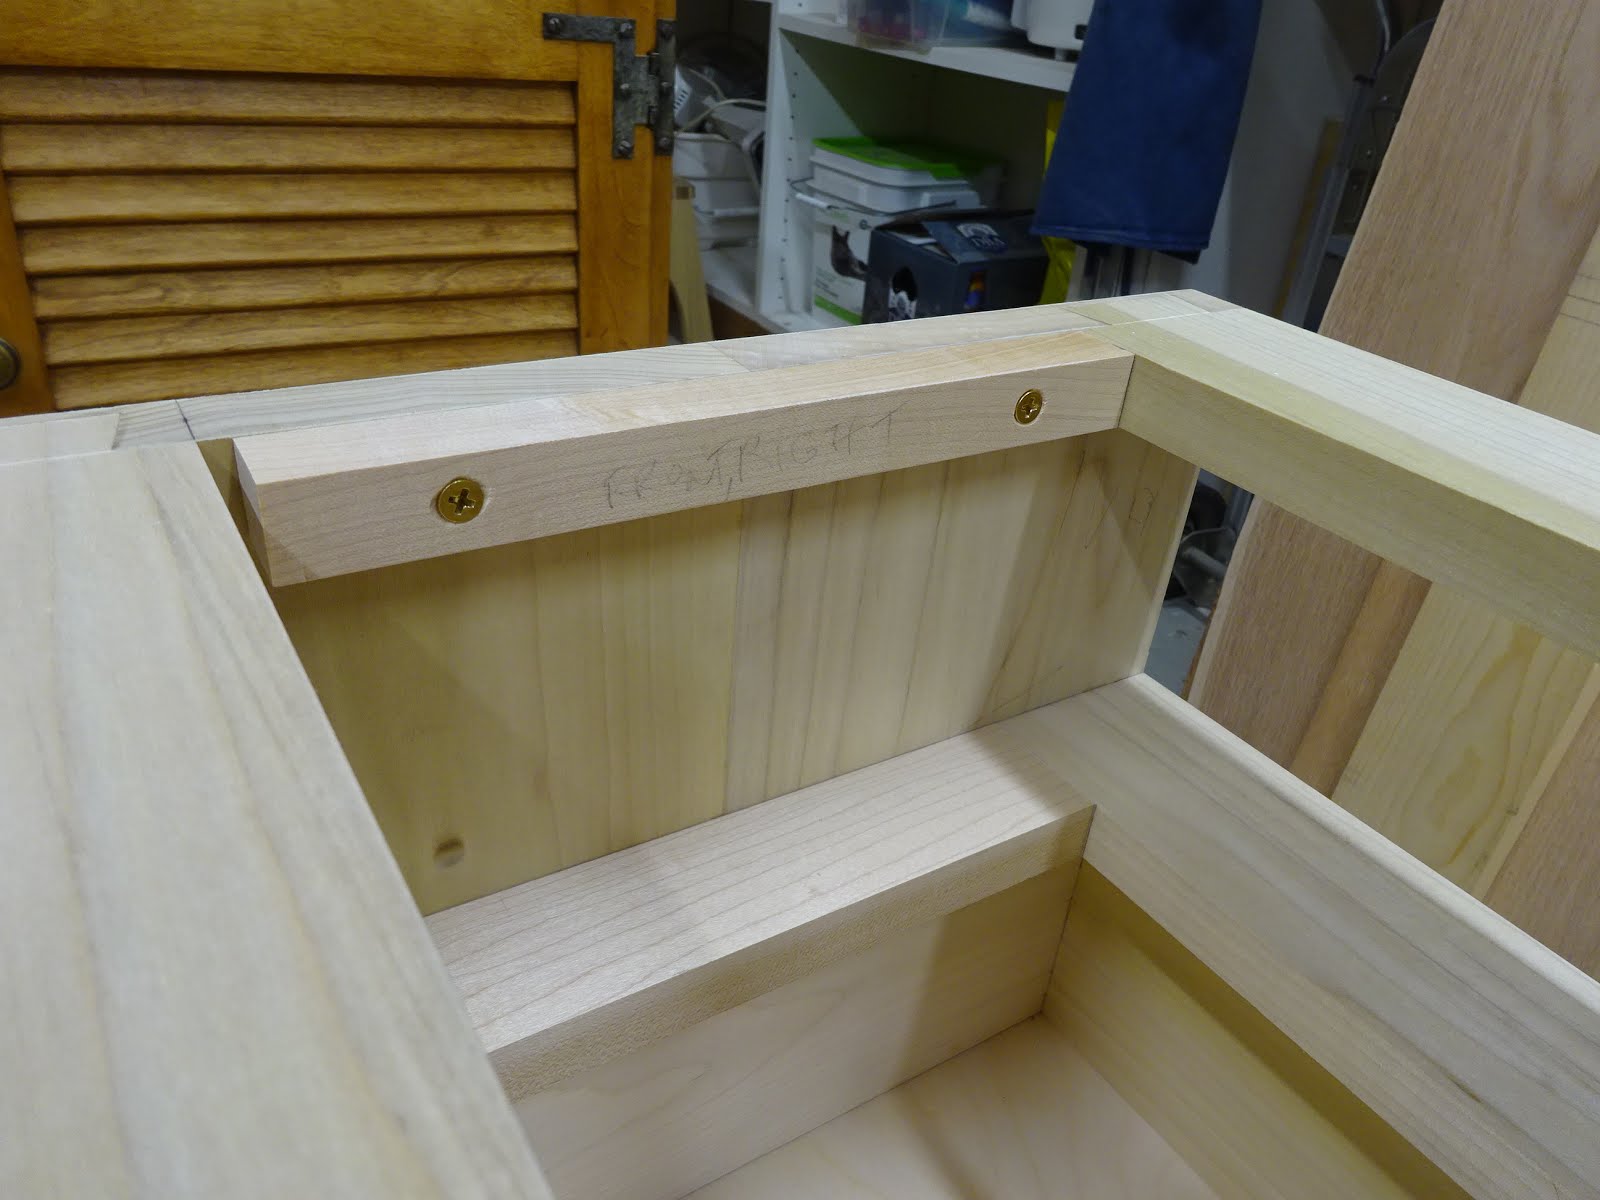
I wanted to try out a method that really strengthens the joint, so I made a couple of small tenons on each end of the drawer back.  The tenons fit into mortises formed at the bottom of the dado that extend through to the outside.  With a bit of glue, these things will never come loose.
The joint
I wanted to record the method of getting the shoulder to shoulder length of the drawer back.  I try not to depend on measurements, so I made a stick whose length is the exact shoulder to shoulder distance of the drawer front.  That's the distance the inside surfaces of the sides should be from each other when the back is installed.  I clamped that stick between the sides just behind the dadoes, then placed the back piece up to the dadoes and made a knife nick where the back's shoulder lines need to be.
The pencil is pointing to a stick clamped between the sides.
The plywood I bought for the drawer bottoms is actually very close to 1/4" thick.  I ploughed 3/16" grooves in the front and sides, thinking the plywood would be undersized.  So I put a chamfer on the bottom edges for a good fit.
Planed a chamfer on the drawer bottom and tested the fit with a grooved "mullet"
Three screws will secure the bottom to the underside of the drawer back.
One of the drawers in clamps
I still have to make the third drawer - it's 6 3/4" deep, so it will be a bit more challenging than the first two.

Next up: finishing the drawers and making the top.