Wednesday, August 31, 2016

A Rabbeted Dovetail Experiment

In "The Joiner and Cabinet Maker", Chris Schwarz writes about making a small rabbet on the inside face of the tail board when laying out for dovetailed drawers.  I wanted to give this a try to see how it might work for me.

I got a piece of pine, straightened and squared an edge, cut the board in two and squared the ends that would be dovetailed together.
Two pieces ready to be dovetailed together
I used the pin board (shown vertically below) to mark the base line on the tail board.
Getting an accurate baseline for the tail board
Then I knifed a line and created a 1/32" rabbet using a router plane.
1/32" rabbet on inside surface of tail board
I also continued the knife line all around the board - should have done that before making the rabbet.  Then I marked out the tails using dividers, dovetail marker and pencil.
Dovetails marked and ready for cutting.  Backer board is used to extend the lines for straighter cuts.
After the cuts were made and the waste sawn and chiseled out, I set the pin board in the vise and used the #4 on its side to set the pin board height.
Tail board getting ready
Then I moved the plane back, set the back end of the tail board on it, and set the front of the tail board on the pin board to transfer the dovetail outlines to the pin board.
Ready to mark tails outlines on pin board
Here is where the shallow rabbet comes in.  You can push the shoulder of the rabbet tight to the edge of the pin board, eliminating any guesswork about whether or not the edges meet exactly.  Here's a side view.  If you look closely, you can see that the tail board's inside (bottom) face is 1/32" down from the pin board end.
Tail board resting on pin board

After cutting the pins I ended up with a pretty nice joint.
A nice joint - if you ignore the errant baseline coping saw cut under the right tail
and the ugly pencil mark to the right of that
But here is the other benefit of the shallow rabbet.  Recently, Ralph the Accidental Woodworker and responder Derek Long mentioned (on the 29-August-2016 blog) how the inside corners of their dovetails look a bit shabby.  I've had this problem, too.  The shallow rabbet completely covers the dovetail's inside corners.
Inside corner of the above dovetailed joint
The inside corner shows just a straight line, unbroken by my sometimes ham-fisted chisel cuts.  I like this method using the shallow rabbet on the tail board.  The rabbet takes only a few minutes to do, makes marking the pins easier, and hides the dovetail on the inside corners.

I'm not sure why, but The Schwarz did not mention this method when cutting the long row of dovetails on the carcase of the chest of drawers.  Maybe there is a flaw in the method when used on that many dovetails.

Friday, August 26, 2016

A "Honey-Do" Project With a Curved Rebate

SWMBO asked me to make a cutting board that would fit over the small part of our kitchen sink.
The need arises
You can see in the picture that there is a small step-down from the uppermost flange to the level of the separator of  the two sinks.  This would allow a cutting board to nestle nicely in the opening.  I wanted to put a rabbet on the underside so that the cutting board would fit down in the opening and not move much when in use.  As you can see, this means cutting curved rabbets.  Recently I read an article in "The Woodworker: The Charles H. Hayward Years (Vol. II)" about working curved rebates.  It was not necessarily too helpful, but gave me some ideas nonetheless.

So I got myself a piece of maple and glued up an oversized panel.  I was surprised at how easy this maple was to plane.  For the glue-up I got one side flat and one edge straight.  I planed the edges together to guarantee good flatness of the panel.  I also oriented the grain of the two pieces so that I could plane them both the same way after being glued together.
The panel glued up, ready for sizing
After gluing, I gauged to about 11/16" thickness and planed to it.  The two boards were about 7 1/4" wide, so the panel was almost 14 1/2" wide.  Since my combo square blade is just 12", I use the square and a straightedge to strike a square line across the end.
Squaring a line across the width
Made a little step down with a chisel
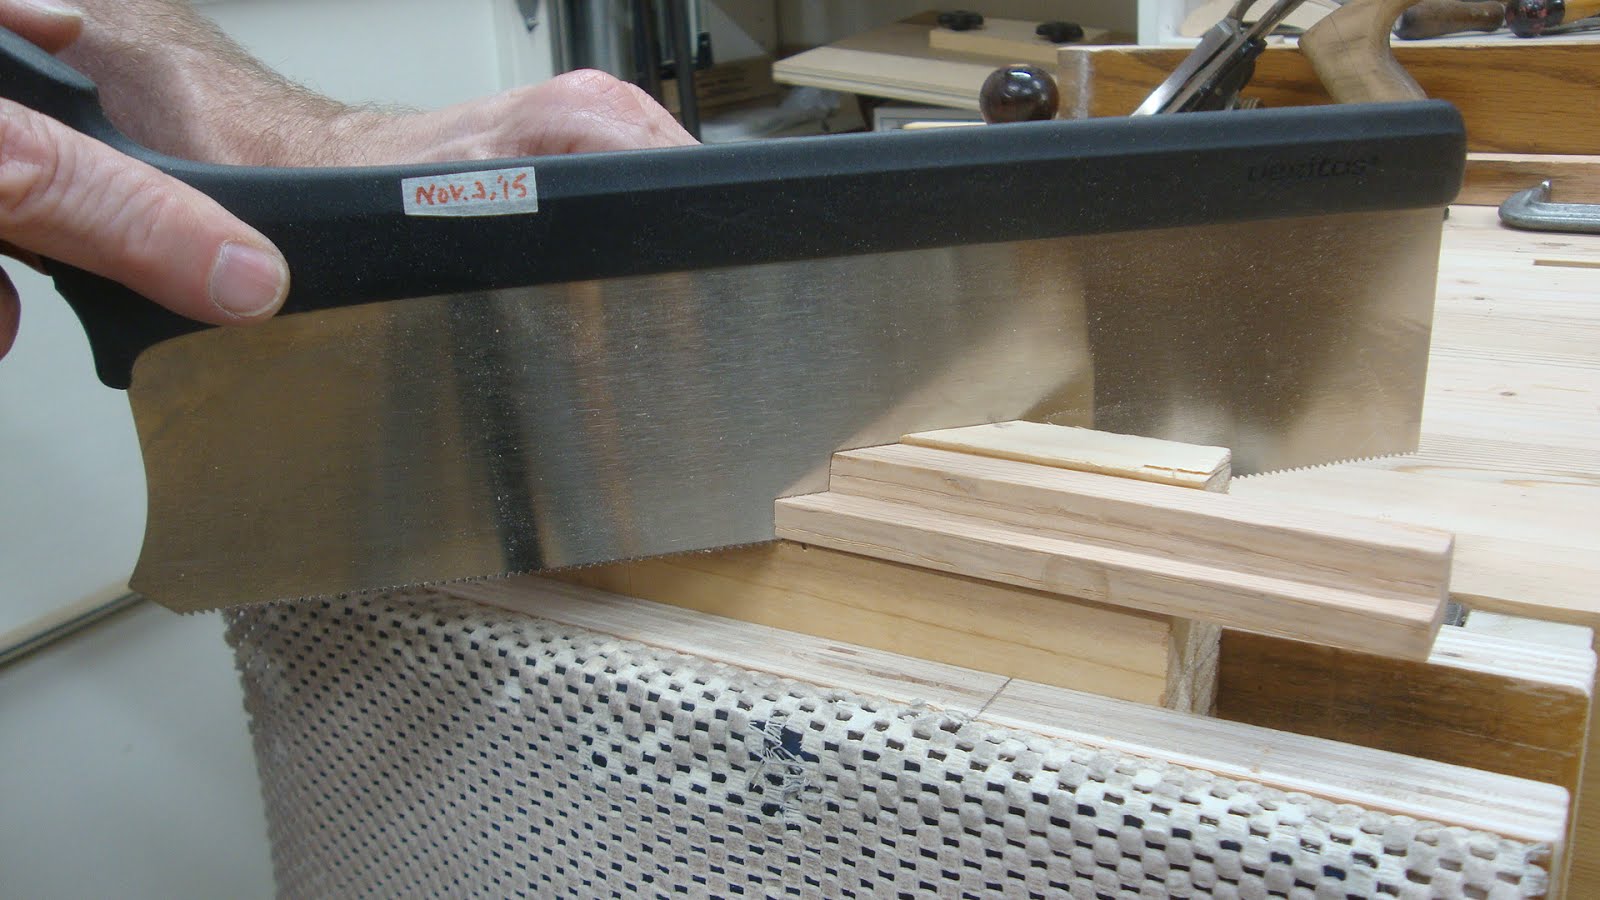
... and cut the end.  Clearly I need some practice cutting squarely.
Fortunately this maple planed beautifully on the end grain.  FAR, far better than any pine I've ever worked with.  I got a nice, square end.
You can still just see the knife lines around this end grain
I repeated the process at the other end to get the (roughly) 16" length I needed.  After straightening one edge, I used the new homemade panel gauge to mark the (roughly) 12" width.  You really have to be careful that the panel gauge fence stays tight to the edge.
Marking the width with panel gauge
In the picture of the sink, you can see that the rabbets I need are not as simple as those used for rectilinear furniture.  But at least I can start with 5/8" rabbets, about 3/8" deep all around.  I started with the ends.  This would help ensure that any blow-out at the corners would be inconsequential because of subsequent rabbeting of the edges.  I gauged lines for the width and depth of the rabbets.  This being one of the first times I've done cross-grain rabbeting, I got to use the nicker in the Record #778.
Nicker not yet in position.  Had to sharpen it as it had apparently never been used.
After setting the plane fence and depth stop, the rabbeting started.  It went slowly as I took small bites.  I've been having problems with the plane shavings jamming in the throat.  Since then I got feedback from Bob and Stephan that I hope helps with this.
Rabbet started
You might be able to see in the above picture a small saw kerf at the left, just above the gauge line.  I cut the kerf also to avoid any blow-out below gauge line level from cross-grain planing.  This worked well.
Almost complete rabbet
One of Bob's comments was that my left hand might be keeping shavings from exiting the plane.  I'll have to look into different hand positions to fix this.

Once the two ends were done, the long grain rabbets went easily, though slowly.
Long grain rabbet started
For the rabbets, I've been clamping the work to the bench using the slot in the middle of the benchtop.  I align the edge being rabbeted with the front edge of the bench and this gives me more surface for the plane's fence to slide along.  It wasn't critical for this project, but all the rabbets came out quite square and clean.

The next step was to mark the curves that needed to be added to the rabbeted area.  It turned out to be about a 3 1/8" radius.
Curves marked on one end ...
... and the other end
You can see a mistake here.  With the rabbets going so slowly, I decided on one of the ends to saw a kerf down the gauge line to make it easier.  I went a little too deep with the saw.  At least that's on the underside and won't be seen.

I thought about how best to chop out waste.  I don't trust my sawing enough to saw out most of the waste.  So out came the chisel and mallet and I chopped away.
Chop chop choppin'
Here I used a couple of wedges (and the bench slot filler strip) to fix the board between two bench dogs.  I love wedges.  I know they were used extensively years ago (and sometimes still are), but I've only scratched the surface of how much they can help.
Wedgie on left
I managed to get a fairly clean curved shoulder with the chisel, but I cleaned it up with a shoulder plane as well.
Cleaning up shoulder
I also finished up the bottom of the rabbet with a router plane (no picture).  The rest of the corners went well, although I really got chopping hard at times.  And although the tip of the chisel didn't get into the "keeper" wood, the force of chopping deformed some keeper areas and they didn't look too good after oiling.
All corners with curved rabbets
You can see here that I've also shaped the corners of the top (non-rabbeted) surface.  A test fit had it fitting pretty well in the sink.

The last material removal step was to form an elongated hole both as a handle and as a place to push unwanted vegetable waste to the disposal drain.  The hole was to be 2" wide.  I have a 2" hole saw and thought about using it, but the shank did not fit my drill chuck.  It would fit my drill press, but that's in storage.
Can't use the hole saw.  That's OK, I thought it would give too rough a cut anyway.
So I laid out the hole, drilled a small hole for the coping saw blade and went to town.
Coping to the lines
When that was done I used rasps and files to clean up the inside surfaces.  I also laid out lines for a rounding over of the hole on top and bottom and used a chisel to do the work.  This was good practice in chisel work.
Chiseling the round-over
I used plane and spokeshave to ease the outside edges of the board and then sanded to smooth them off.  Then a final smooth planing top and bottom followed by light sanding.

For finishing, first I raised the grain with water, let dry and sanded (twice).  Then I applied mineral oil with a rag, slathered on and wiped off about 1/2 hour later, with a day between each of the three coats.
Easy finishing
And there you have it.  Fit's like a glove.  Happy wife ... happy life!
A nice fit - and looks good, too!

Sunday, August 21, 2016

Making a Practice Frame

I've been wanting to try making a picture frame by hand methods for quite a while.  I thought I'd start with a simple rectangular profile (no molding or shaping) so I can work on the miters.  As planned, this would be the size for an 8x10" photo.

I started by finding a piece of red oak that had once been a frame member for a bathroom cabinet.  After squaring it up (it was bowed pretty seriously along its length), it was about 11/16" thick, 3 1/2" wide and 26" long.  For the frame I needed two pieces about 10" long and two more about 12" long. Each would be about 7/8" wide.  I would get one 10" and one 12" member from each side of the board.

The first thing to do was to cut rabbets that would eventually accept the glass, the photo and the backing after the frame is assembled.  The rabbets were to be 3/8" wide and 3/8" deep.
Rabbets laid out and cutting started
File this under "things they don't tell you about".  For a board that has a clear grain orientation, if the grain is going in the right direction for planing the rabbet on one side, you should be able to flip the board end for end and cut the second rabbet on the same side of the board.  But for some reason (I don't recall what it was - a knot, a screw hole, reverse grain?) I felt like I needed to cut the second rabbet on the other side of the board.

In any event, the first rabbet went OK using the Record #778 with one annoyance.  I was getting a lot of clogging in the throat of the plane.
Clogging in the throat
I took WAY longer to cut the rabbet than I see on some videos, but perseverance paid off and the rabbet got done.
Completed rabbet (ignore screw holes - most will be in scrap areas)
Notice that for the first rabbet the width of the board is oriented vertically in the vise.  Because of grain orientation, I couldn't orient the board in the vise the same way for the second rabbet.  Since I don't have a sticking board long enough to handle this, I borrowed a page from Seller's book and used his "clamp-in-the-vise" method.
Board clamped in a sash clamp which is clamped in a vise
The rabbet had been marked carefully.
Layout of the second rabbet
The cutting went OK, but with lots of clogging again.  Not sure if this is a normal thing for the #778 or if I could be doing something to avoid the clogging.
Second rabbet complete
With the rabbets complete, I started cutting approximate 45° angles using a small miter cutting board. I've put on my to-do list to make a new miter cutting board out of a harder wood.  The pine was far too soft for this as you can see by the ever widening kerf on the right side
My miter cutting board is looking a bit ragged
It worked though, and I got my approximate cuts done including some test cuts.
Cutting one 45° end
I used the shooting board to get a nice pristine surface.
Shooting the sawn miter
Alright, here's another of those "things they don't tell you".  Shooting a miter is very different from shooting a square end.  When shooting a miter, as the plane blade contacts the internal corner of the frame member, it wants to pull the member with it.  This has the result of moving the plane away from the edge of the shooting board that it is supposed to be tight up against.  The lesson is this - when shooting miters, you really need to push the plane hard against the shooting board as well as applying forward force.  This was a tough lesson as I'll explain later (I had to trim too many times - know where this is going?)

Well, even though the shooting board's miter fence seems to be spot on 45°, when I mated two trimmed pieces together they made an angle greater than 90°.  Should have taken a picture here.  To adjust this I needed to cut a bit more off the internal corner of each miter and to do that I placed a paper shim between the frame member and the 45° fence.
Paper shim in place to cut more off internal corner
Well, eventually this worked with some trial and error, but I shaved so much off the miters that the frame ended up being a little too small to fit the 8x10 glass into.  Oh well - it's just a practice run anyway.

For glue-up, I did a practice run with some scraps.  I'm using twin splines to strengthen the joints.  The depth of the spline cut was marked and the kerfs cut.
Note the lines - you don't want to cut too deep and get into the rabbet!
I used two saws on the test piece - one with a set of 0.026" and another with 0.045".  I've had trouble cutting thin splines so I wanted to try two sizes.  I think the thicker kerf will also lead to much stronger joints and that is what I went with.
One thin spline and one thick spline
Another view of two different thickness splines
Once I was happy with the process I glued up one corner and let it sit and then the opposite corner and let it sit.  These two subassemblies were then fitted, trimmed and glued.
Last two corners glued up
After the glue set up, I trimmed away the excess spline material, then planed the joints flush.  Here are the four corners.
Upper left
Upper right
Lower left
Lower right
And here's the frame completed.
Done
Overall I'm pretty happy with the miters.  Unfortunately due to too much trimming on the shooting board trying to get things to make 90° corners, the frame is a bit too small to accept a standard 8x10 glass.  It's also out of square considerably due to the trimming.

Next time I'll be better at the shooting board trimming and I think it'll come out much better.  Looking forward to that.  Good thing this was just practice.