Having completed the beading on the side panels, I moved on to the joinery for the carcase. I cut stopped dadoes into the top and bottom to accept the side panels.
 |
| Dado in the bottom |
The front of the side panels would extend past the dadoes by about 1/2" and I used the router plane at it's maximum setting from cutting the dadoes to mark the cutout for that.
 |
| Marking the cutout depth - being very careful as there was little bearing surface for the router plane |
I don't know how it happened, but one joint fit poorly. It was way too loose. I ended up having to glue a few shavings to the part of a side panel that would be inserted into the dado. My two sides are not exactly the same thickness, so I suspect that I used the wrong side piece when sizing the dado. It's way too easy to make mistakes - checking that you're using the right parts when laying out and cutting joinery is key.
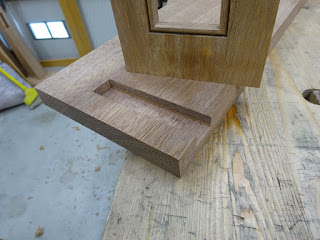
 |
| Here is the carcase dry assembled |
Next, the top and bottom needed stopped rabbets to accept the back panel. It's tedious to do this with hammer and chisel, but it goes fairly quickly.
 |
| Chopping away some waste |
 |
| Paring to one gauge line |
 |
| Then up in the vise and paring to the other line |
 |
| Came out nice and clean |
 |
| The sides got a through rabbet using the Recond #778 rabbet plane |
The underside of the top was to get a cove moulding on the front and both sides. This will be the first time I've incorporated this type of detail in a project using hand tools. I had made a few pairs of H&R's some years ago and used them for this. First I made a template of the shape.
 |
| Used a circle template to mark a quarter round of just under 1/2" radius |
Last year after I had bought Matt Bickford's DVD "Moldings in Practice", I practiced making mouldings with some success. But each one I did was
with the grain. For my current project, the profile on the two sides would be across the grain and I really had no idea how the planes would perform. So I practiced on a scrap of hardwood (maple) and it came out very nice.
 |
| The practice piece with profile on cross-grain and long-grain edges |
Then, ...
 |
| Used the template to mark the stock |
 |
| Laid out the rabbet that would remove the bulk of the material |
 |
| Cut the rabbet with a saw cross grain, chisel to split cut the waste and a wooden rabbet plane to clean up |
 |
| Then used the moulding plane(s) to shape to the layout lines |
 |
| Note that I used a backer board to keep the grain from blowing out at the far end |
 |
| Very pleased with how it turned out |
On the upper edge of the bottom, I put a simple 1/4" chamfer on three sides.
 |
| And here's the carcase dry-fit |
Next I need to make the frame for the door. I'll be using the mitered bridle joints that I practiced on. I need those to be RIGHT! To be continued ...


Very nice. I have a curio cabinet coming up as my next project as well. Out of curiosity, what size molding plane are you using?
ReplyDeleteI used mostly the #8 (1/2" radius), but also used the #6 and #10 a bit.
DeleteLooks good, nice clean work. BTW, I've never had one joint be a little loose, no not me :-).
Deleteken
Ha! I guess I'm a little hard on myself. BTW, looks like your new bench build is progressing nicely.
DeleteMe too, just kike Ken... yeah right :-)
ReplyDeleteCant wait to see the final results, good work
Bob, who could use a lot of curio cabinets :-)
I'm looking forward to seeing it finished, too. Just ordered the hardware from LV - hinges, shelf pins and door pull. Hope they get here within a few days.
Delete