Side note to anybody out there whose blogs I comment on (primarily Ralph, Bob, Ken, Ron and Lionel) - any comments I've tried to make in the last few weeks get zapped to the ether and I have no idea why. Any ideas how to fix this?
Now to our regularly scheduled blog ...
Recently, I wrote about the 8"
J. Pearce smoothing plane that I bought at an auction. I'd been wanting to make a wooden smoother and finally I had something to use as a model.
 |
| J. Pearce model |
I made a prototype (from "non-traditional" plane-making woods) before making the real thing. This blog post will have pictures of both planes, because I didn't get all the pics I needed from the final build. The prototype was made from poplar and maple and the "final" build used better wood (red alder).
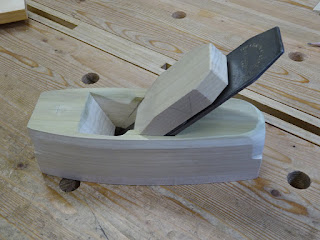 |
| Prototype smoother near completion - poplar with maple sole |
I made the planes in the old style - from a single chunk of wood (albeit a vertically laminated chunk). In the past, I've made planes using a lateral lamination technique (sort of like Krenov-style, but rather than a cross pin, mine had abutments) and that worked well, but I wanted to try making a plane like they did a couple hundred years ago.
I took most of the key measurements from the J. Pearce smoother. The prototype used the 2" Chapin-Stephens iron and cap-iron that came with the Pearce plane. The final plane used a 2 1/8" Buck Brothers iron and cap-iron that I got at a tool show. I made this plane slightly wider and longer than the prototype and the measurements I present in this post will be from the final plane build.
The first thing to do is to square up an over-length plane blank, 9 1/2" x 2 11/16" wide x 2 1/2" tall. I made as reference surfaces the sole and the left side, and made sure the grain of the sole was descending from toe to heel. After marking out the overall 8 1/8" length with knife lines on the sole, I marked the rear aspect of the mouth (where the bed meets the sole) 2 7/8" back from the toe line. Starting from that line, on the side, mark the bed angle at about 47 1/2°, angling towards the heel.
 |
Showing bed line on sole (rear aspect of mouth) and bed angle on side.
Also shows wear angle and breast angle, as well as abutment line. |
In the following picture I've drawn the outline of the iron and cap-iron assembly as they would be seated on the bed line. That allowed me to play with how the wedge and abutment might fit. Drawing the iron and cap-iron also allow me to lay out the front of the mouth.
 |
| Side layout |
After laying out these lines, I extended them side to side across the top and bottom. With a 2 1/8" wide iron, the throat should be 2 3/16" wide. I drew a lengthwise center line, then marked either side of that 1 3/32" for the lateral extents of the throat. Then marked a second set of lines parallel to them and 1/4" towards the center line to mark the inner edges of the abutments. Similar lines were placed on the sole within the mouth area.
 |
| Top layout |
With this layout done, I grabbed a brace and bit and bored out much of the throat.
 |
| Bored from the top, using the layout lines on the side to guide the angles |
From below, I drilled holes within the mouth lines, keeping to the angles marked on the sides. Then it was a lot of chisel work to get close to the lines.
 |
| Chiseled close to the lines |
I don't own any plane floats, so I'm making due with chiseling guides and sanding sticks. One such guide is shown in the next pic. These guides are easy to make and really help a lot. Made from 1" thick poplar, they have one end cut precisely to the angle of the bed. I made another guide that helped with the wear and breast angles.
 |
| Here, the guide is clamped to the back end of the plane and the whole is clamped in the vise |
Running the chisel flat against the guide makes it easier (not exactly easy, mind you) to push the chisel at the right angle to chisel away the waste. But don't place the guide directly on the bed line right away - place it forward of the line and pare the waste down to the mouth, then move the guide back a little at a time until you get to the bed line. The jig can also be used from the bottom to work on the mouth area of the bed.
 |
| Paring the bed on the final plane |
Note the use of a narrow chisel. A wider chisel requires too much force. And I only chiseled about 1/4" to 1/2" of the bed at a time - you can see in the pic above that I'm able to use the guide as well as the upper bed (that has already been pared) as a reference surface in continuing to pare down the bed.
Once I was reasonably happy with the bed surface, I made a sanding block to smooth it further. The better this bed surface is now, the better the plane will turn out later.
 |
| Making a sanding block to fit in the throat and smooth the bed |
 |
| Sanding the bed smooth |
The breast and wear angles of the plane are similarly pared to their respective lines, though they don't need to be perfect.
 |
| And there's the initial excavation complete |
Note in the photo above there are no abutments yet. Those lines on the top that are parallel to the sides will define the abutment depth.
I'll continue next time with the abutments and further details.


Im impressed, good work. Must try that some day.
ReplyDeleteAbout your commenting on our blogs.
I look around my blogger dashboard did not saw anything out of place??
You did not ended up in my Spam neither. No idea why you have problems???
Bob, suspecting a possible "upgrade" in software ??
Which profile are you uding yo comment? A while back, blogger disabled some profiles that were not Google friendly.
ReplyDeleteBob
Bob, when I comment, I select "Name/URL" like I've always done. I use "tinyshopww.blogspot.com" as the URL and when I submit the comment, it resets as if it's ready for me to enter a comment anew. I'm a computer know-nothing, so I'm not able to help myself very well ...
DeleteWhen I respond to other people's comments on my blog, I reply as "Tiny Shop Woodworks (Google)" and have no problems. Maybe I should try that as a profile when commenting.
Update: I was just able to reply to one of Lionel's posts using my usual profile. Maybe the problem has fixed itself.
DeleteYour comment has been well received sir!
DeleteThat plane is beautiful, I am really impressed, I wish I had your skills!
Thanks, Lionel. I was just using the smoother out in the shop. It has been finicky to get the iron set just right, but with time I think that will be easy. BTW, I'm sure you could do this too - I've seen some of your work. It's all about laying it out carefully and cutting to those lines.
ReplyDeleteMatt,
ReplyDeleteNot a clue why, I have not changed anything but Bogger does at times with out telling.
I agree with Lionel, beautiful work and loved the tick tock.
ken
Thanks Ken. BTW, I enjoyed your initial foray in to video, but was unable to tell you. Hopefully that's fixed now.
DeleteDitto marks on what Ken said about blogger. I have found this platform to be very buggy for no apparent reason(s).
ReplyDeleteYou are making this plane look ridiculously easy to do.
Thanks, Ralph. In truth, it's not that tough. But you do have to be precise. Getting the bed flat was one of the tougher things to do. A lesson in patience, for sure.
Delete