I keep hearing about old tool shows across the country, but they seem to be mostly on the East Coast or in the Midwest. I'd been wanting to find some kind of tool show here in California, not only to look at (and maybe purchase) some old tools, but also to talk with like-minded people.
A couple weeks ago, I went to a meeting of an organization called
PAST (Preserving Arts and Skills of the Trades). At one time they were the West Coast branch of EIAI, the Early American Industries Association, but they are no longer affiliated with them.
Anyhoo, it was a fun half-day in the thriving metropolis of Spreckels, CA (yes, Spreckels). And I came home with a few new tools.
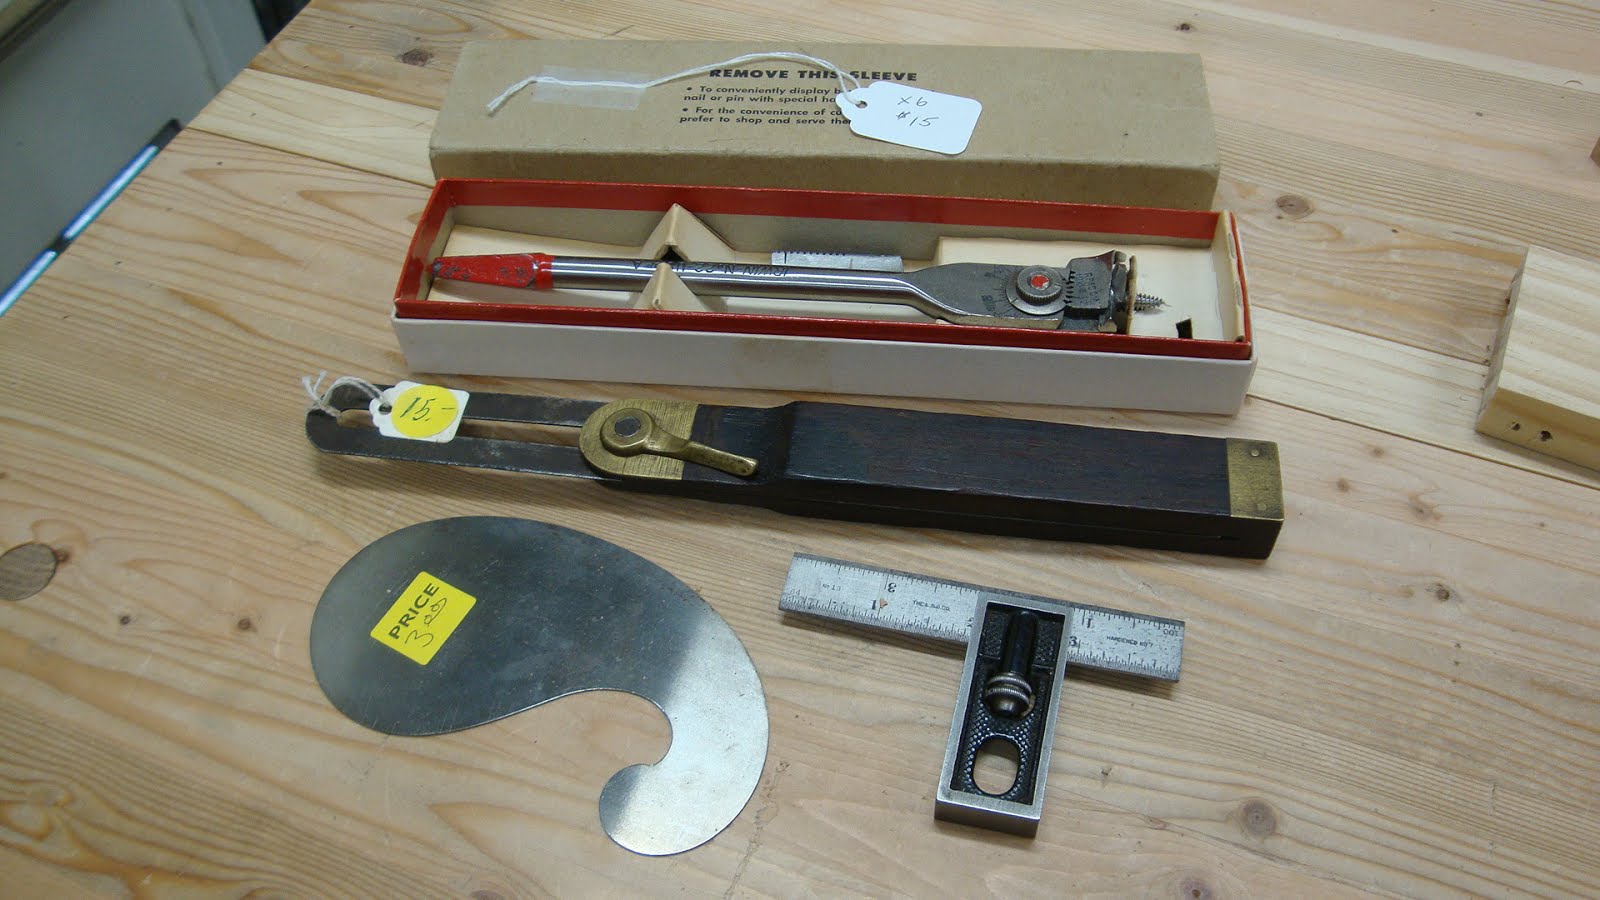
 |
| Four new tools, total cost: $60 |
I've needed a curved scraper for a while, so this was a nice find. It's by Eberle, who I think is a German manufacturer.
 |
| Not bad for $3 |
The tool I'm most happy about is the 4" sliding square. It cost $30, but it's a Starrett. There's a reason why Starrett products are expensive - they're so damned good!
 |
| Little sliding square |
 |
| Wasn't sure that "L.S.S. Co." was Starrett, but the Athol, Mass. confirmed it |
This square needed very little clean-up. I took it apart to look at all the parts, cleaned them in Simple Green, and then used a wire wheel in the drill.
 |
| Just five parts |
The clamp screw was interesting.It has a small tab protruding from the side so that it can't turn in its hole.
 |
| Clamp screw |
The thumb nut and spring were the dirtiest parts of this tool. Gotta be really careful not to lose these small parts.
 |
| Thumb nut and spring |
After applying a little oil and putting it back together, I tested it for square and it was perfect. I think I'll be using this gauge to check how square to the reference surface my dovetail saw cuts are.
Up until now I've been building stuff with just a single bevel gauge (or is that called a bevel square? or a sliding T-bevel?). When I built my version of Nana's Dining Chair, I needed to keep track of four different angles. So I drew those angles on my benchtop, referencing off the front edge. Every time I needed one of the angles, I reset the bevel gauge from those written on the bench. And the 8" bevel gauge that I had was nothing great - some unknown brand from Woodcraft or similar store.
 |
| Unknown brand above, old (but new to me) unknown brand (probably Stanley) below |
My old bevel gauge employed a wing nut to tighten the blade in the stock and the wing nut stands up very high. Sometimes you need to use the bevel gauge with nut down and it can create problems.
 |
| Wing nut higher than the surface of the handle |
In comparison, the one I just purchased has a low profile locking mechanism.
 |
| A much better thought-out mechanism on this rosewood tool |
The only indication about this 10" bevel gauge's history was in a patent date stamped on one side.
 |
| Pretty sure that says "PAT. SEPT 4 1877" |
An internet search came up with a patent granted to Justus A. Trout of New Britain , CT on Sept. 4, 1877 for an "Improvement in Carpenters' Bevels". The drawings show this exact mechanism. But there is no indication of who Mr. Traut worked for. No telling if this was a Stanley or other manufacturer patent, but Stanley did have a factory (or maybe headquarters) in New Britain.
UPDATE: From the site "
oldtooluser.com", this looks to be a Stanley #25, manufactured between 1877 and 1897. I've also recently seen Mr. Traut's name on Stanley patents.
The gauge needed a little work. First, the locking mechanism should lock with the lever nut within the recessed area of the handle.
 |
| Lever nut extends too far when locking the blade |
 |
| But this is easily fixed with a slight turn of the nut on the other side |
One brass pin was not quite seated, but a couple taps with small hammer and nail-set put it right.
 |
| Pin on right a little proud of surface |
The screw works nicely. It is a double threaded screw (double helix arrangement of threads) for quick locking.
 |
| The screw with double threads, also has flats filed on both sides at one end |
The flat sides of the screw go through a hole of that shape and that keeps the screw from turning. Here are all the parts of the locking mechanism.
 |
| Parts of locking mechanism |
Note that the lever nut has an extended portion on its underside that goes into the hole and provides a longer length of female threads.
 |
| Lever nut and its hole |
The thing that I took a lot of time with on this tool was the handle. The two edges of the handle should be straight, flat and parallel to each other, otherwise the angle you mark on one side could be different from the angle you mark after flipping the bevel over and using the other edge as reference.
So I spent some time with scrapers and sandpaper, and checked progress with squares and winding sticks to try to get this in better shape.
 |
| Wait. What? |
I flattened one side (not the side with the patent date!) and made it the reference surface, then used that side to gauge my progress on getting the two edges straight and square to the reference face. And I got the two edges as close to parallel to each other as I could. It's a lot better than when I started. I'll be happy I spent the time to get this right.
I used an overnight citric acid bath to clean up the screw and 10" blade. The blade is quite pitted, but at least it looks a bit better now.
 |
| All cleaned up and ready to go |
The last tool I bought was this Irwin #22 expandable boring bit. This was practically new in its original box and needed no work, just a little oil.
 |
| Irwin expandable boring bit will cut up to 3" diameter holes |
There are two interchangeable spur cutters for smaller and larger holes.
 |
| Close-up of the mechanism. A screw on back locks it in place. |
Of course I had to try it out and it cut very well. The spur is very sharp, and it cut the end grain inside the hole fairly cleanly on this pine.
 |
| Test holes |
The right-most hole above was to test out how easy it would be to dial in just the right diameter. It took a few iterations to get it right, but I got the 1 1/4 diameter I was trying for.
 |
| Not bad |
My brace is an old Miller's Falls with an 11" swing (5 1/2" from center of handle to center line of chuck). It cut the 1.5" diameter hole in soft wood fairly easily, but I expect it'll be a little harder with hardwood or larger diameters.
New tools ready to be put to use. Yay!


Nice and very useful selection of tools you aquired. All are in very good shape and serve you well.
ReplyDeleteHi Greg. There were lots of other interesting things at this show, too. I had to show some restraint in coming home with only 4 items. Really psyched about the Starrett square and sliding bevel. Gonna come in really handy.
DeleteHi Matt,
ReplyDeleteif I'm not mistaken, Trout worked for Stanley for years and held well over a 100 patents (119?).
Always wanted to know how those sliding bevels locked down
Justus Traut wasn't on my radar until this. He sure did a lot, though. I'm noticing his name more frequently now.
DeleteIndeed Mr Justus Traut worked for Stanley and hold about over a hundred patents (150?) he was very prolific.
ReplyDeleteGood move on going to a local Tool collector association, highly recommend you join them if not already done.
My favorites T-Bevel sliding square are those that lock at the but, like Stanley No 25. These do not have a problem flipped on one side or the other.
Eberle is German, I have used their blades (from LV) for years in my fret saws, good stuff. You will need a small carbide rod to sharpen (draw a burr) on the goose neck scraper
http://www.leevalley.com/en/Wood/page.aspx?p=32643&cat=1,310,41070&ap=1
Good finds
Bob, patting Rudy with one hand, typing with the other...Multitasking
Bob - are you saying a no. 25 sliding bevel locks at the bottom of the handle? I thought this one was a no. 25. I've seen those that lock at the opposite end (away from where the sliding blade pivots) and wondered how well they locked.
DeleteOups, That's what happened when I talked off my head... I meant No 18 Eureka flush T-bevel, sorry. No 25 had a wing nut or recessed lever (like yours). Stanley, nor Traut did not invented that butt locking mechanism, Samuel Sargent did in 1873. But Christian Bodmer (Stanley) did improved it in a 1908 patent. The earliest ones are not Stanley and cast Eagles, but Disston also made some (like mine) and a few others. Stanley No 18 were available in 6,8,10 and 12 in (blade length) 12in is the rarest, hence more mucho dinaros... Bob who came back to its senses (checked my files :-)
ReplyDeleteThanks for the clarification and the extra info. Good stuff.
DeleteHi Matt,
ReplyDeletenice finds.
As Bob already mentioned. Eberle is a German manufacturer.
In the beginning of the company they made fret saw blades. Nowadays they are producing band saw blades and band steel.
So I guess they make scrapers as a side product.
Cheers,
Stefan
Thanks for the info, Stefan. I find it interesting learning about these different manufacturers.
Delete