With all the joinery, shaping and detail work complete, I could get to the assembly. The glue-up went fairly smoothly, with a little panic (as per usual) when gluing the front assembly to the back assembly.
 |
| Front leg assembly: legs and front rail (note shaped cauls that save legs from dents) |
 |
| Back leg assembly: legs, seat rail, lower backrest rail, backrest panel and upper backrest rail |
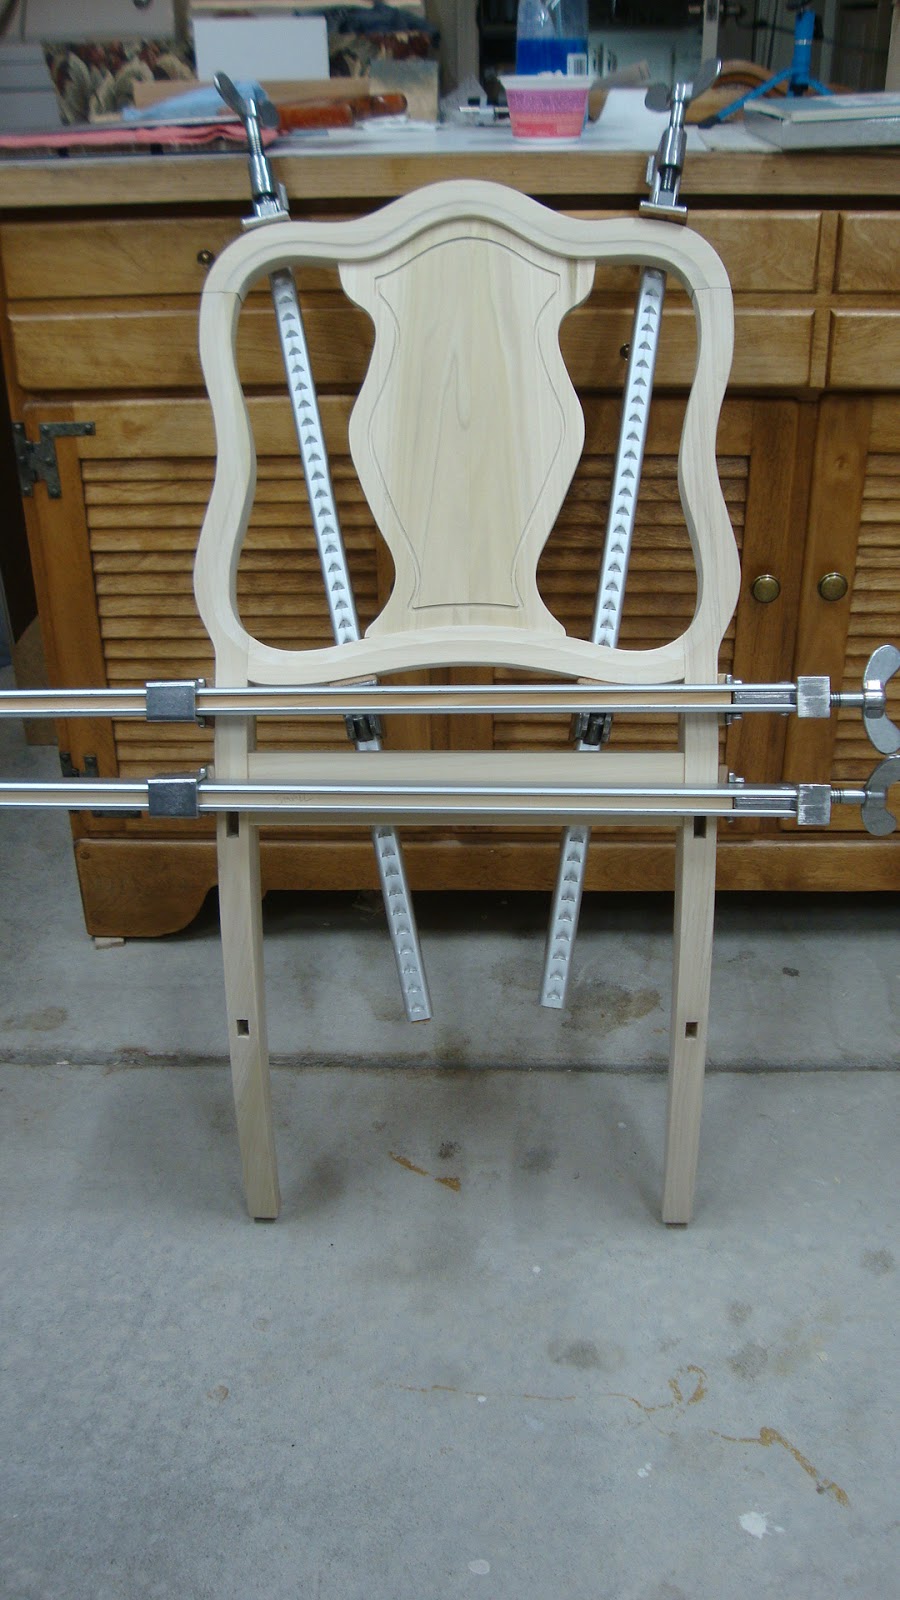
After those assemblies dried and a dry rehearsal was done for the full assembly, it was the point of no return. The lower rails were glued first, then the seat rails were added. I used the off-cut pieces from shaping the back legs as cauls during clamping.
 |
| The whole she-bang |
The chair was a little out of square - less than 1/8" - and I adjusted the clamps to get this to about 1/16" before I was satisfied.
 |
| The glued up chair |
The original chair had arms and I opted not to include them in my reproduction. The next picture shows one of the arms from the original placed where it would have gone. It was a two piece arm.
 |
| Original arm held where it would have been attached |
 |
| The upright of the arm was screwed to the side seat rail |
 |
| The armrest was screwed to the curved portion of the backrest |
Anyway, I made the executive decision not to include the arms on my chair. I thought about how I might prefer to attach them if I had included them - the upright tenoned into a mortise in the seat rail, the top of the upright tenoned into a mortise in the underside of the armrest, and the armrest tenoned into a mortise in the front of the back leg. Maybe next time.
I added corner brackets that really solidify the chair and add a way to attach the seat. The angles came out great and they fit like gloves.
 |
| Corner brackets added |
On to finishing. First was a coat of clear shellac that would hopefully reduce blotching and make the stain more even. I took a couple pieces of the original chair to a local paint store and asked if they could match the color. Turns out a shelf product matched quite well - ZAR interior oil-based stain "Teak Natural". I gave the chair two coats of that, sanding lightly after each coat dried. The color didn't look great after the first coat as some places took the stain differently from others. I think two or three coats of shellac before staining would have been a better idea. But the color evened out after the second application of stain.
 |
| Chair after stain applied |
After the stain, I applied two coats of a satin polyurethane and a coat of paste wax. The chair looked better with each successive layer.
 |
| Poly added |
Finally, the seat could be attached.
 |
| A glamour shot |
And how does it feel?
 |
| Ahhhh! |
Here's the chair next to one of the originals (can you tell which is which?). Overall I'm very happy with the result. Stoked that after so long I finally reproduced the chair and that I've accumulated the skills necessary to do it.
 |
| Original on left, reproduction on right |
BTW, I found out my Grandparents bought this dining set in 1920! Almost 100 years ago! No wonder the original chairs that were put together with dowels were a little rickety. I hope my chair will last as long or longer.
To anybody reading this - have a very happy Thanksgiving. Savor the time spent with family and friends.


That is an incredible good looking chair you have made there!
ReplyDeleteGreat job.
Happy Thanksgiving
Brgds
Jonas
Thanks Jonas. I'm really happy with the chair. Do you have an equivalent holiday to Thanksgiving where you live?
DeleteWe have something called Mortensaften, i.e. the eve of Morten.
DeleteIt is an evening in remembrance of a bishop: Martin of Tours.
I don't know why his name has been changed to Morten instead of keeping Martin, but that aside. The legend goes that he didn't want to become bishop, but the local people wanted to make him bishop nevertheless.
He tried to hide in a goose pen (I don't know if that is the correct English term for that). The geese made a lot of noise, so the local townspeople found him and made him bishop.
As a revenge he made a decree that every household had to butcher a goose once a year. That way he got his revenge over the geese that betrayed him by revealing his hideout.
We celebrate November the 10th by a family dinner, people traditionally eat either a goose or a duck. Based on the a goose used to be a lot more expensive than a duck, but I guess it also yields more meat.
But it is not such an important evening to Danes as Thanksgiving is to Americans.
Brgds
Jonas
Great story, Jonas. I hope you had a nice Mortensaften on the 10th!
DeleteFantastic job! The chair looks like a perfect reproduction. Not an easy task.
ReplyDeleteHappy Thanksgiving to you and yours.
Thanks for the comment, Greg. It was a challenge, but I'm so thrilled that I've gained the skills necessary to do it. Not only that, but also the ability to make new tools to get a specific job done. Happy TG!
DeleteHi Matt,
ReplyDeleteIts been a while since my last comment in your blog.
I'm in a struggle wordpress vs blogger and thech skills and FFS (fat fingers sindrom for smart phones).
But boy, it seems I got a great project to comment:
WOW, WOW, WOW what a work!
Congrats
Thank you so much, Antonio. It was very challenging and that brings out the best in us. Good to hear from you.
Delete